|
|
News / Progress
17-01-2011. Until a few months ago, a blue laser was some very expensive piece of toys. So expensive, that the word "toy", for that reason alone, is a poor choice of word to use. And if you wanted just a few hundred mW, you could easily spent several thousands of dollars to get one. That's why blue-ray diodes became interesting a year or two ago. They were cheap and had a sort of "bluish" color. Mixed with a bit of green, they could make a more decent blue color. But still they were not good enough. The wavelength of blue-ray lasers is 405nm, and in fact that's violet - and not so visible to human eyes. Not even my 4-500 mW dual diode setup gave sufficient power to make a good visible beam.
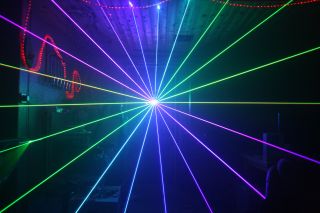
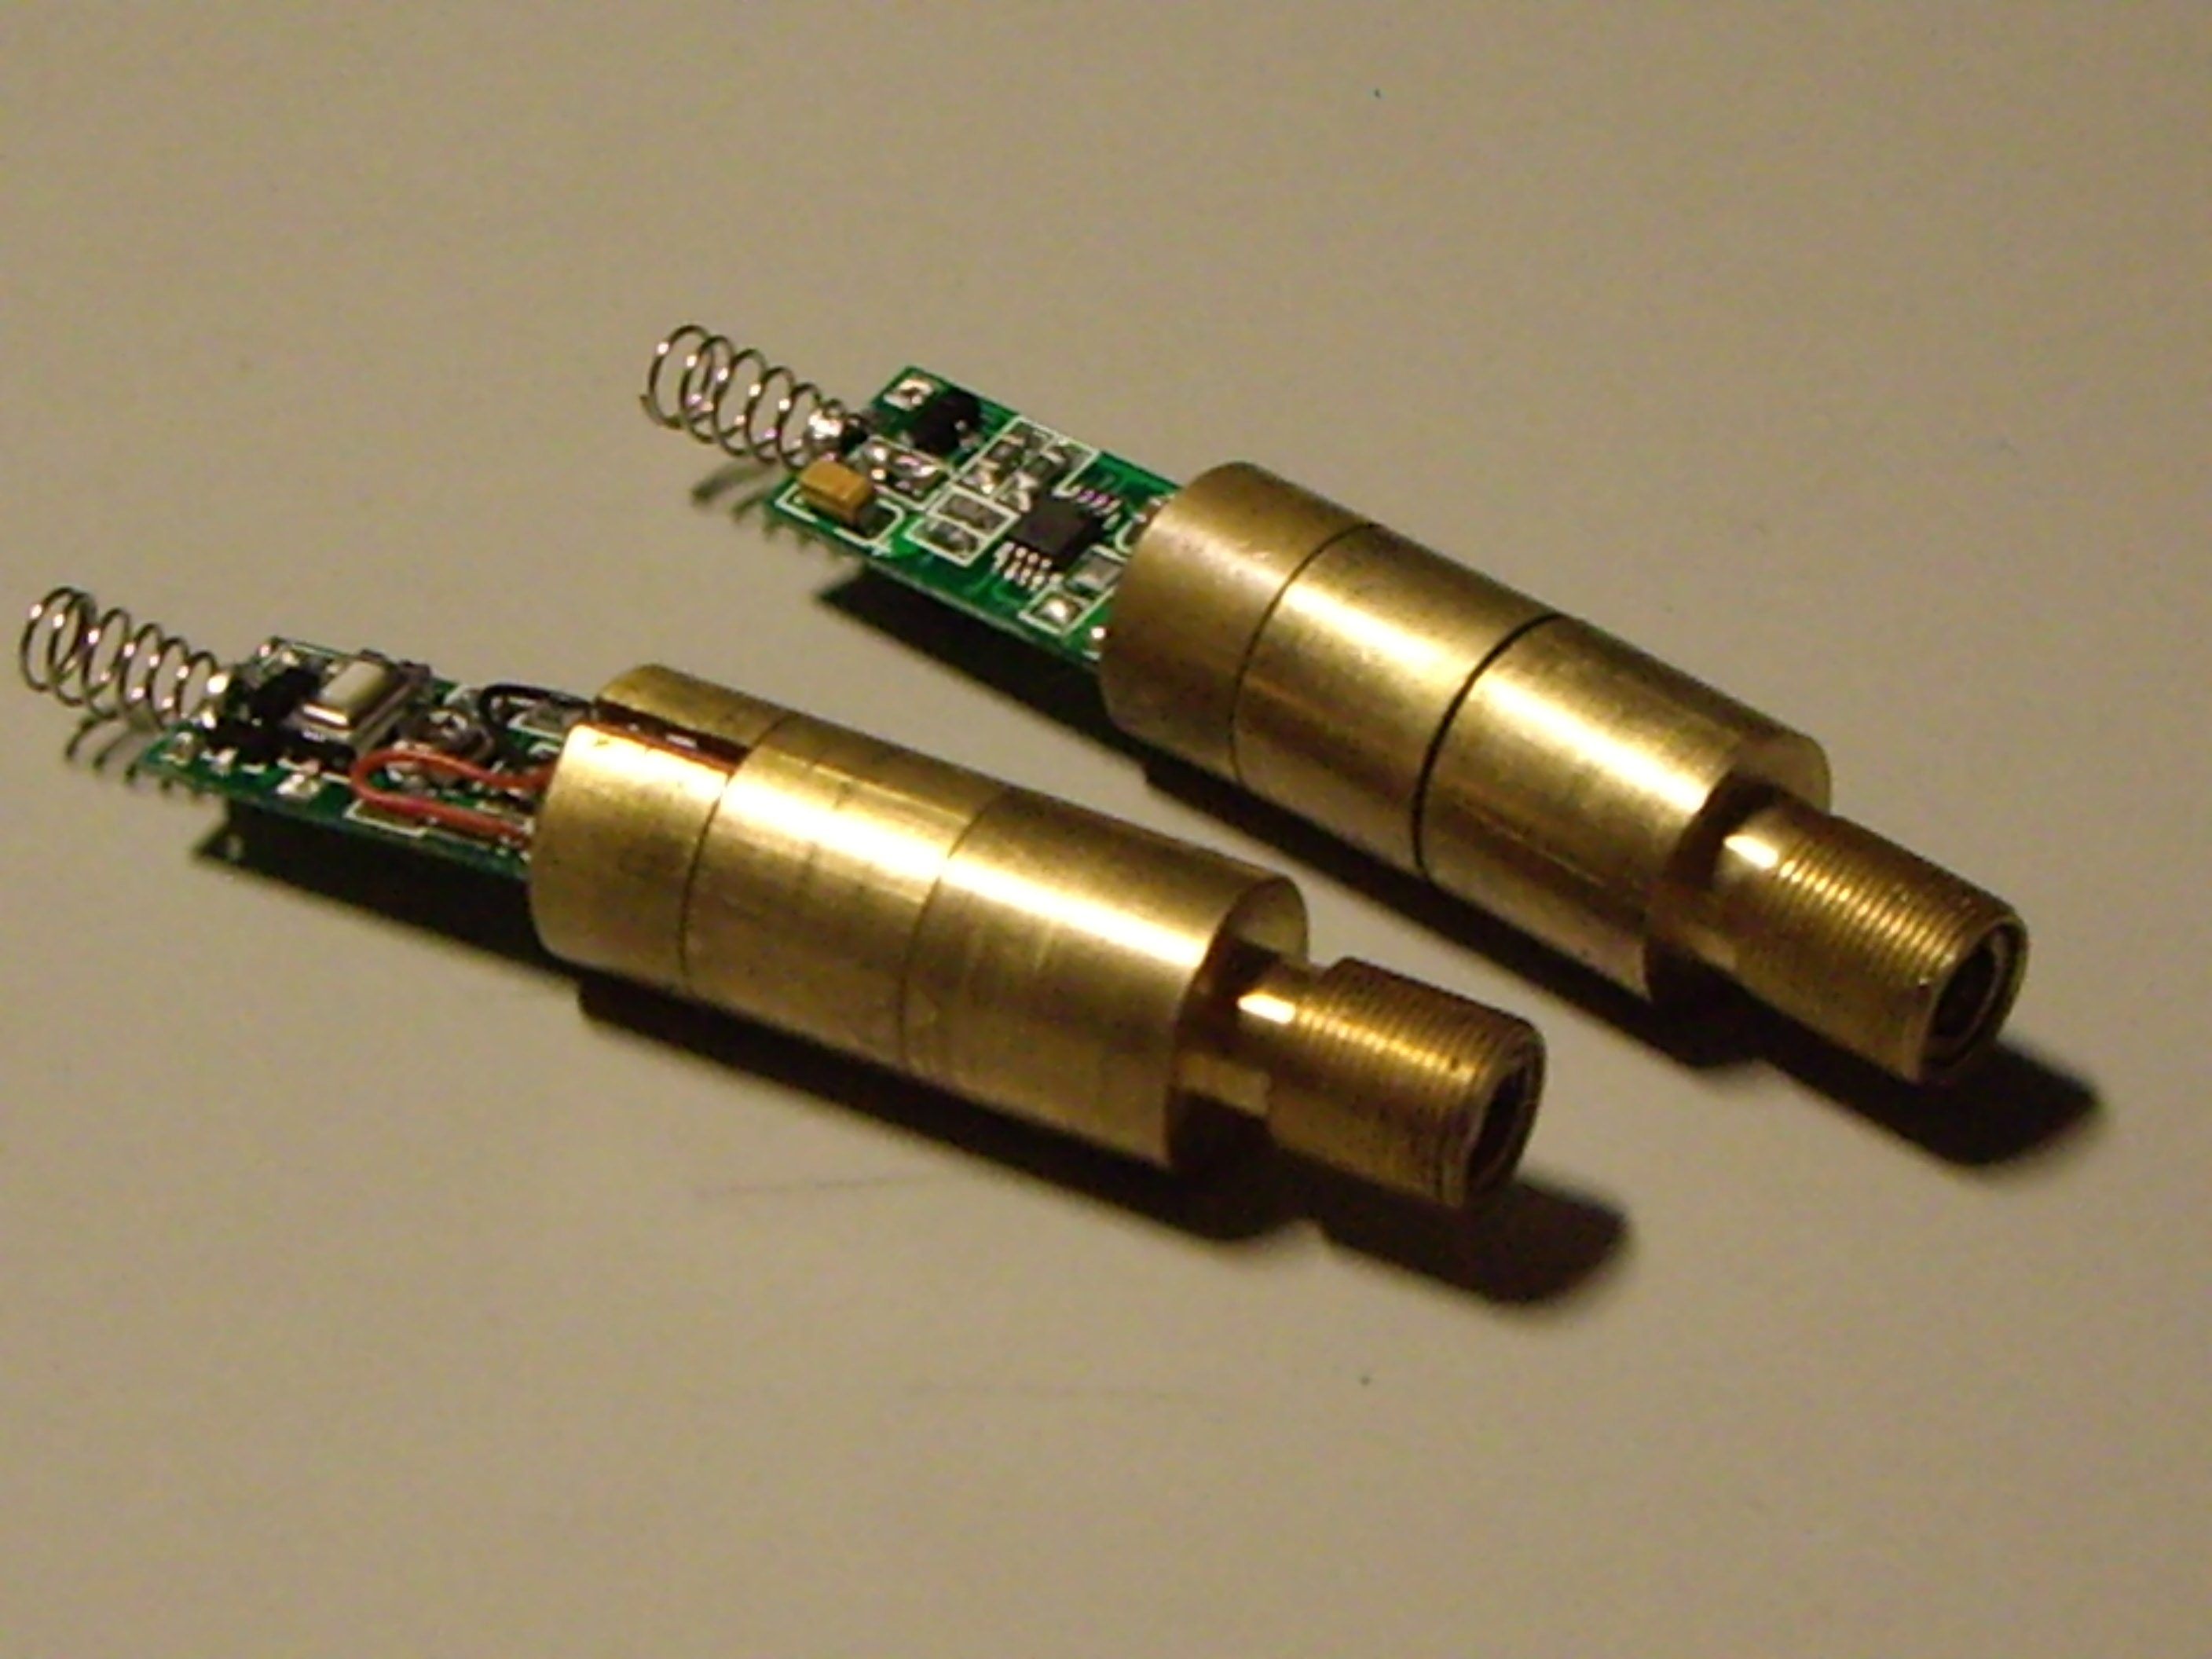
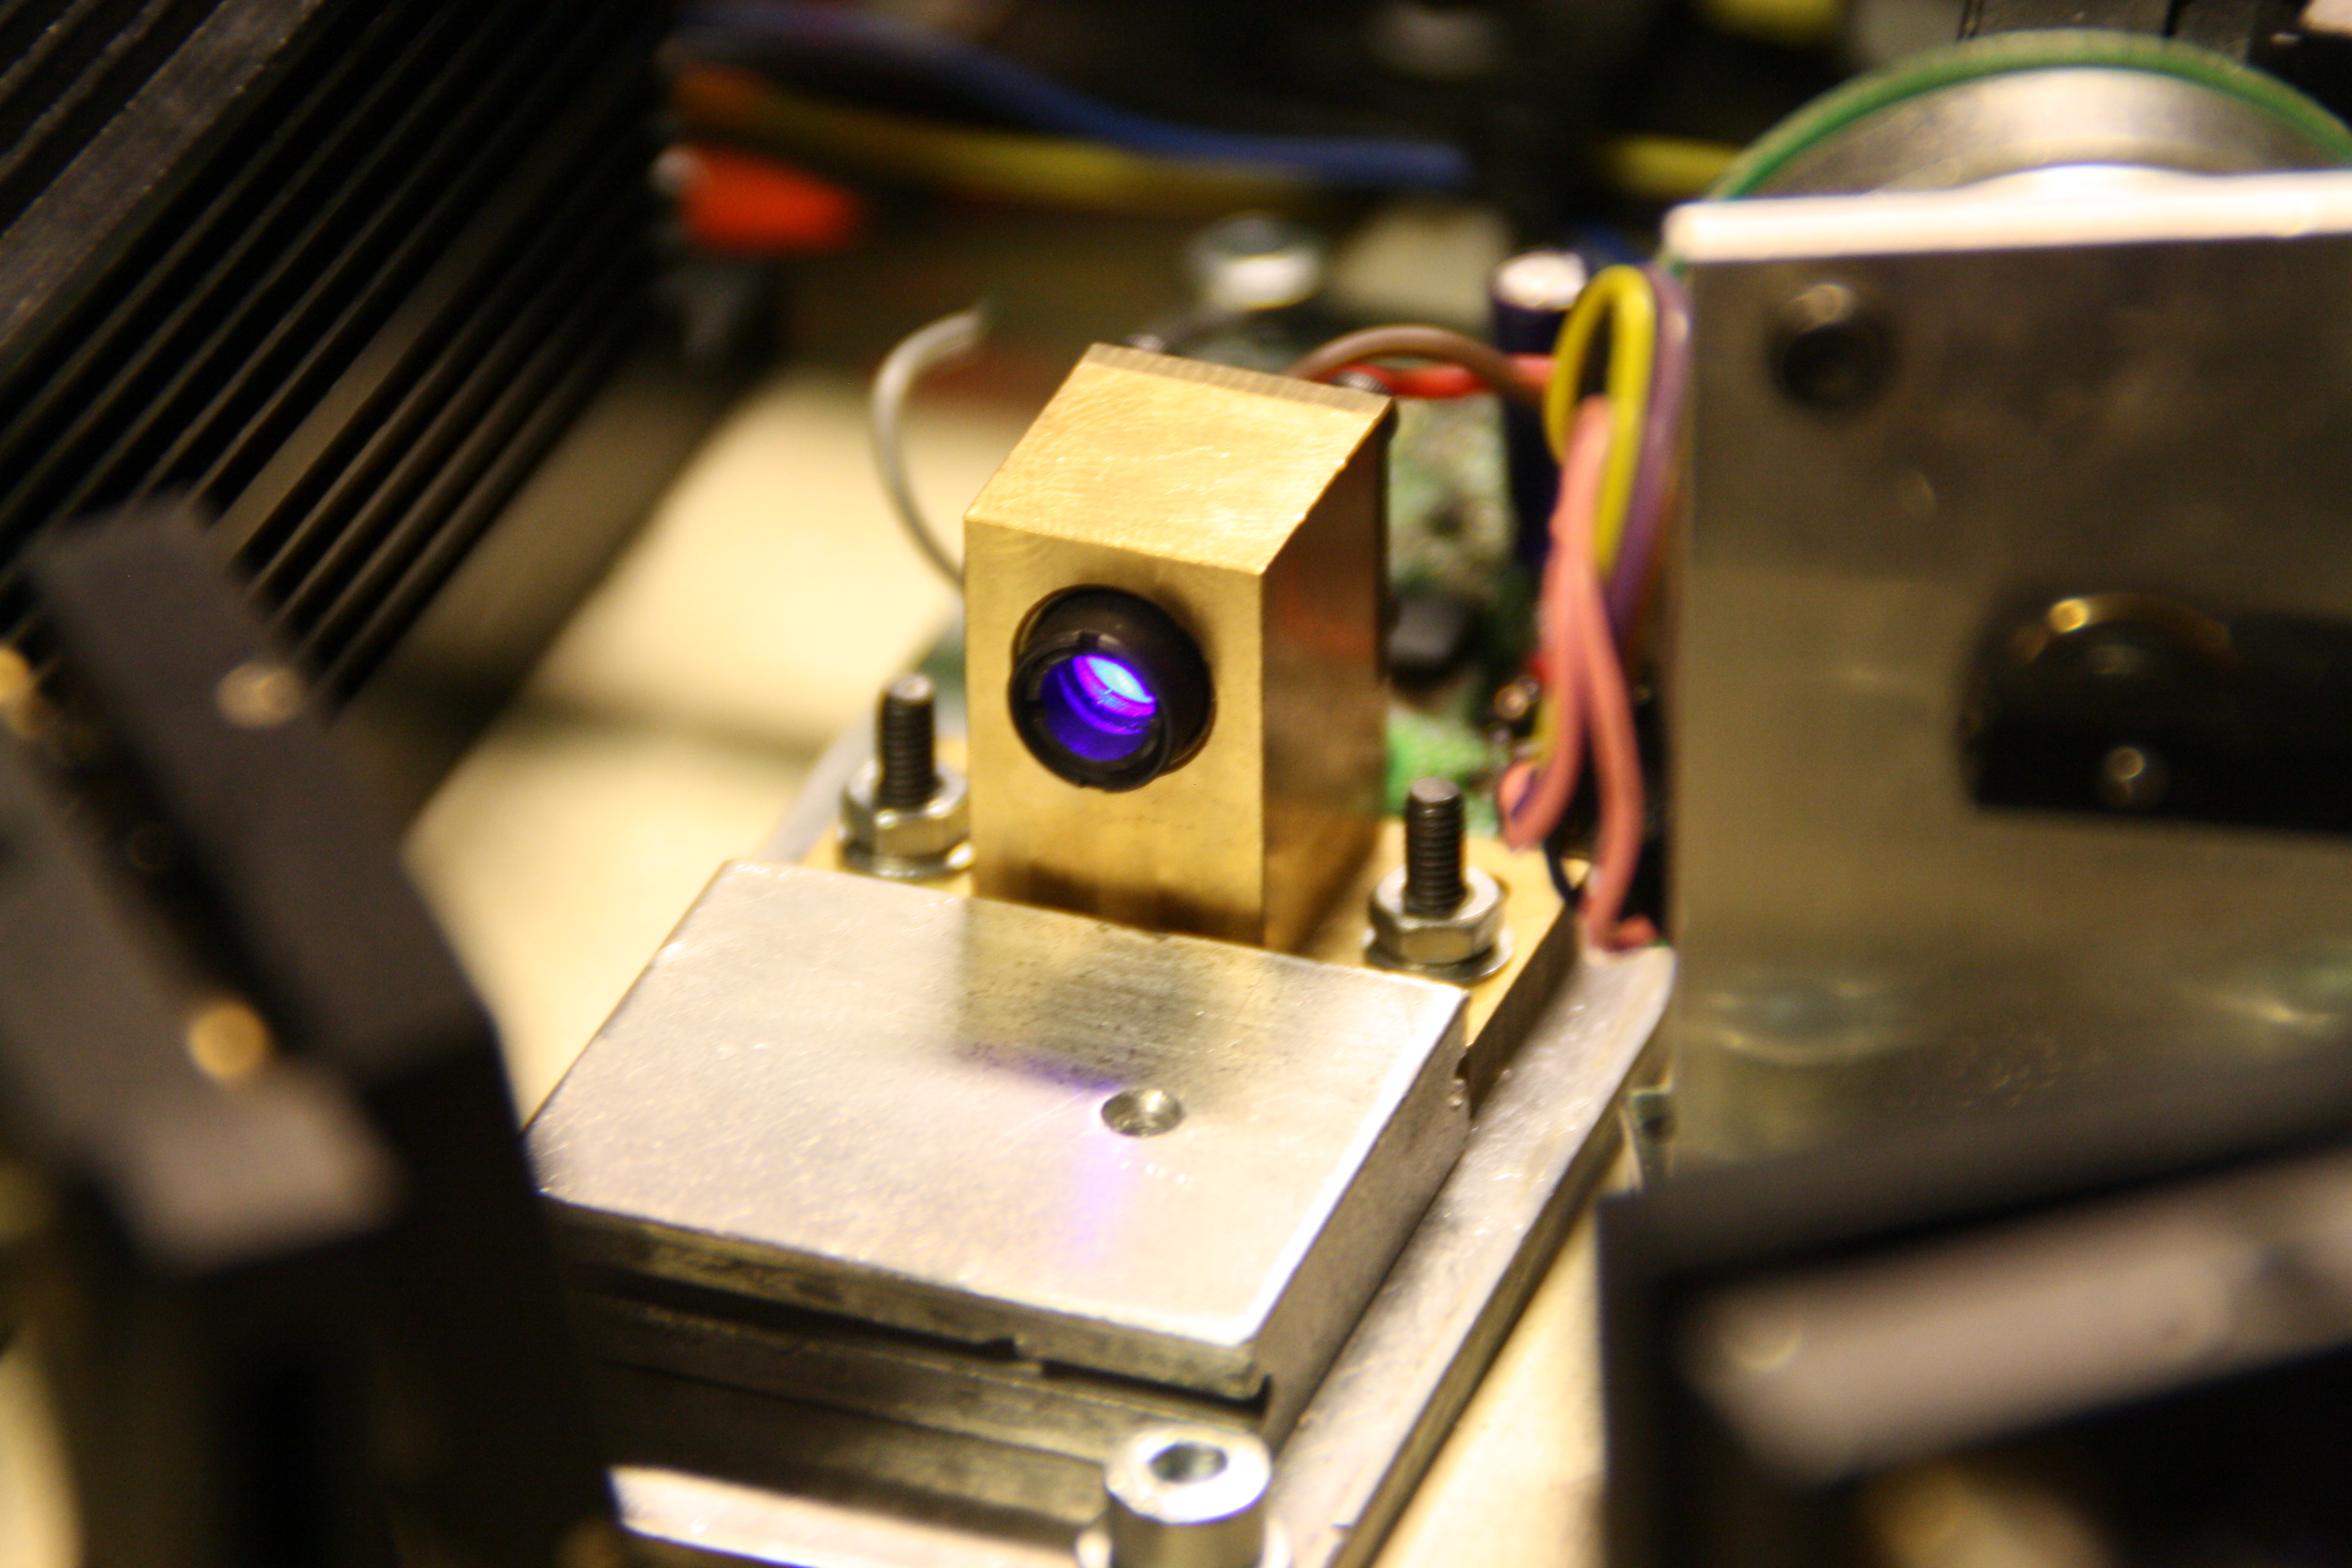
But now they are here: true blue, high power laser diodes. 1 Watt of delicious 445nm laser light. And best of all - they can be made for an affordable price. And that's exactly what I did last year.
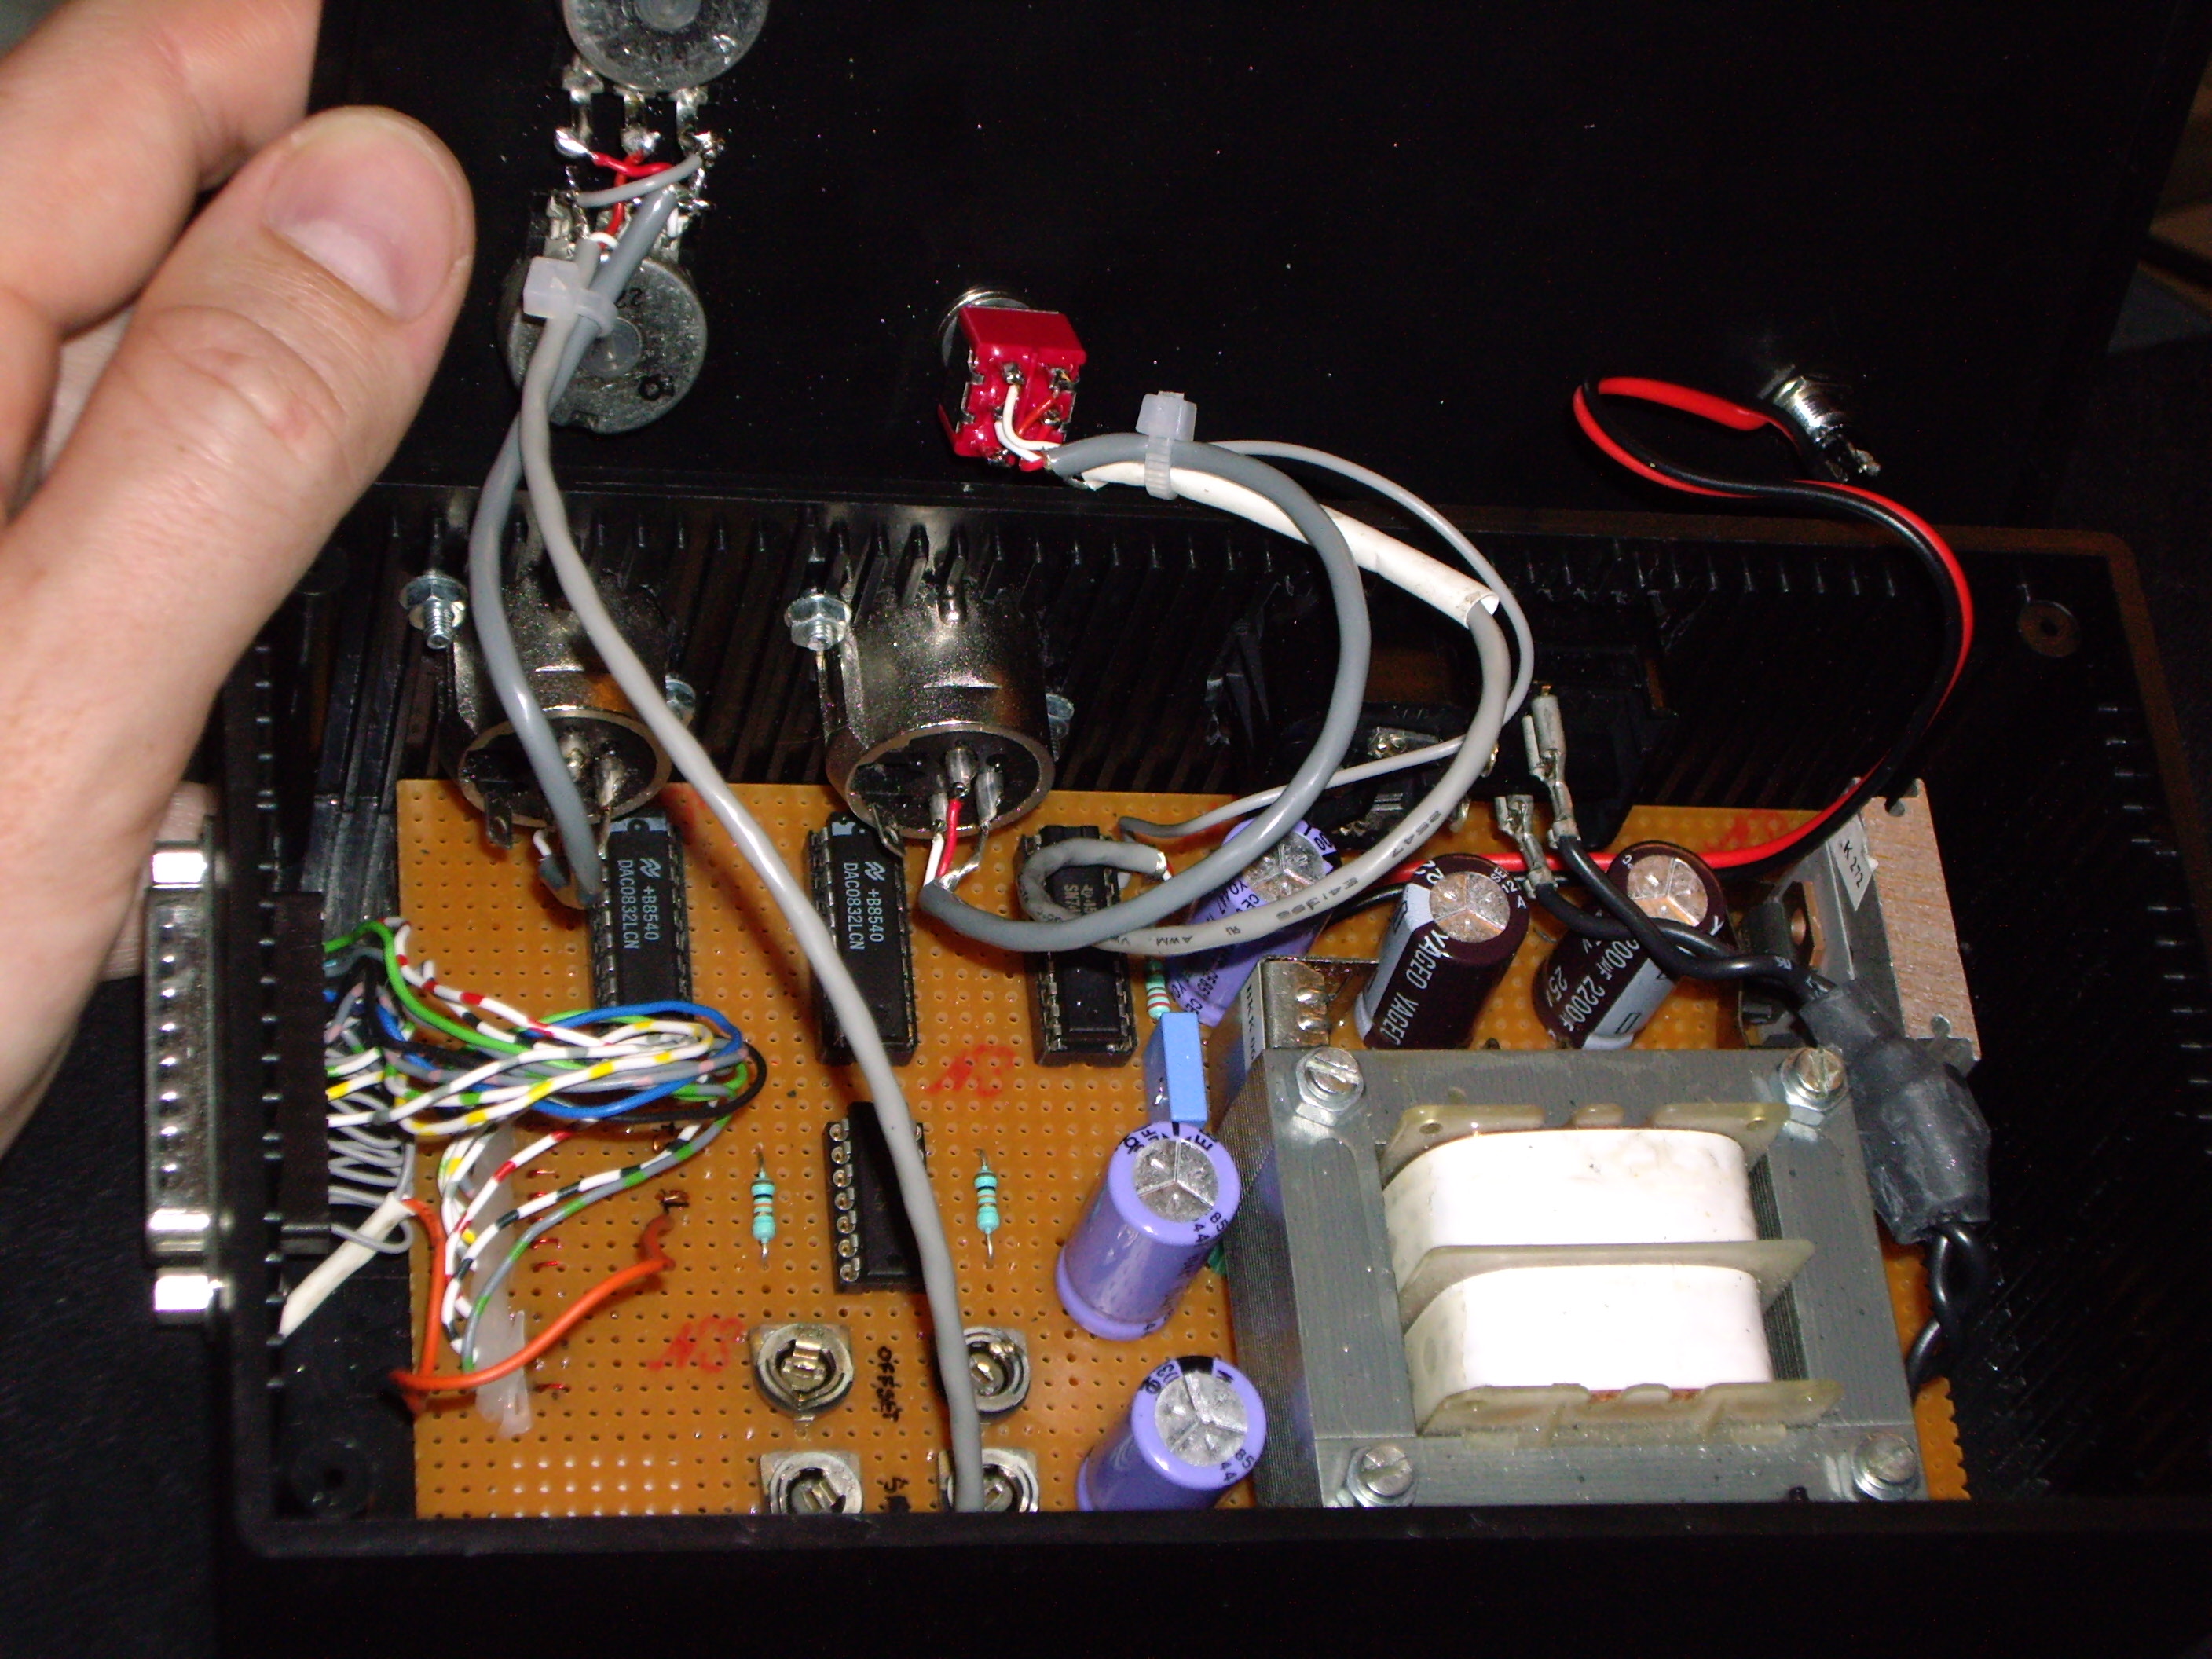
 First I made two small modules for two of my satellite projectors. I made them out of a pair of Aixiz housings and lenses. As drivers, I used two Die4Drive that I had in the drawer. In addition, some aluminum jigs to mount the lasers on the base plates. After a few evenings and nights by the workbench, both satelites was upgraded from being some boring "green only"-lasers, to a pair of super cool Green/Blue projectors. Sooo nice! First I made two small modules for two of my satellite projectors. I made them out of a pair of Aixiz housings and lenses. As drivers, I used two Die4Drive that I had in the drawer. In addition, some aluminum jigs to mount the lasers on the base plates. After a few evenings and nights by the workbench, both satelites was upgraded from being some boring "green only"-lasers, to a pair of super cool Green/Blue projectors. Sooo nice! 
To avoid the laser diodes from being overheated, I adjusted the output power slightly to around 700mW. Still relatively quite a lot of light. And on the first following job, an outdoor gig at "Klřften Festival", I was pretty surprised, as outdoor jobs can be quite difficult. Even at twilight the beams were sharp and clear, and the beams reached not only to the edge of the stage, but also far out over the audience's heads.
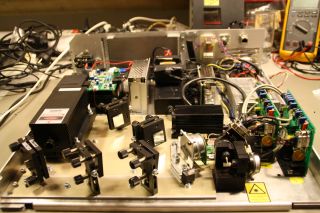
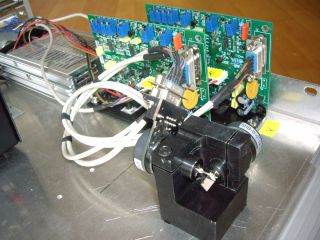
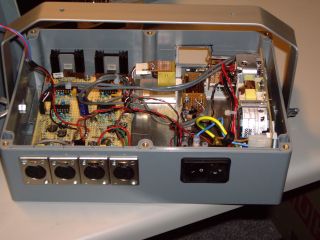
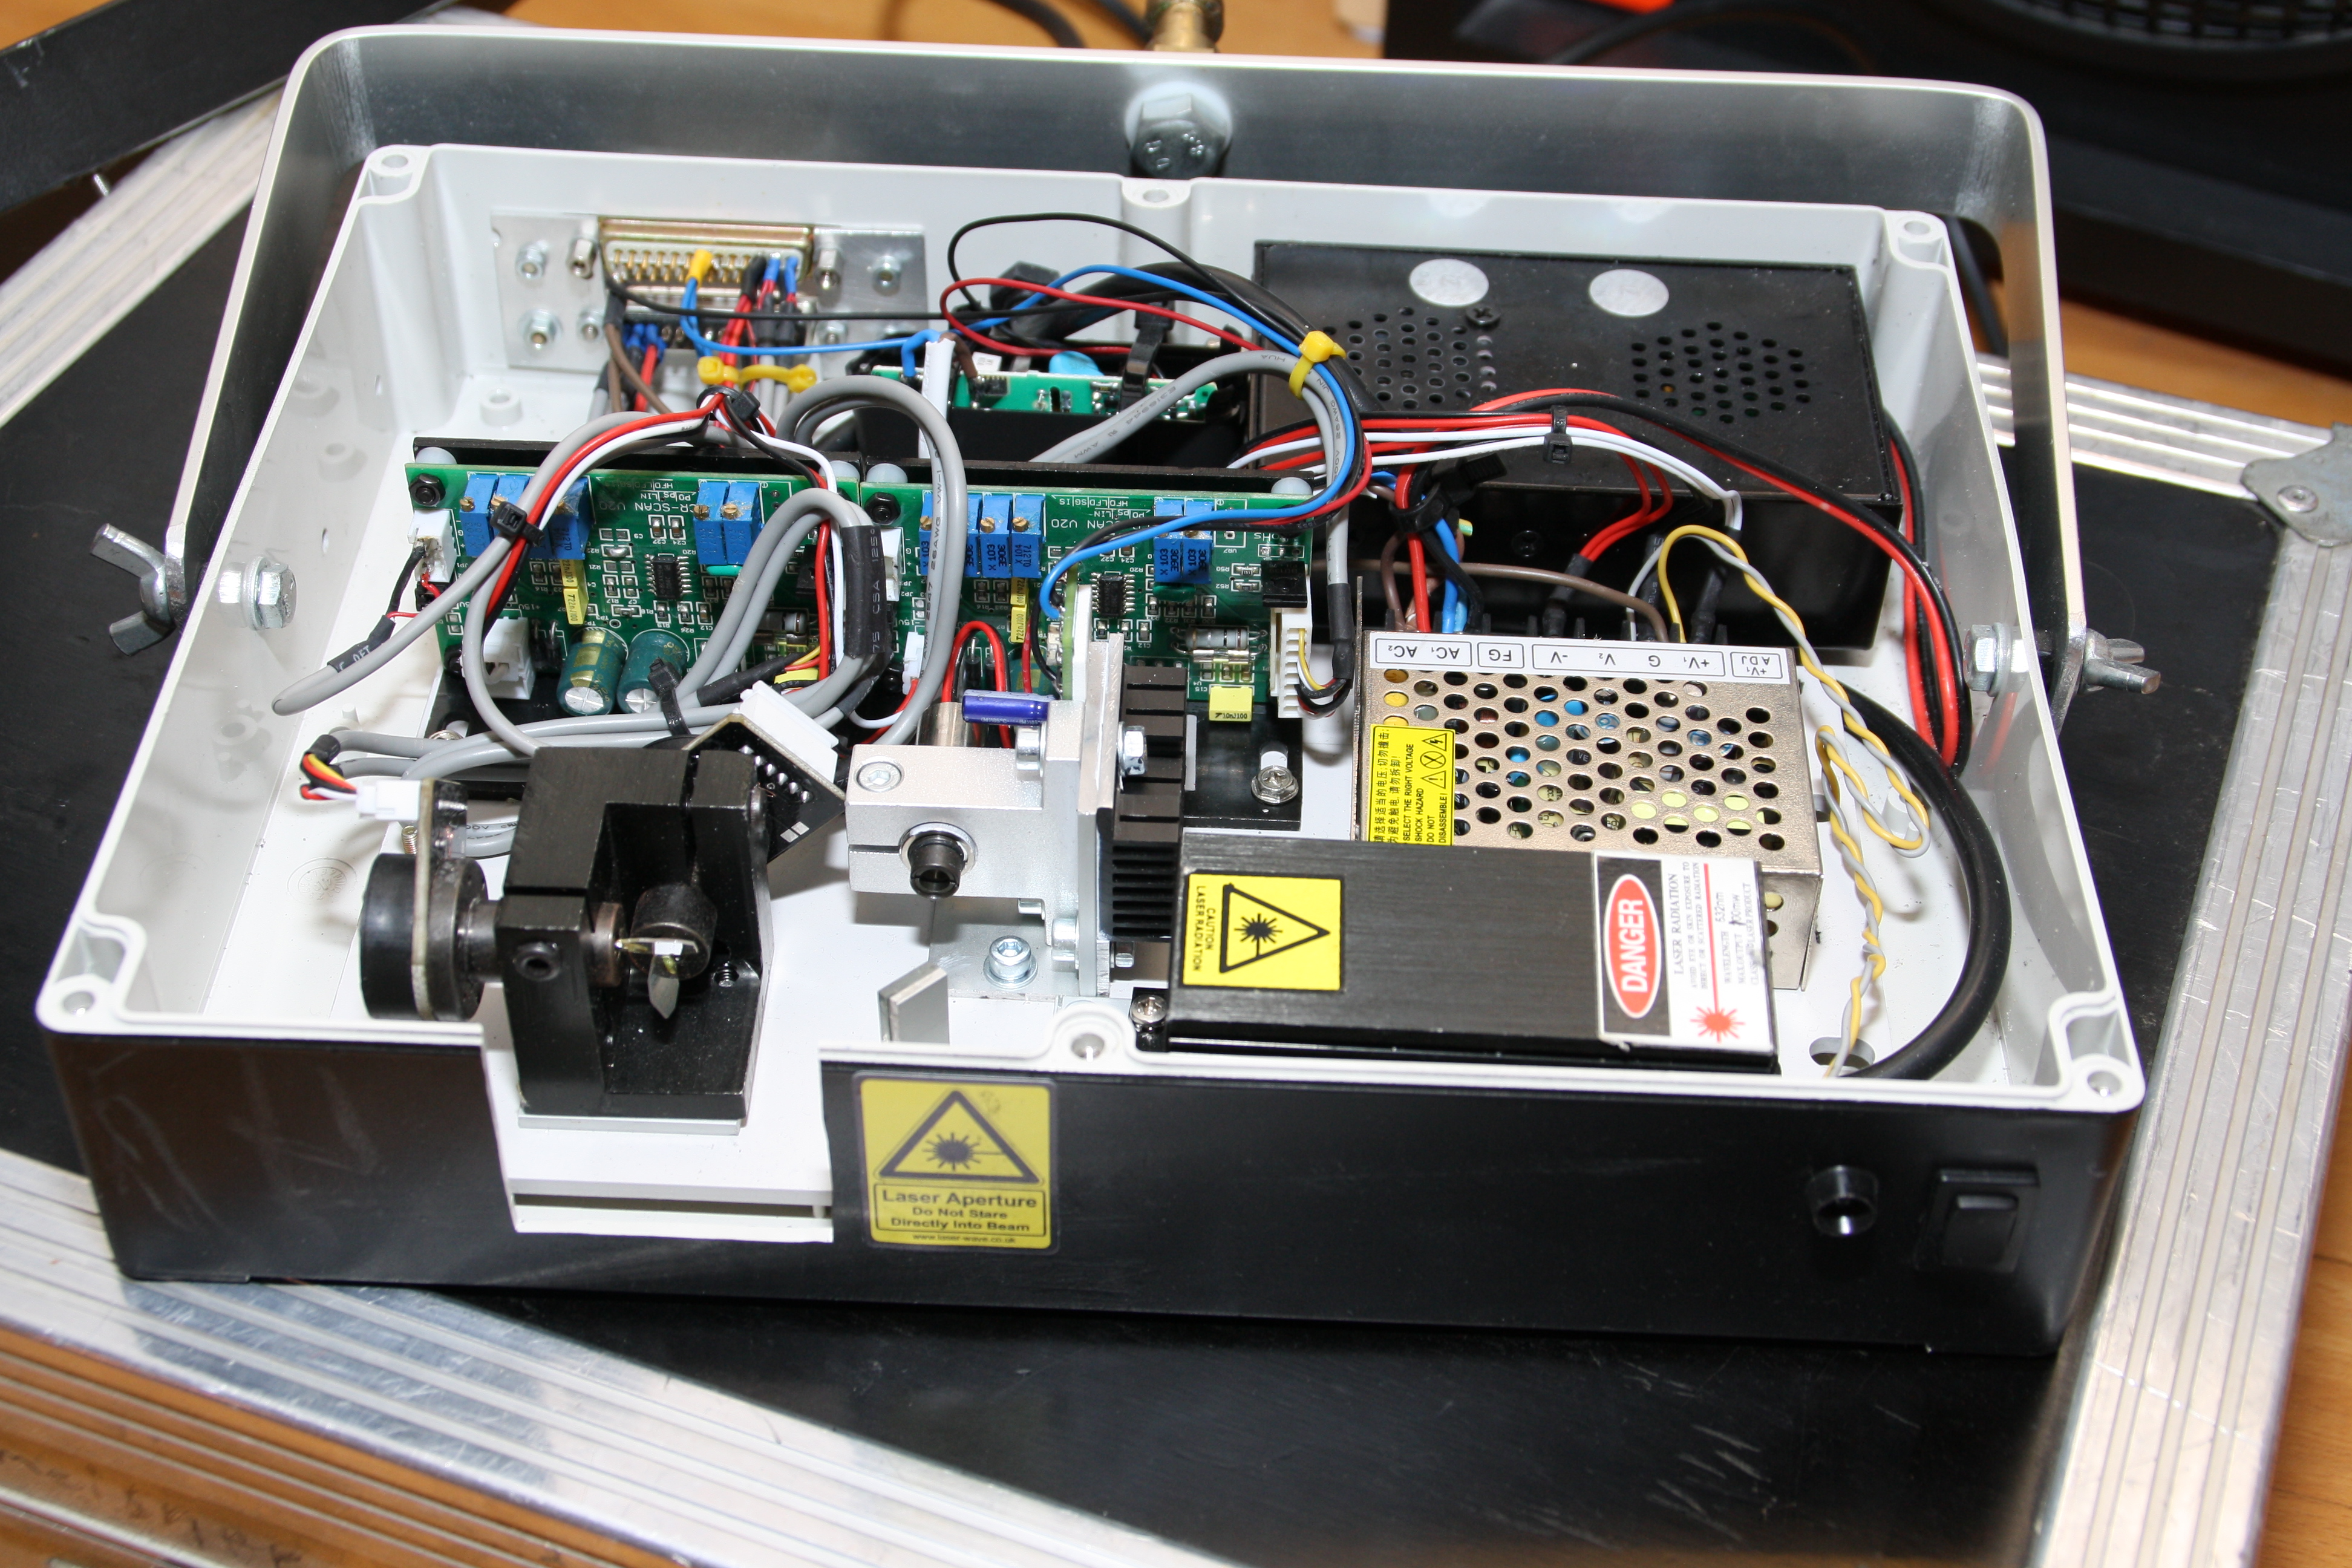
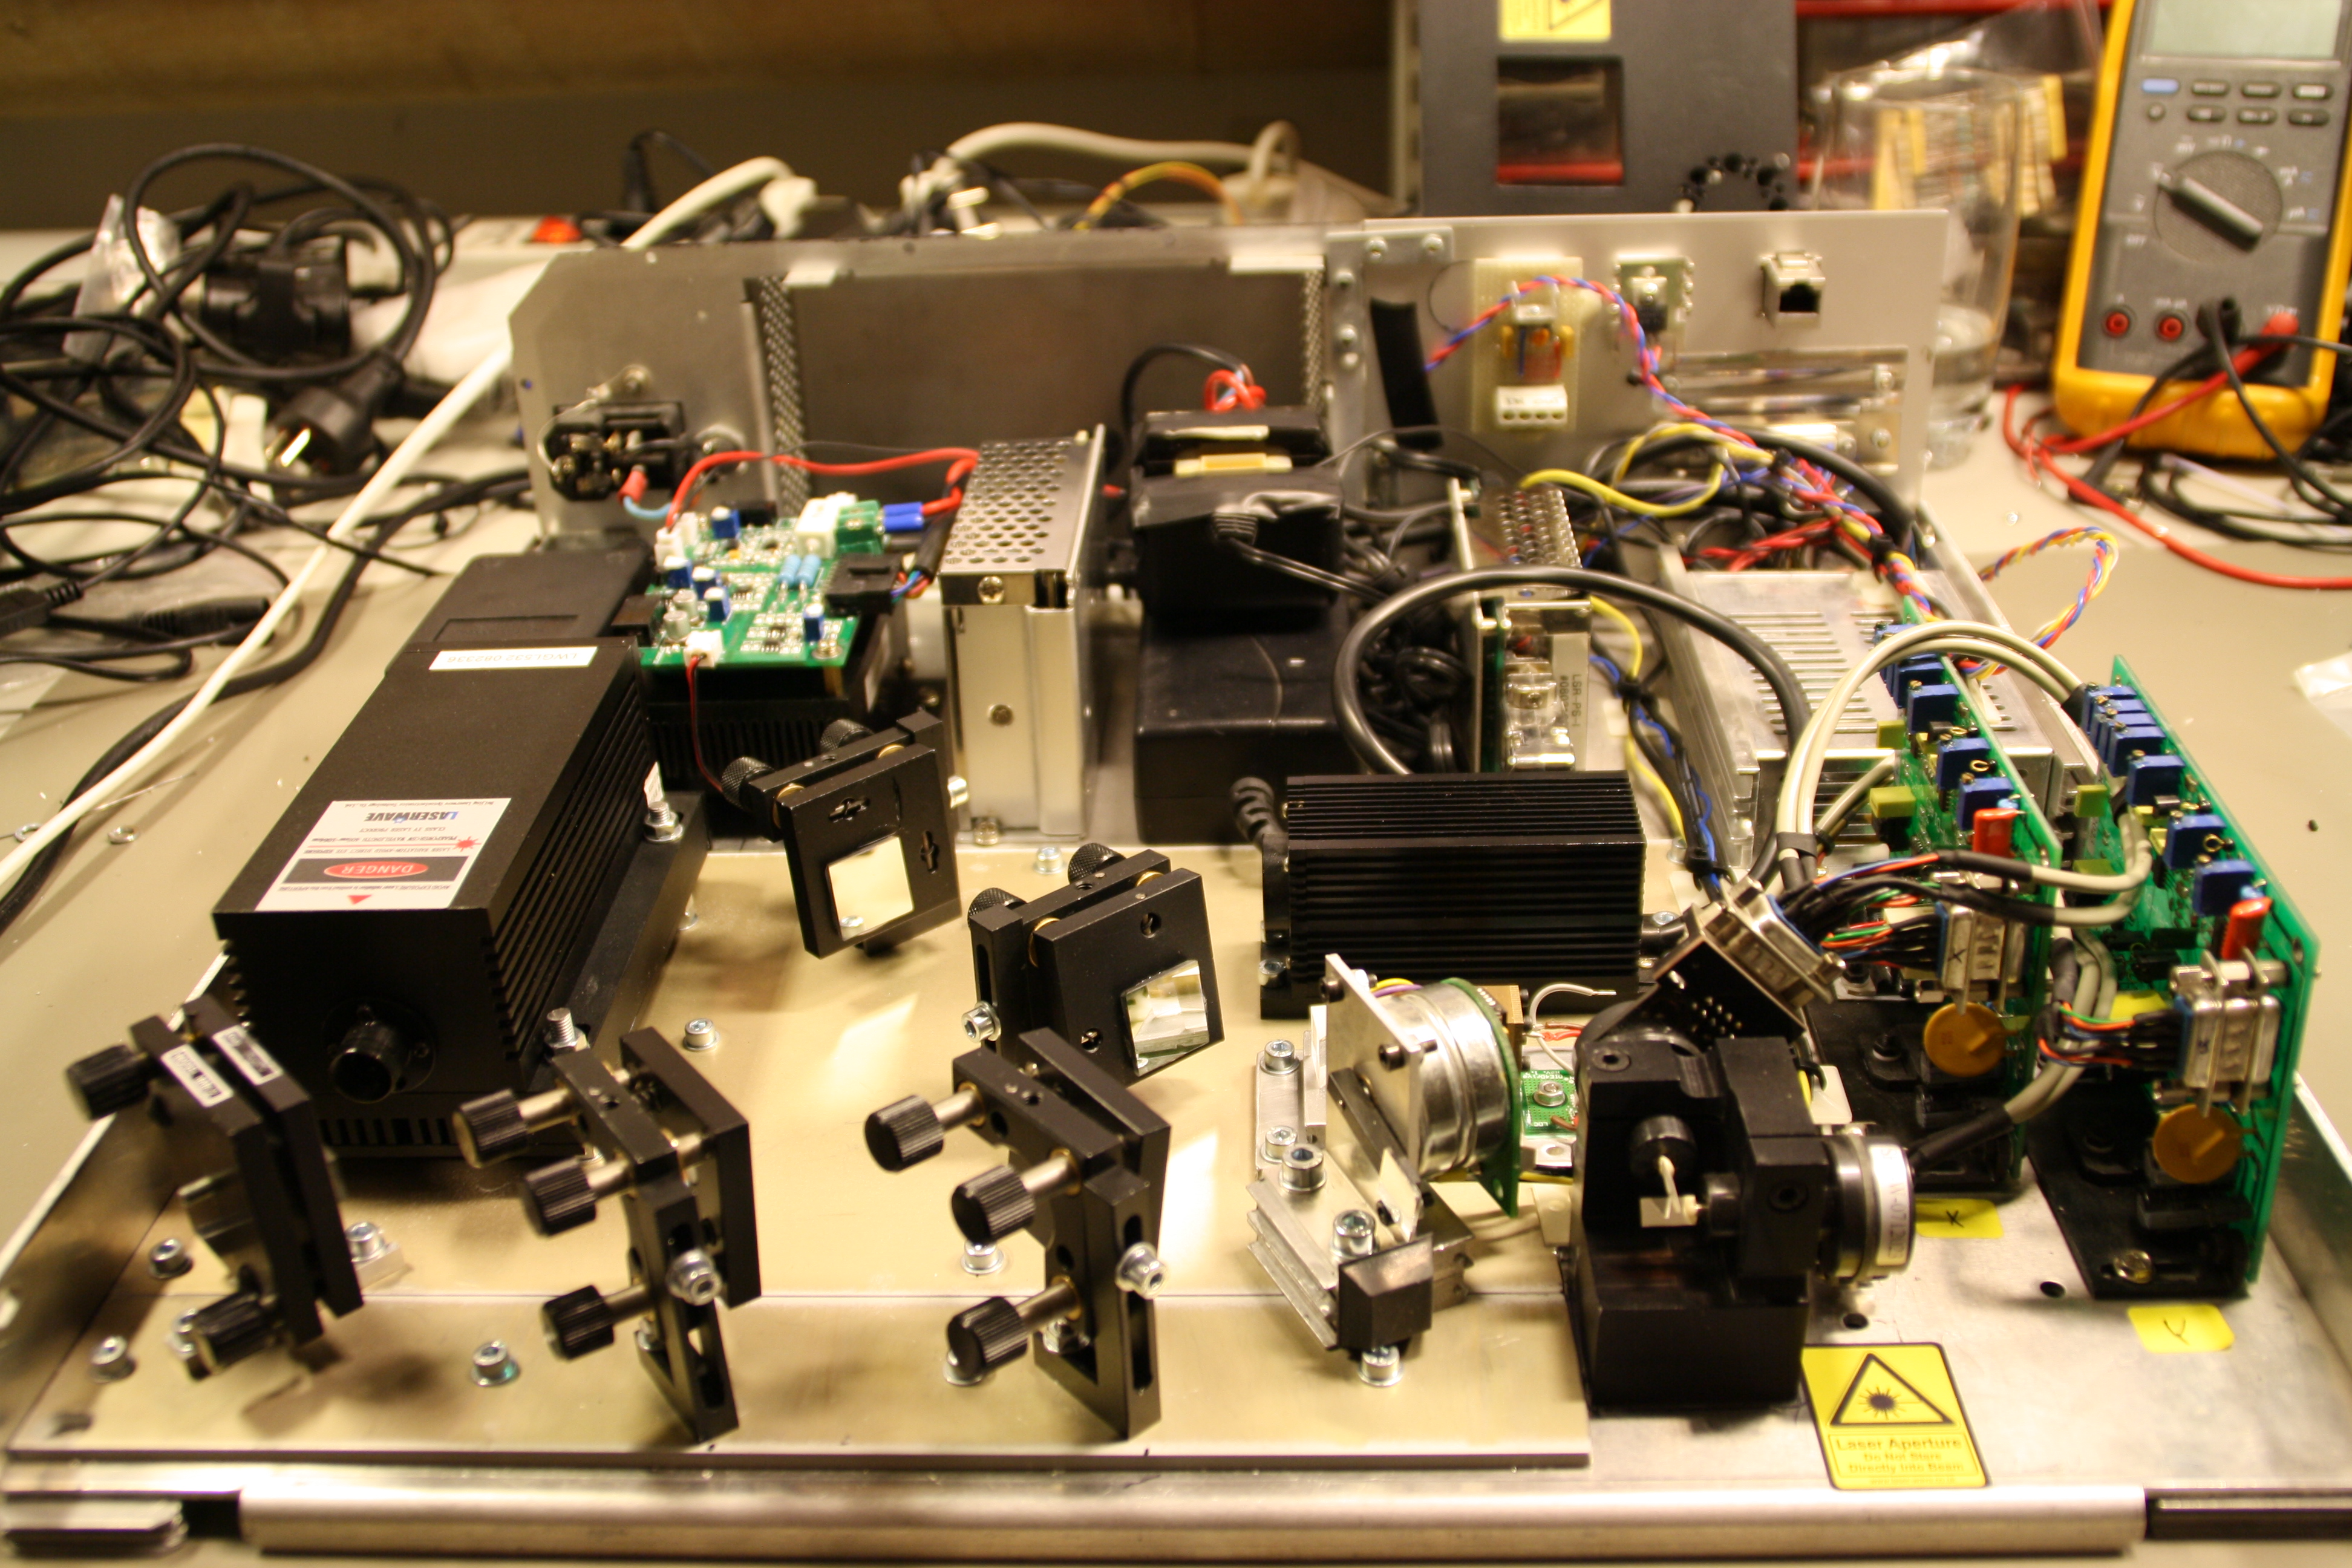
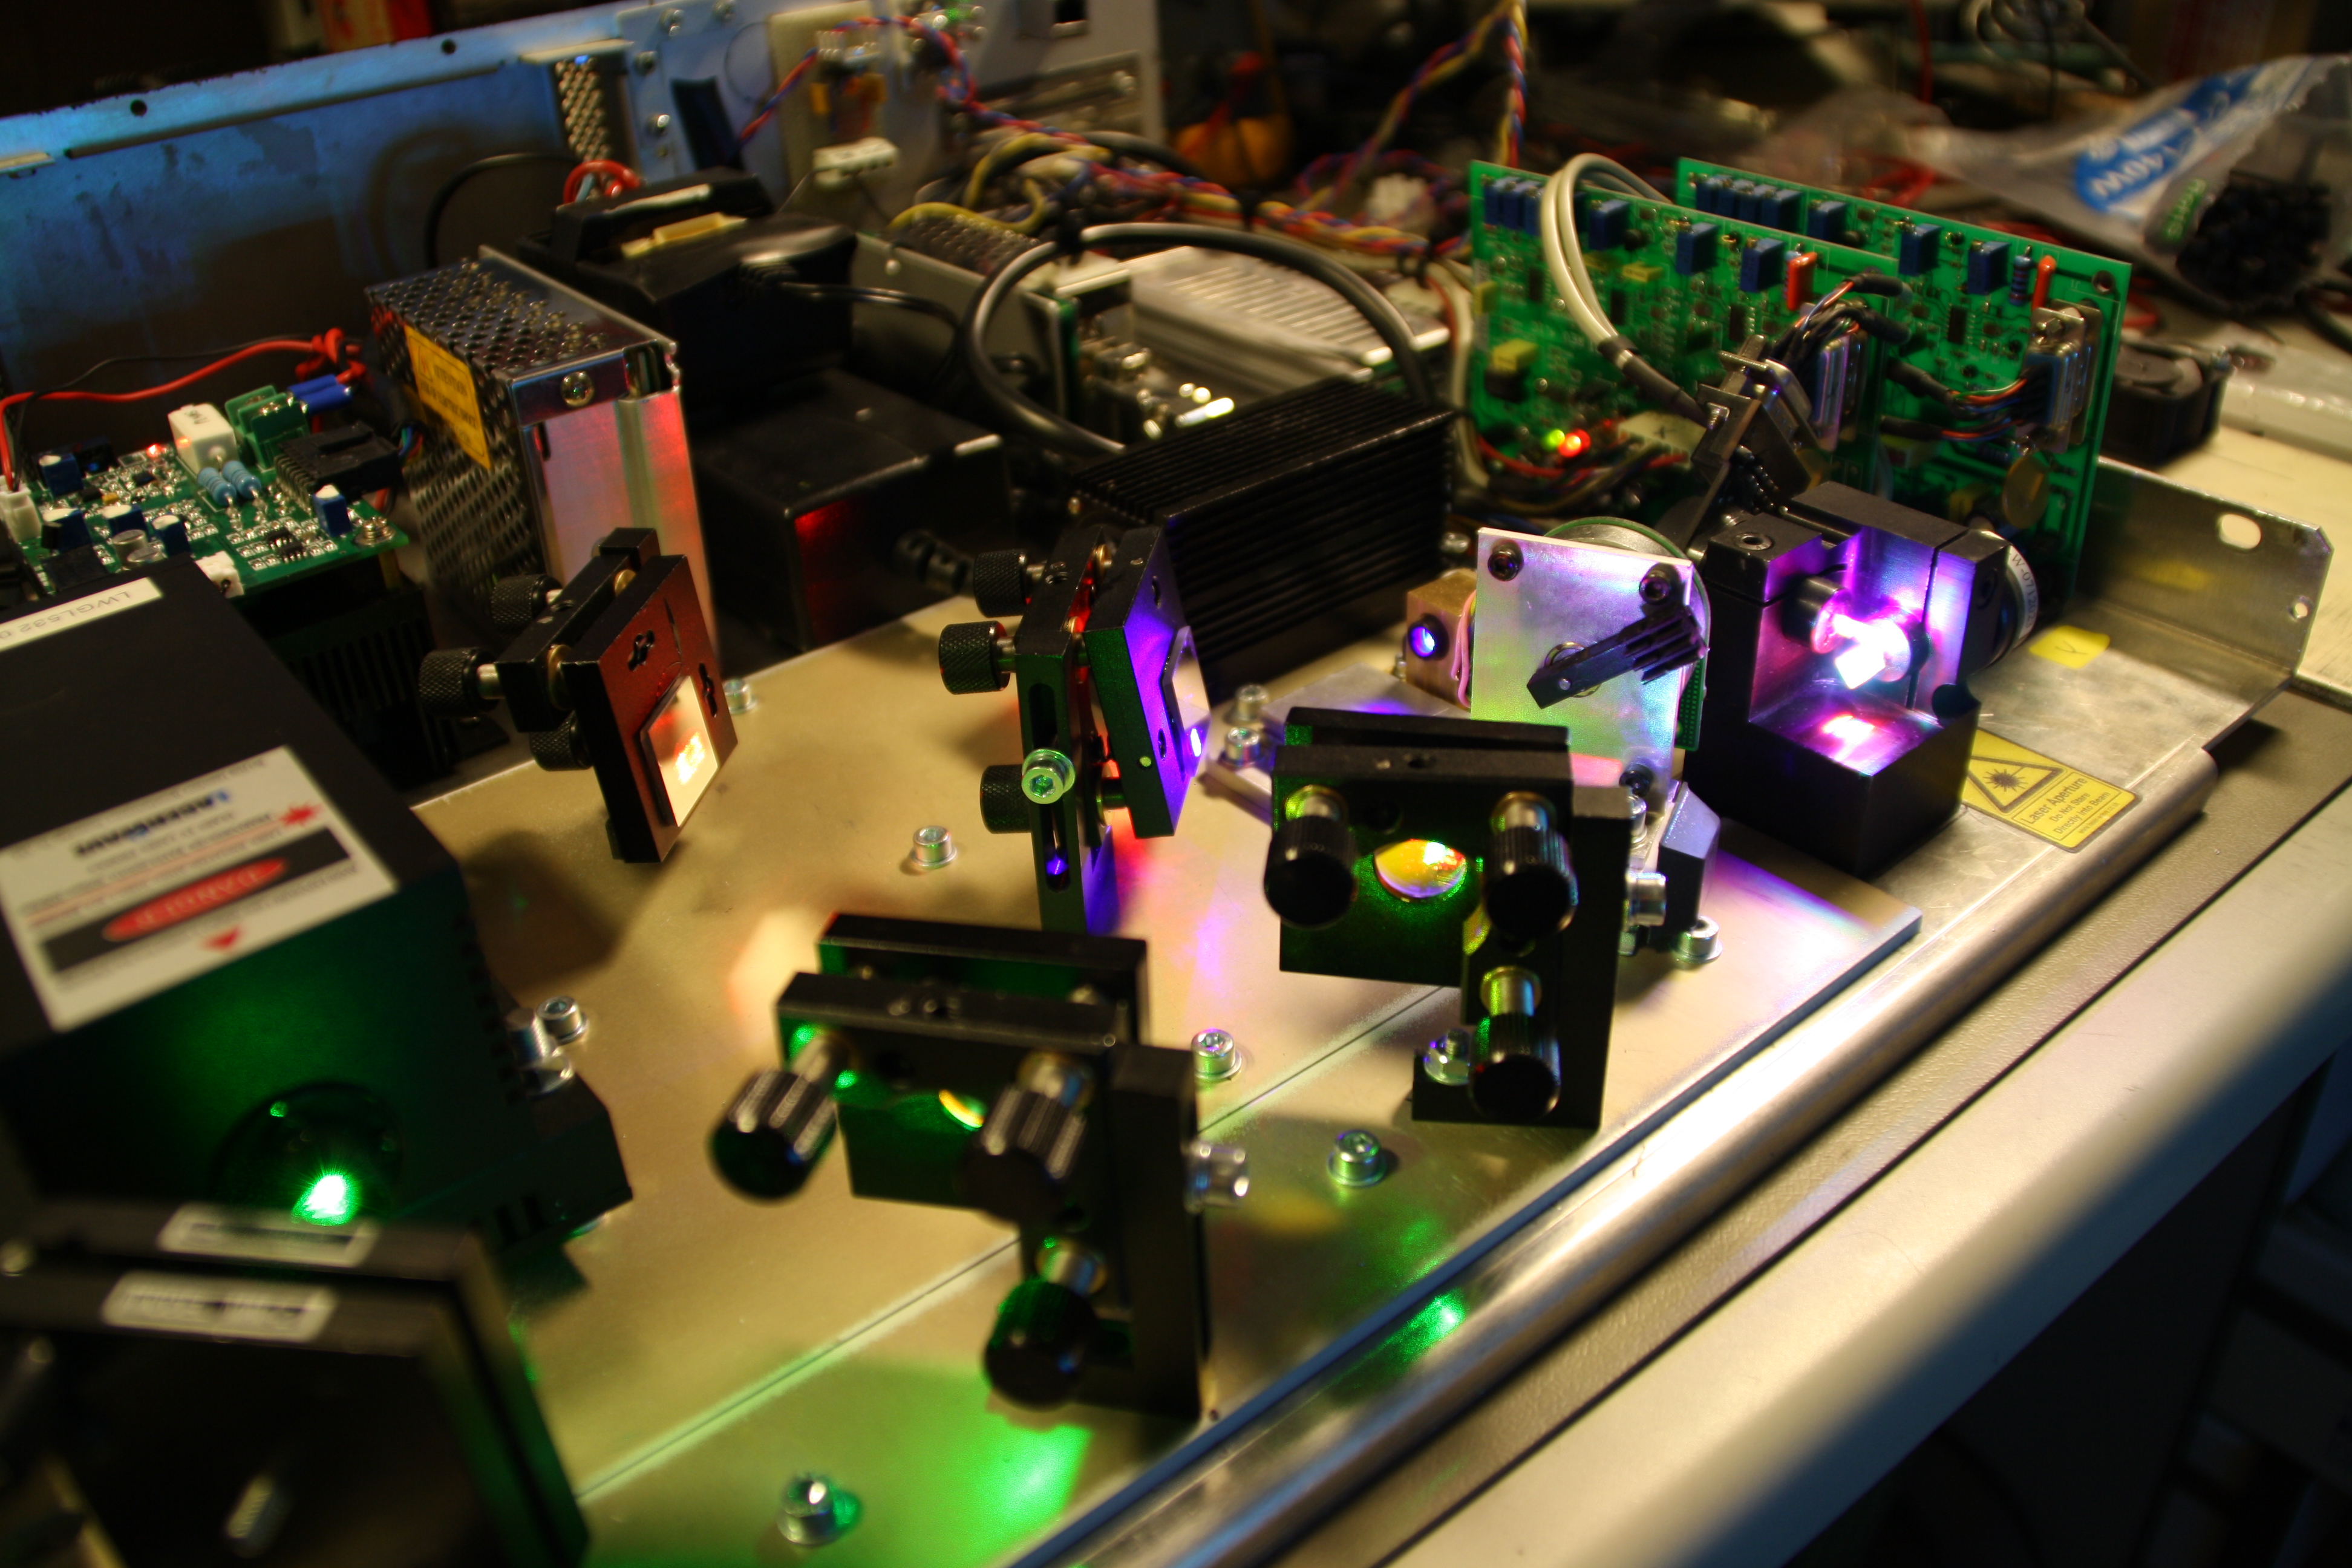
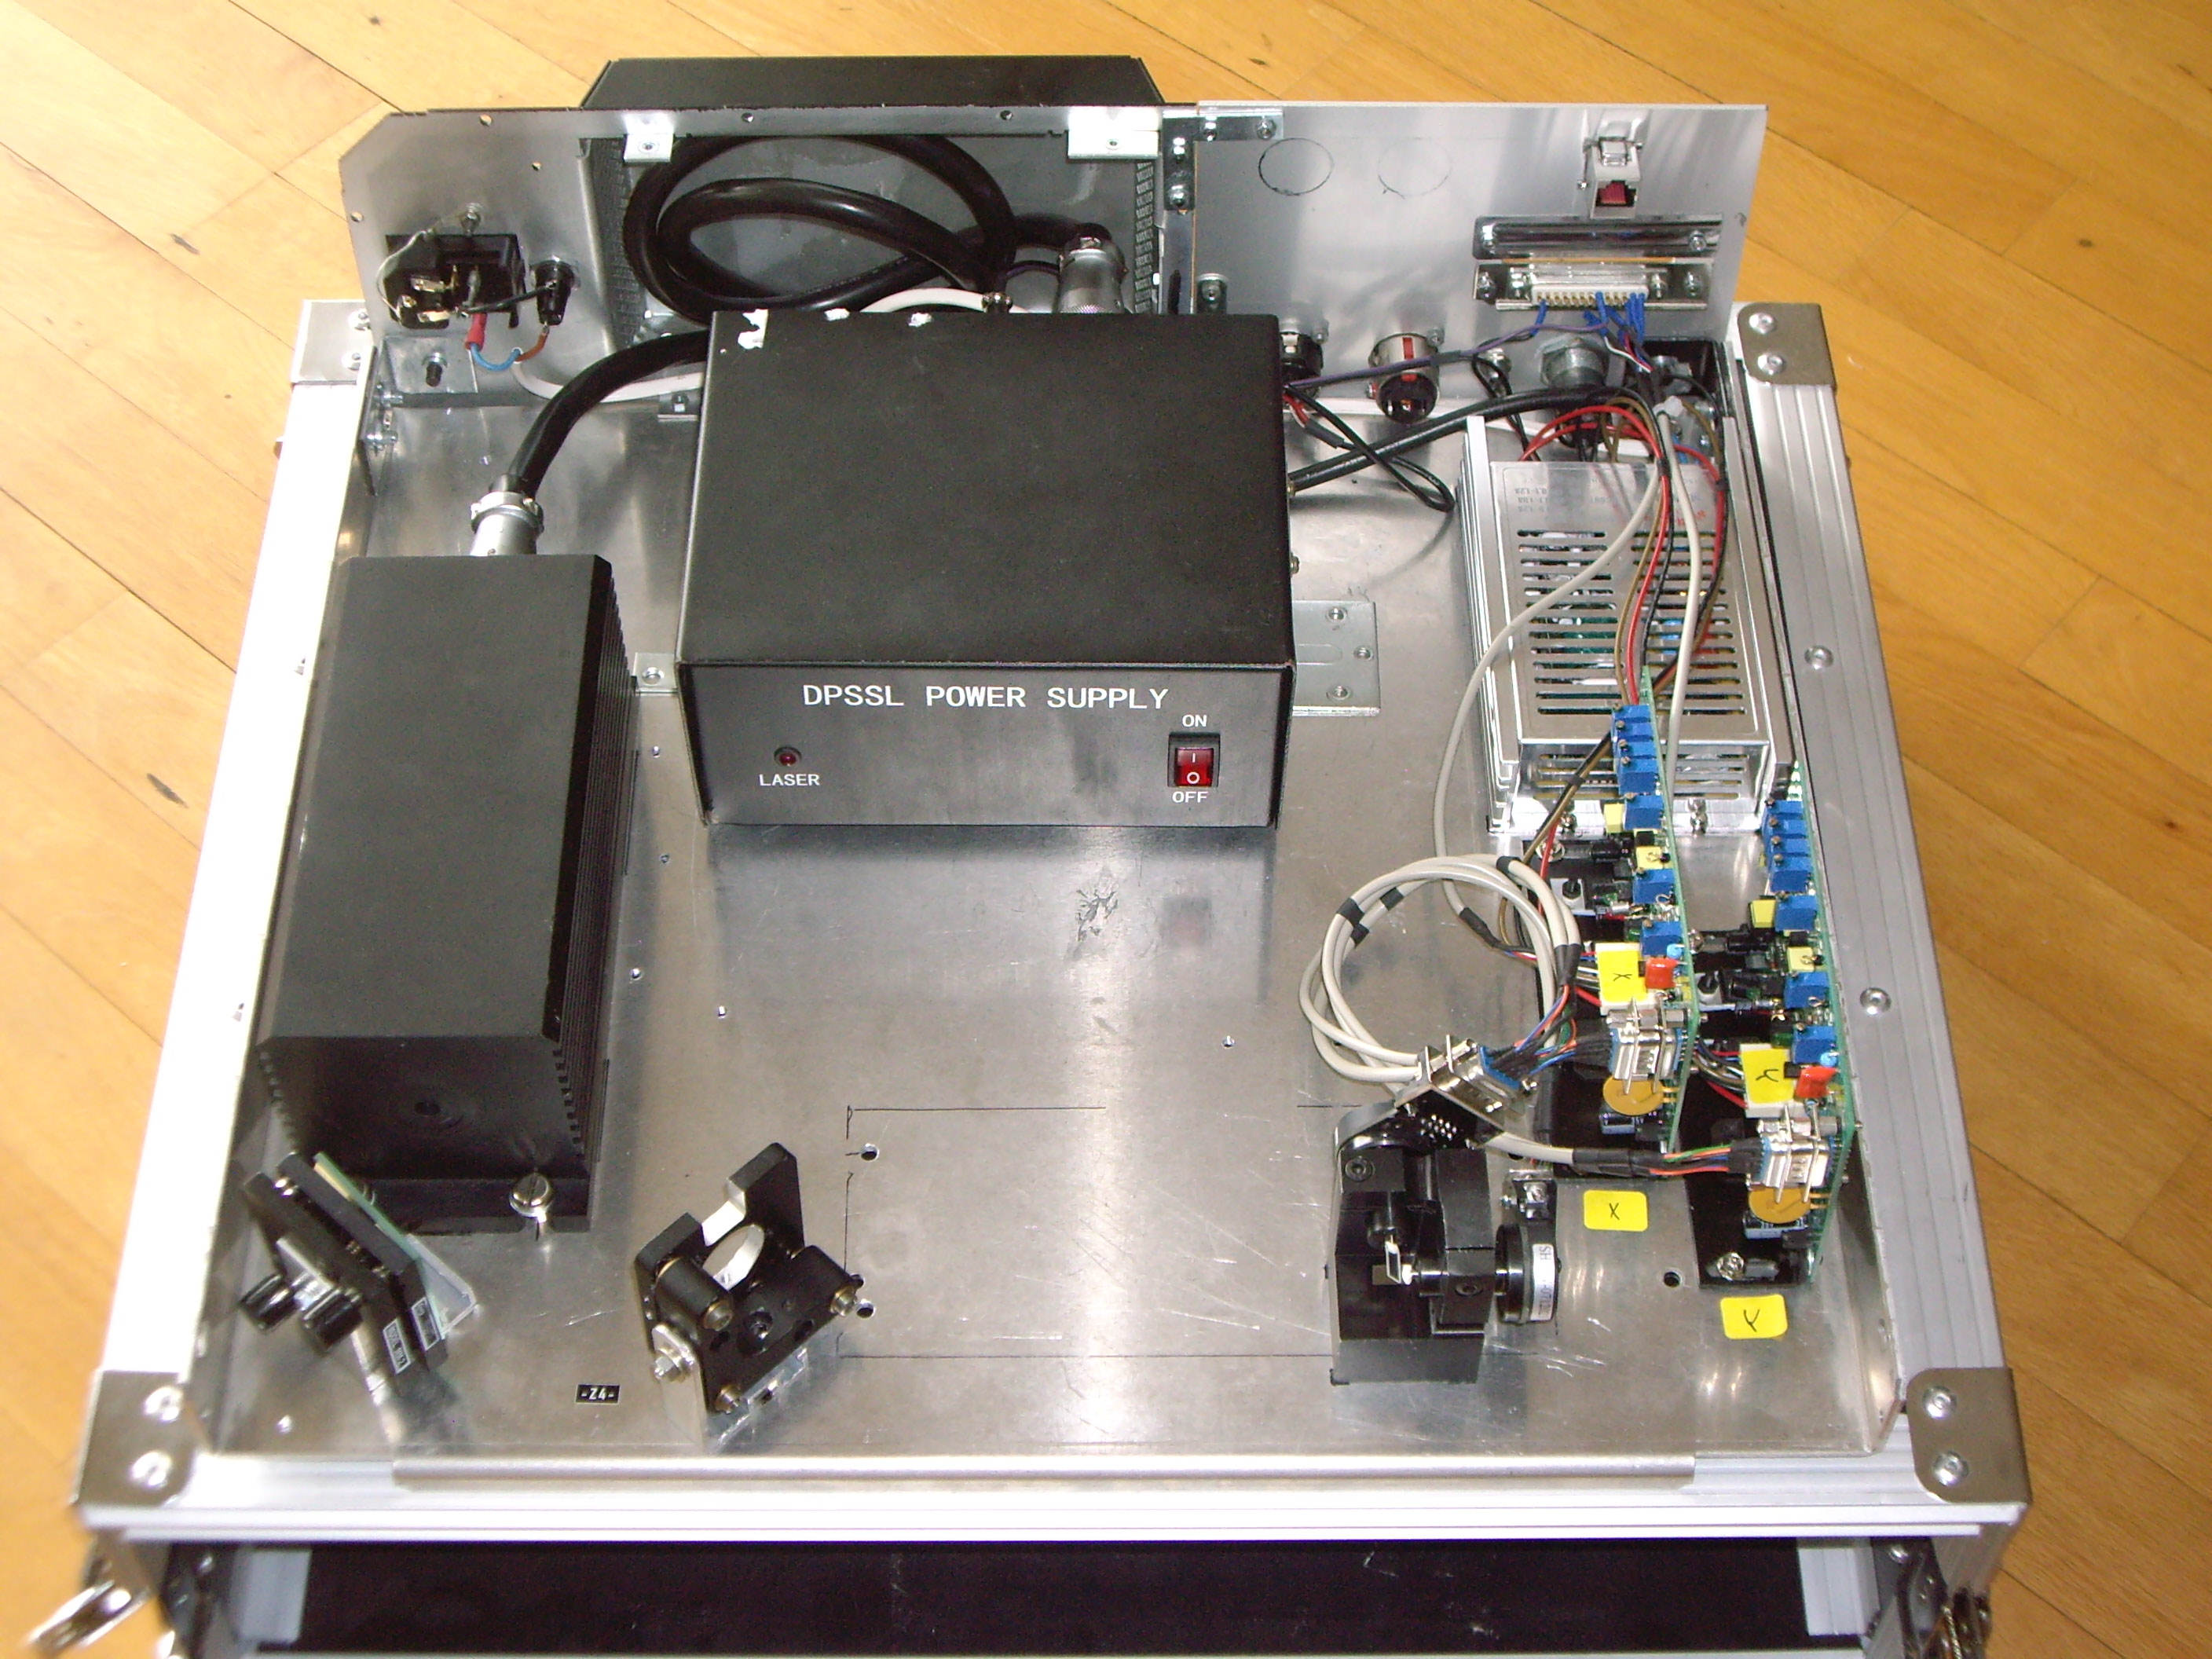
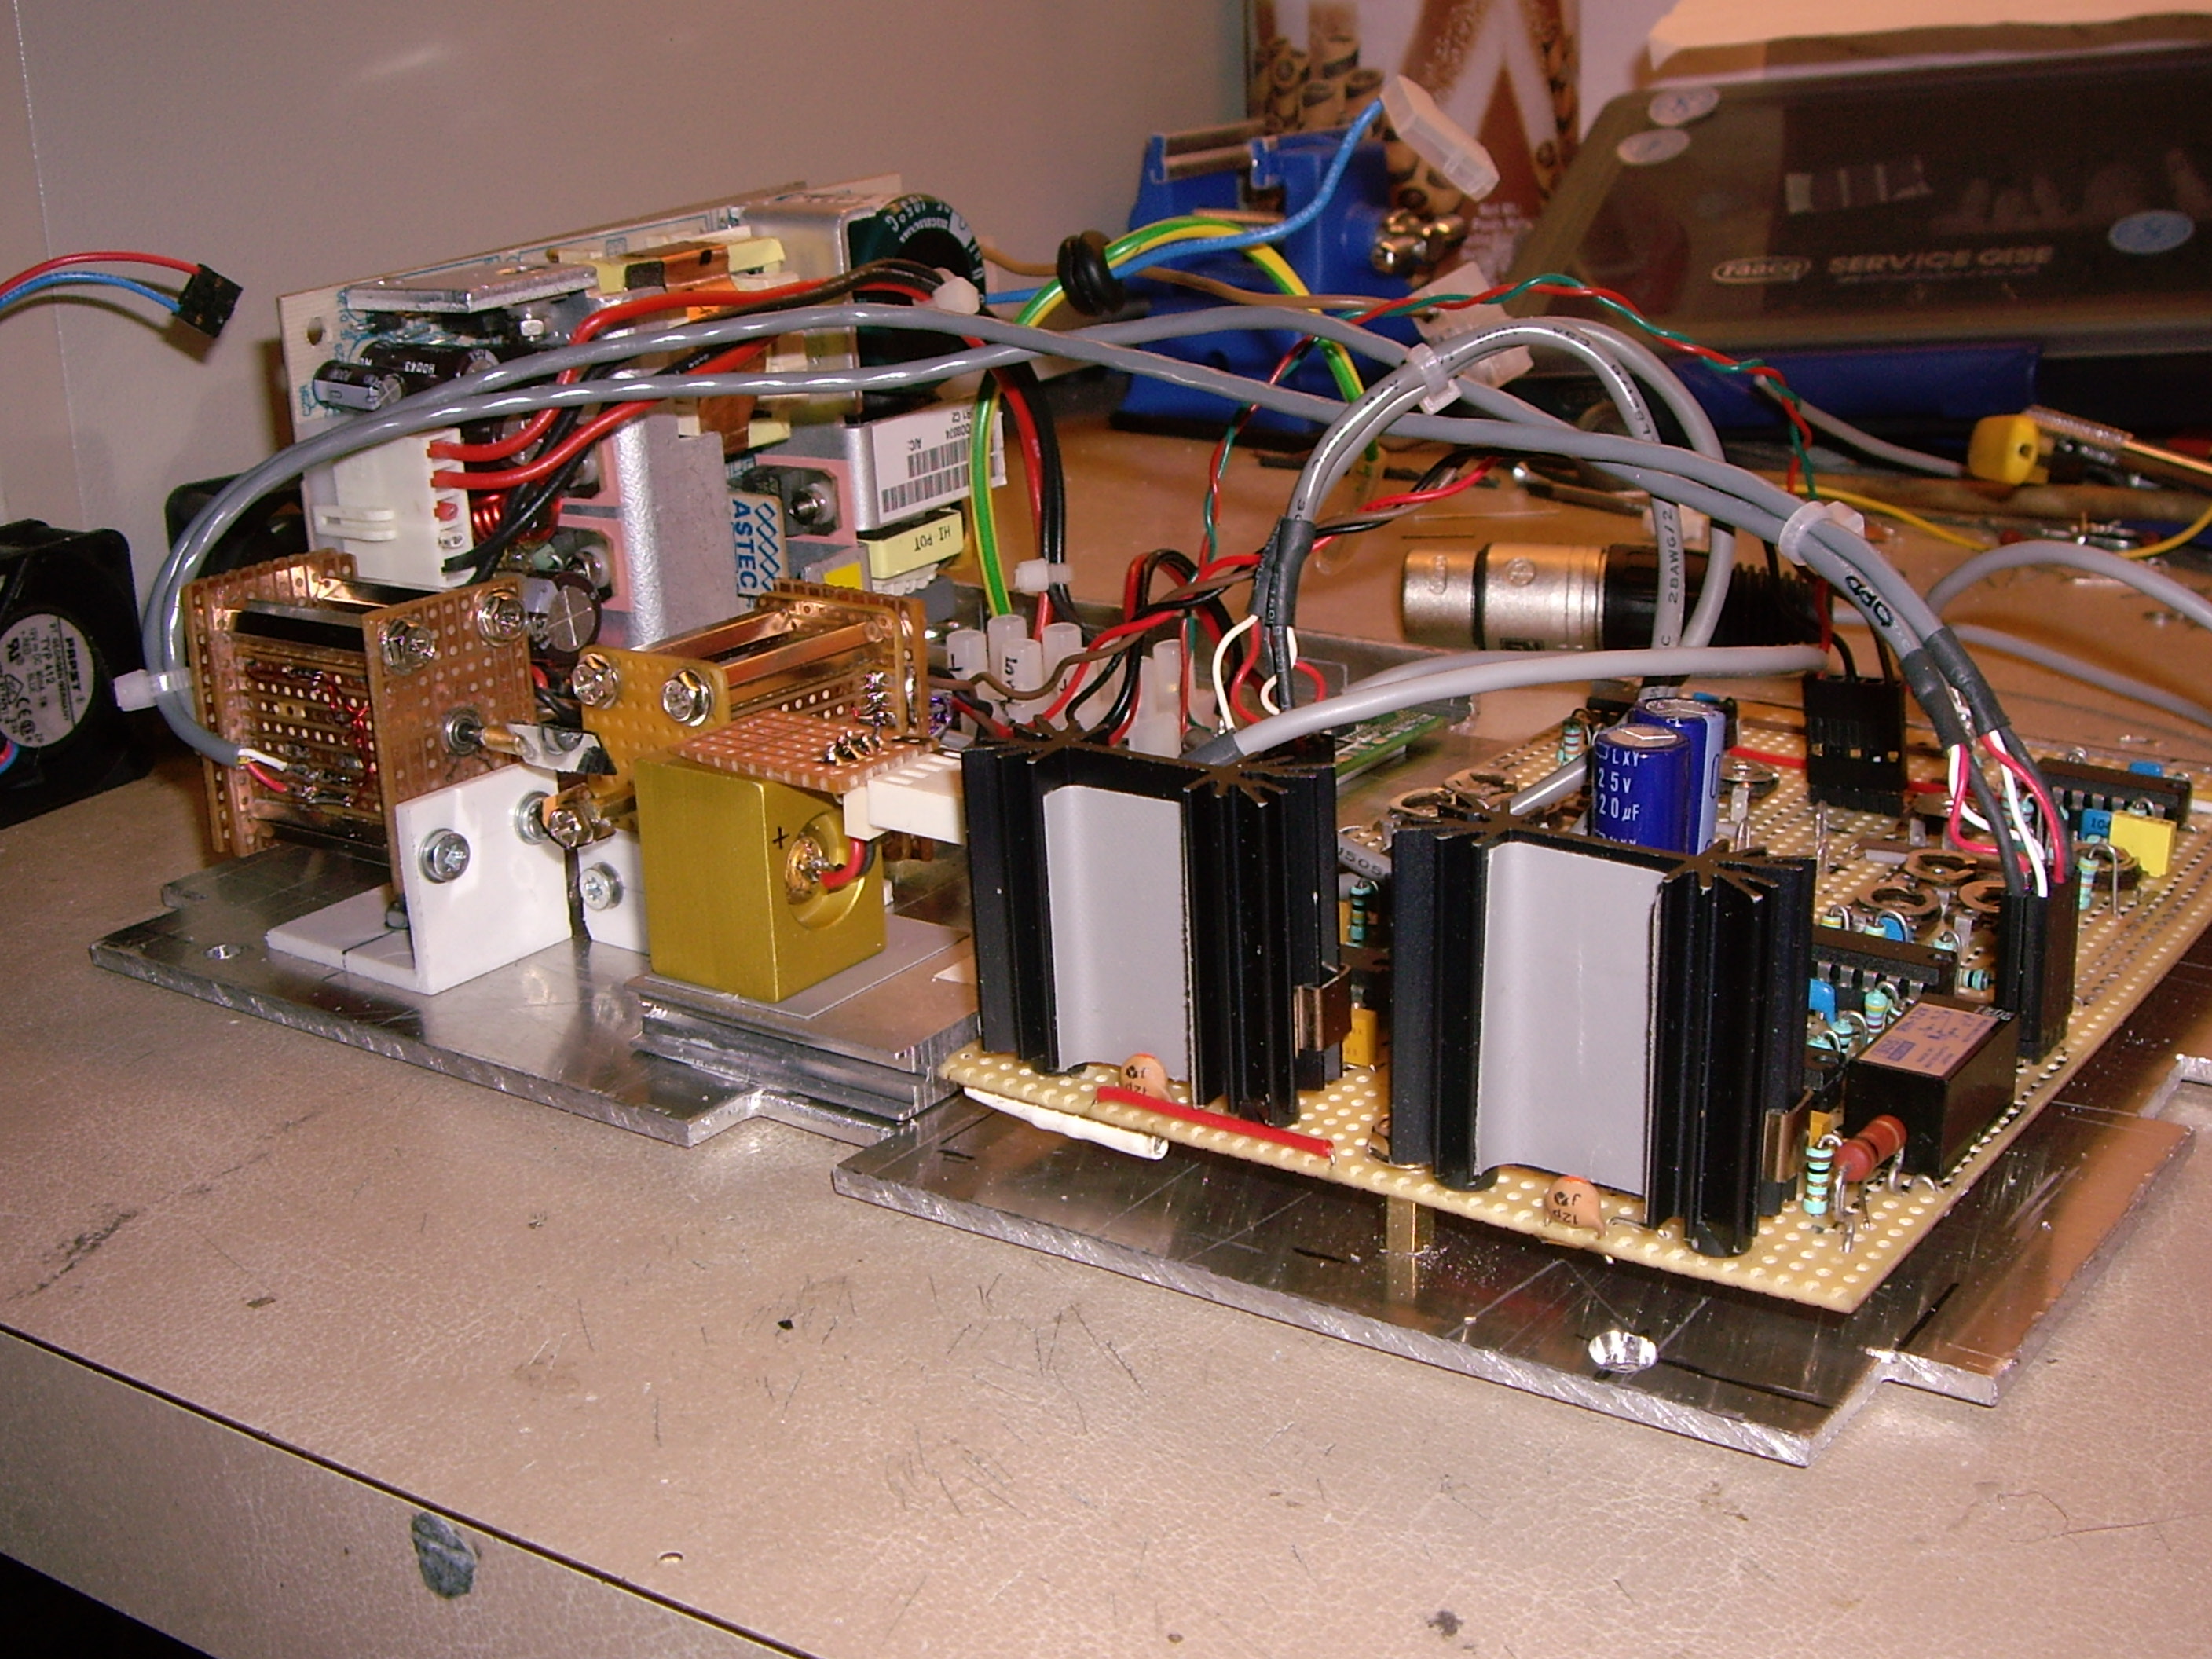
Now to my big RG(real)B projector...
For a long time I wanted to change the layout, so it was easier to align the beams, and not least to strengthen the base plate. And now the occasion was here.
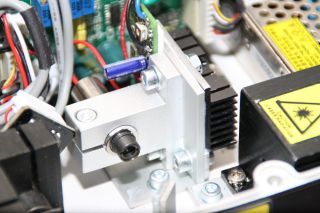
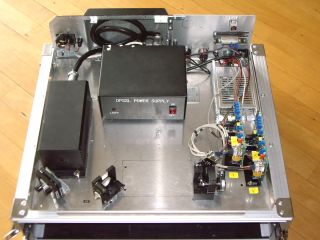
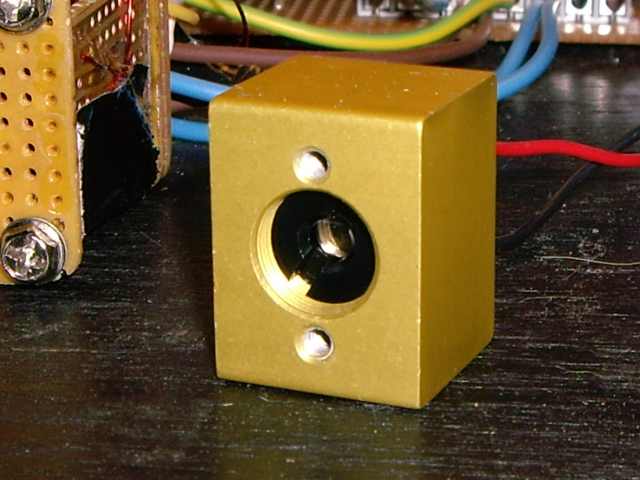
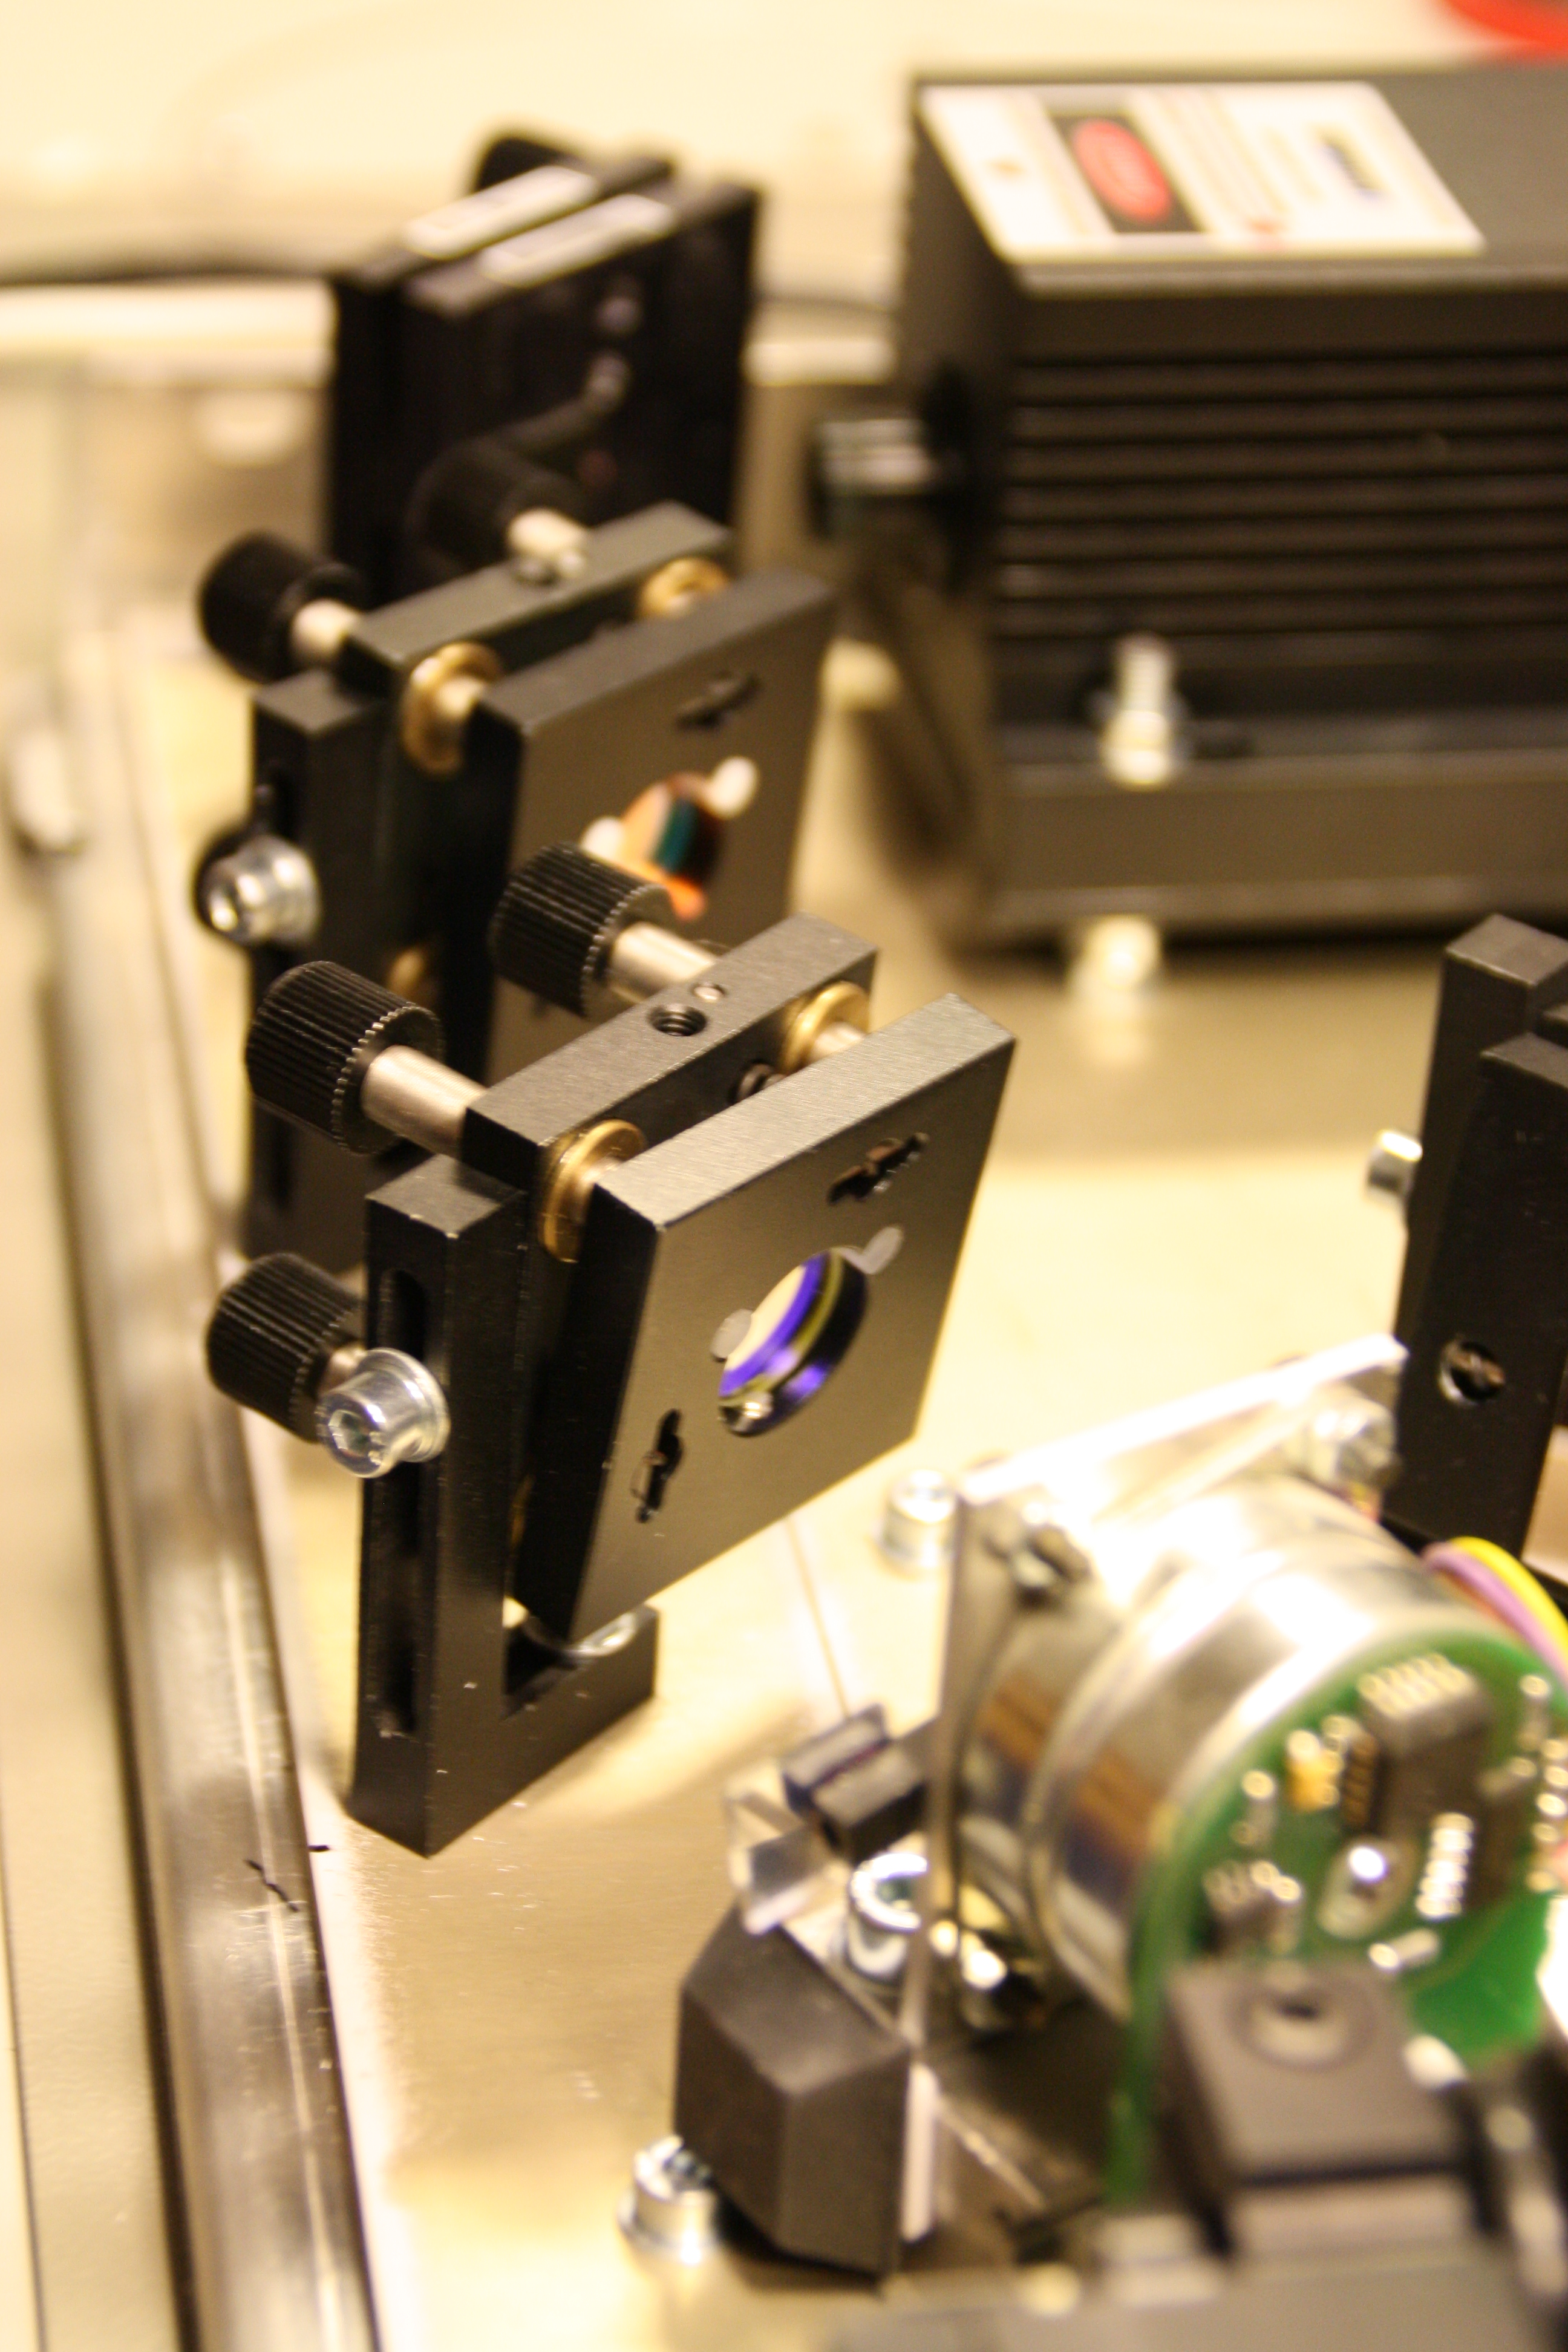
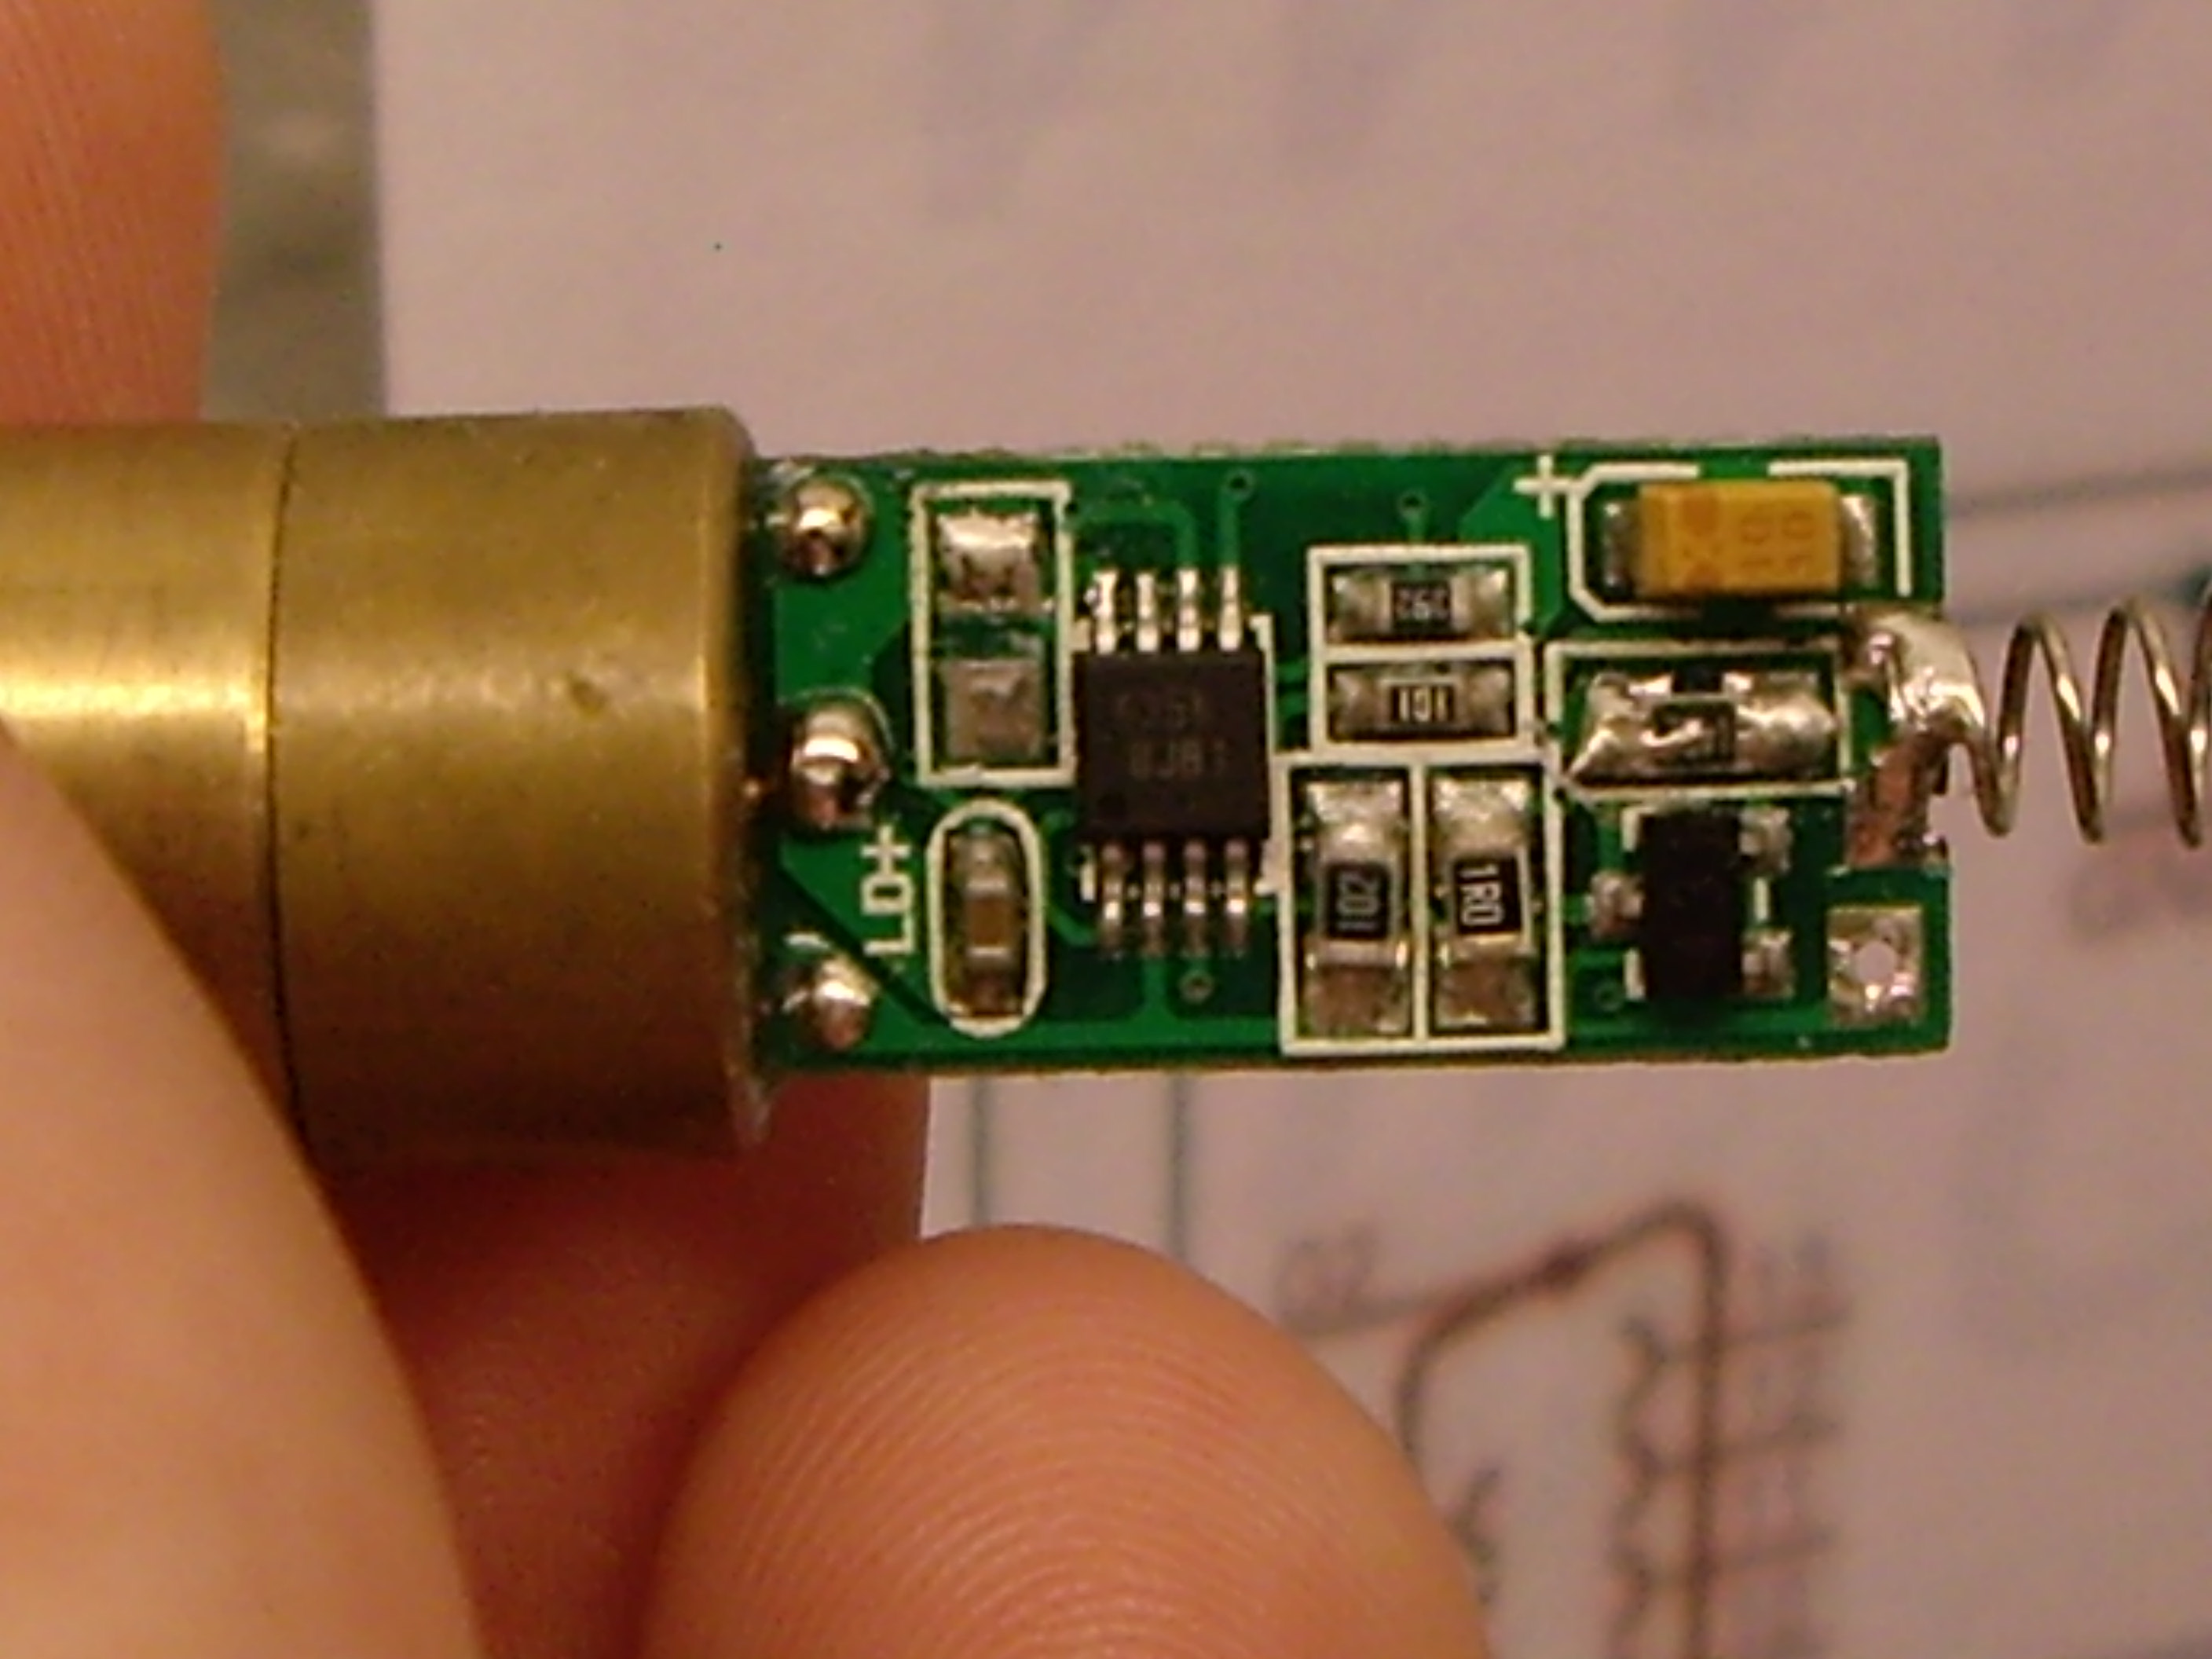
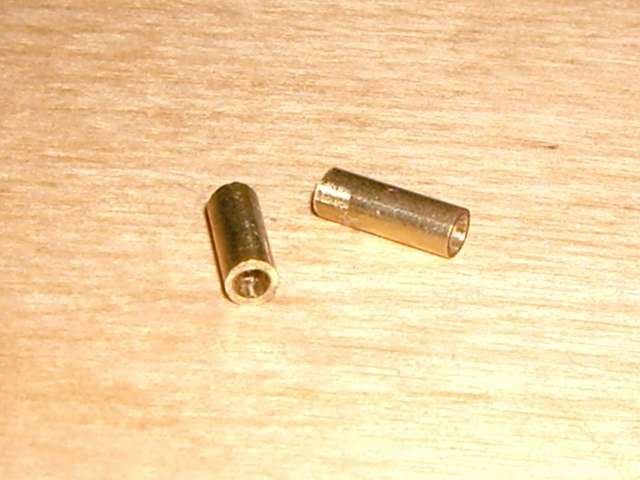
 The blue-ray went out, and in came this little beauty ... ===>> The blue-ray went out, and in came this little beauty ... ===>>
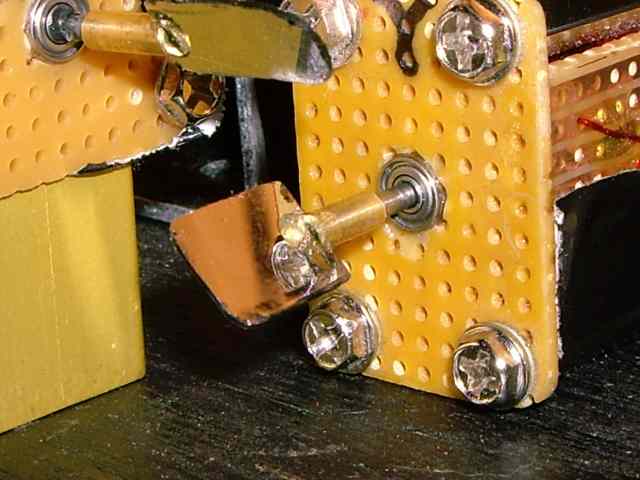
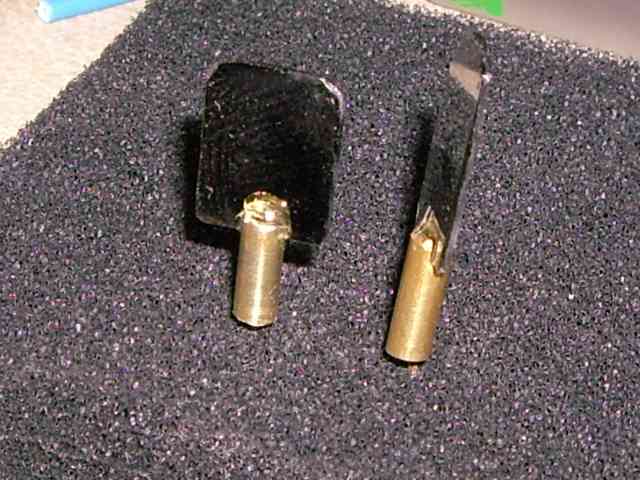
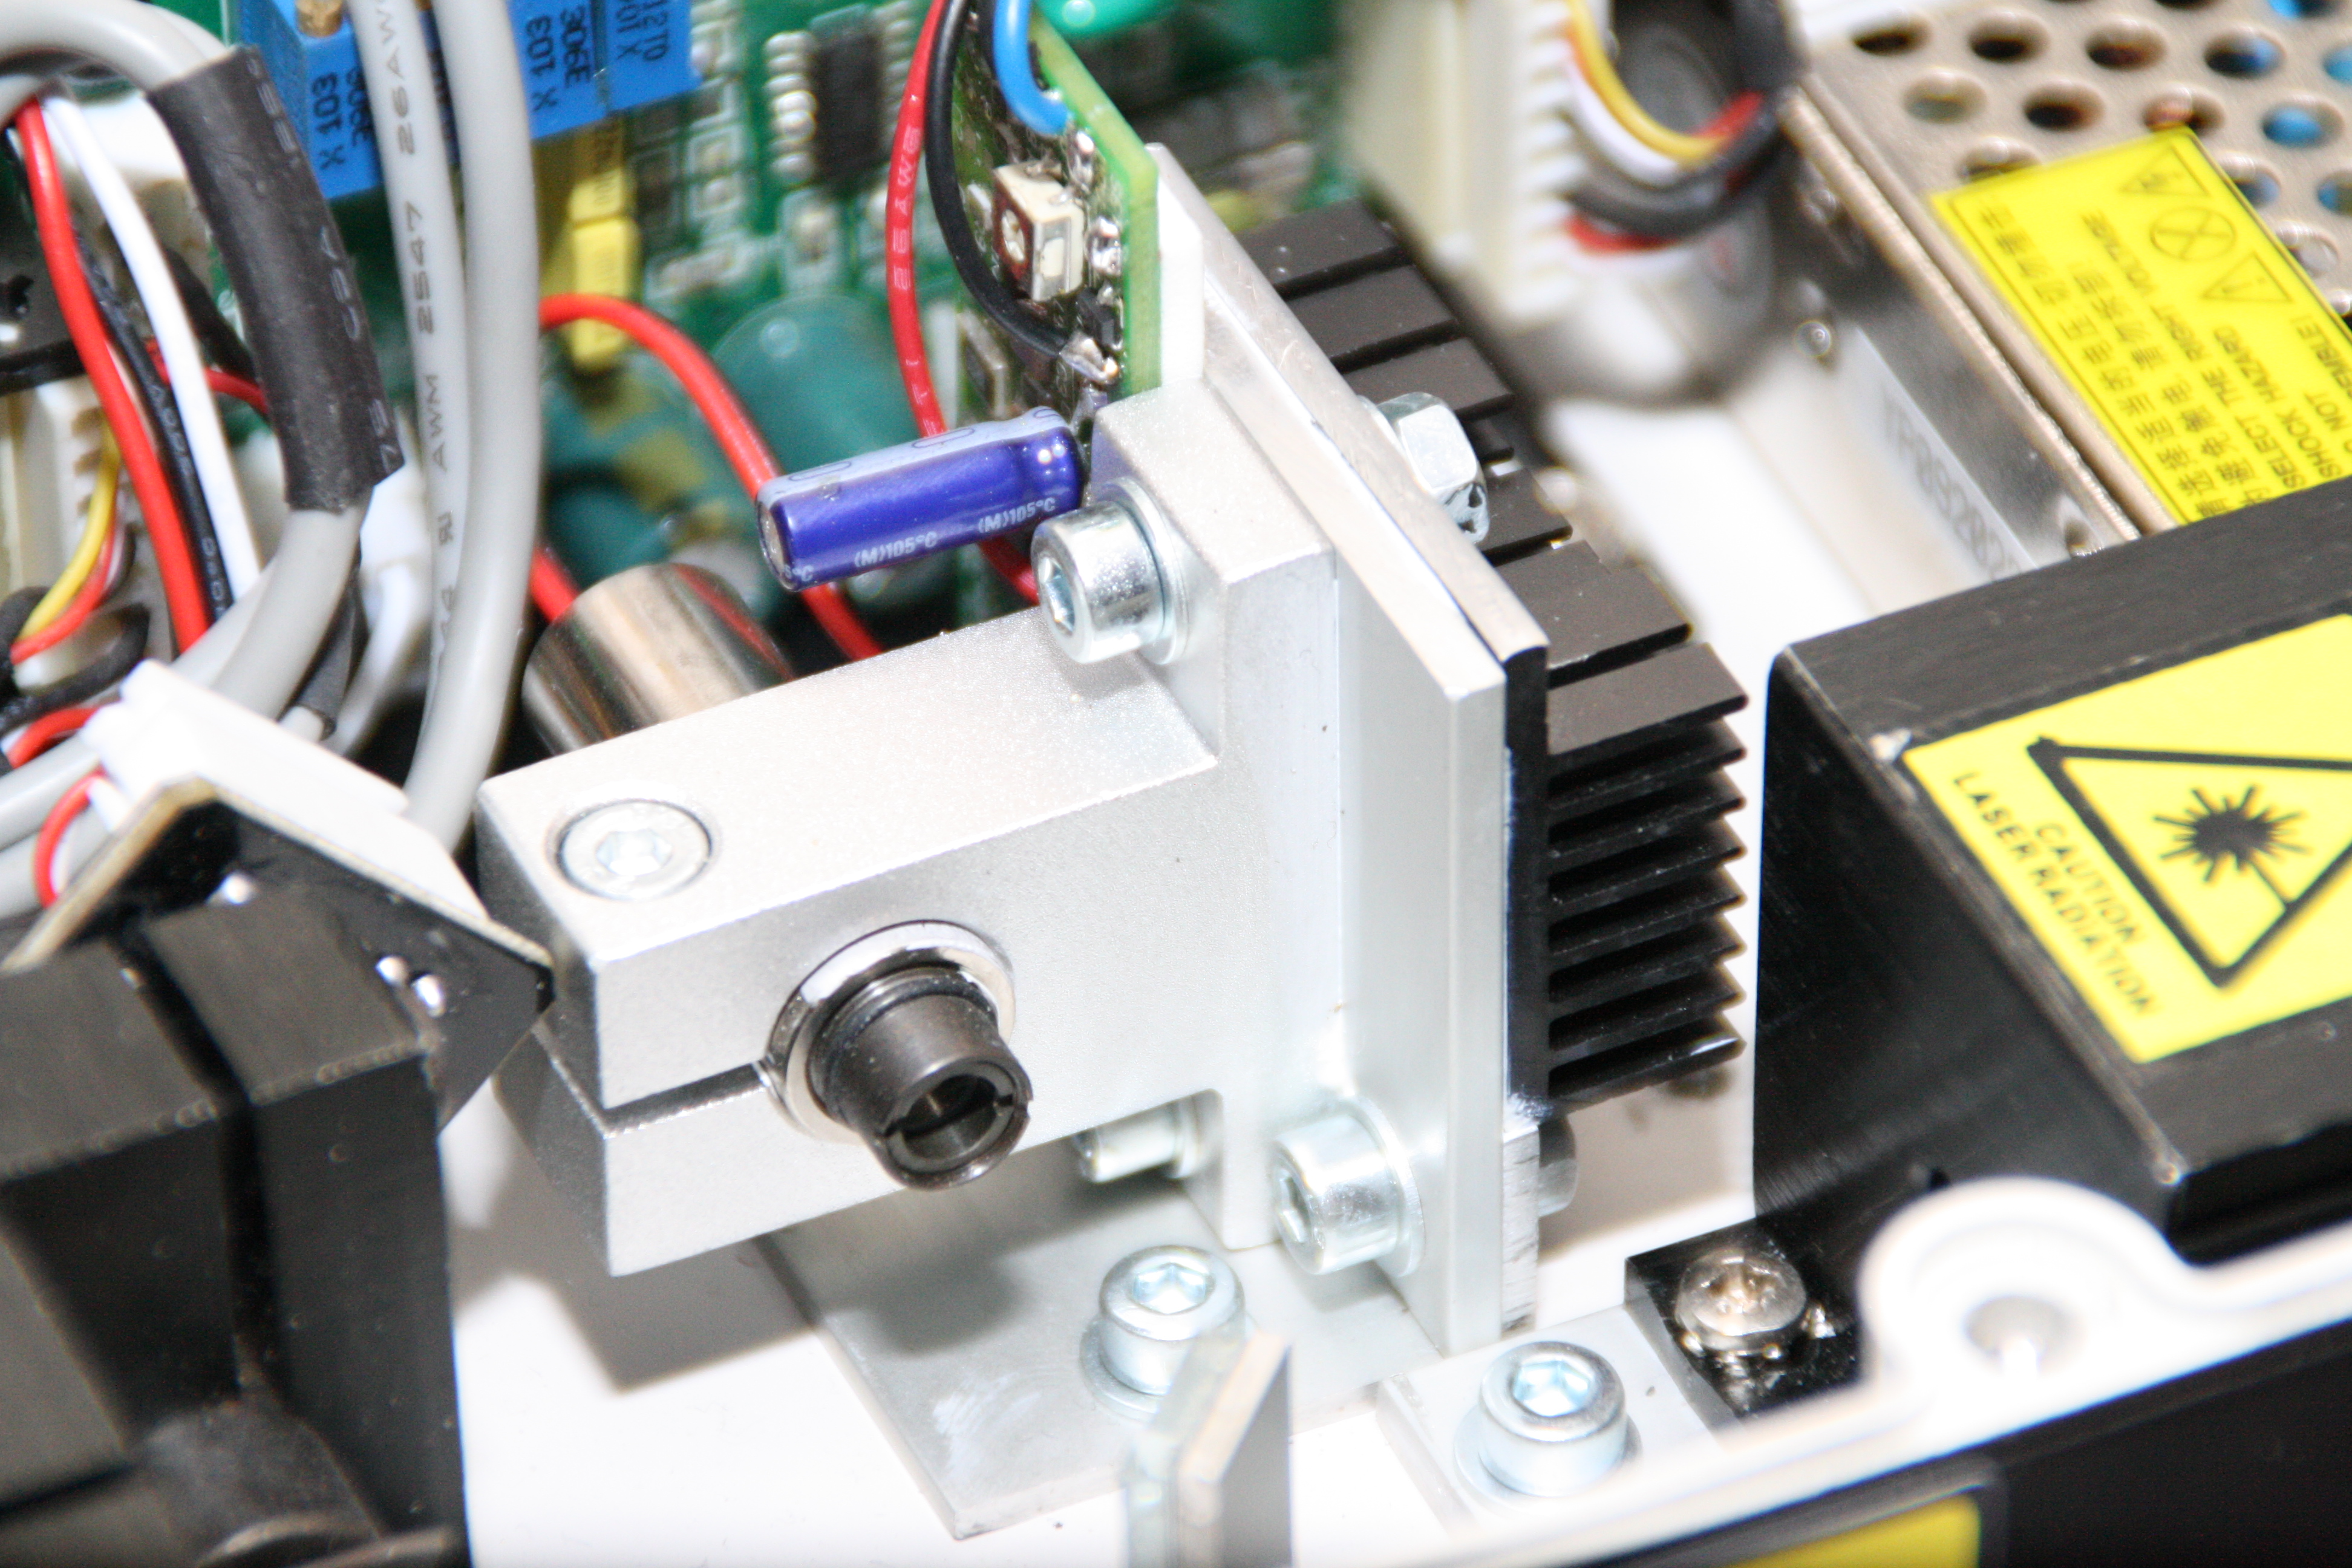
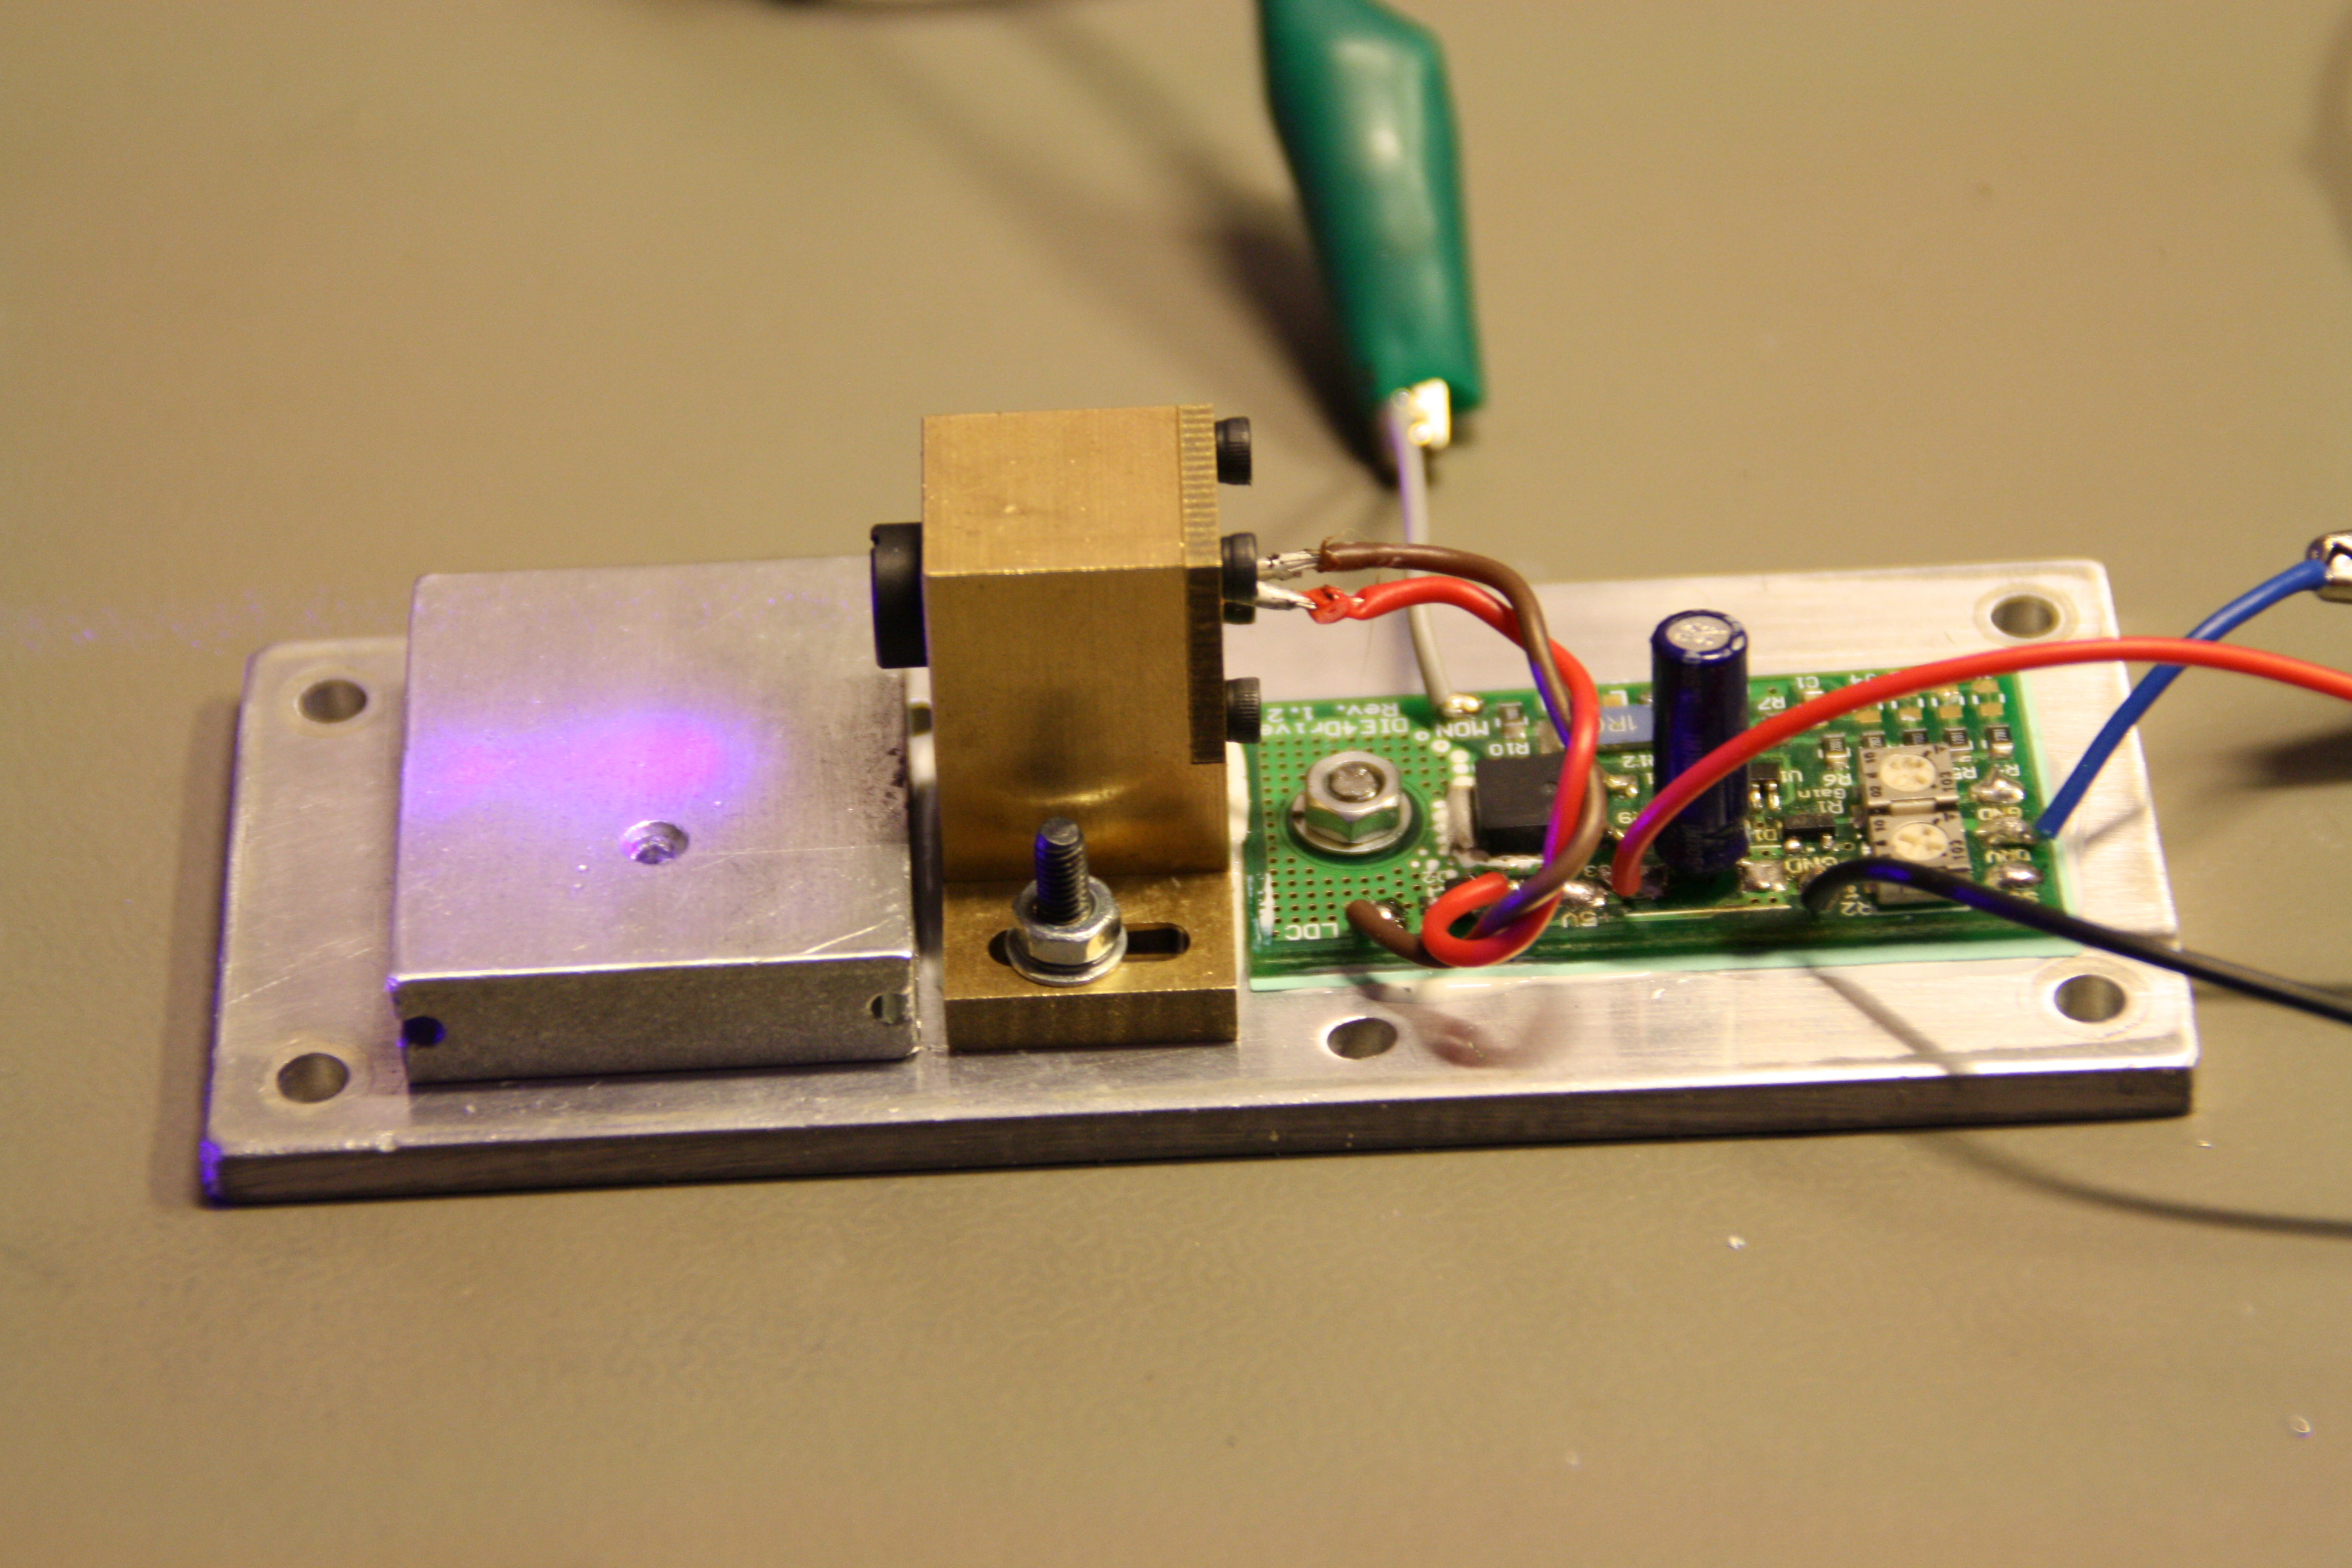
This one makes around 1 Watt of blue light. The lens is an O-like and the copper housing for the diode is from Lasershowparts.com. The setup is prepared for a pair of prisms to shape up and gain the beam specs.
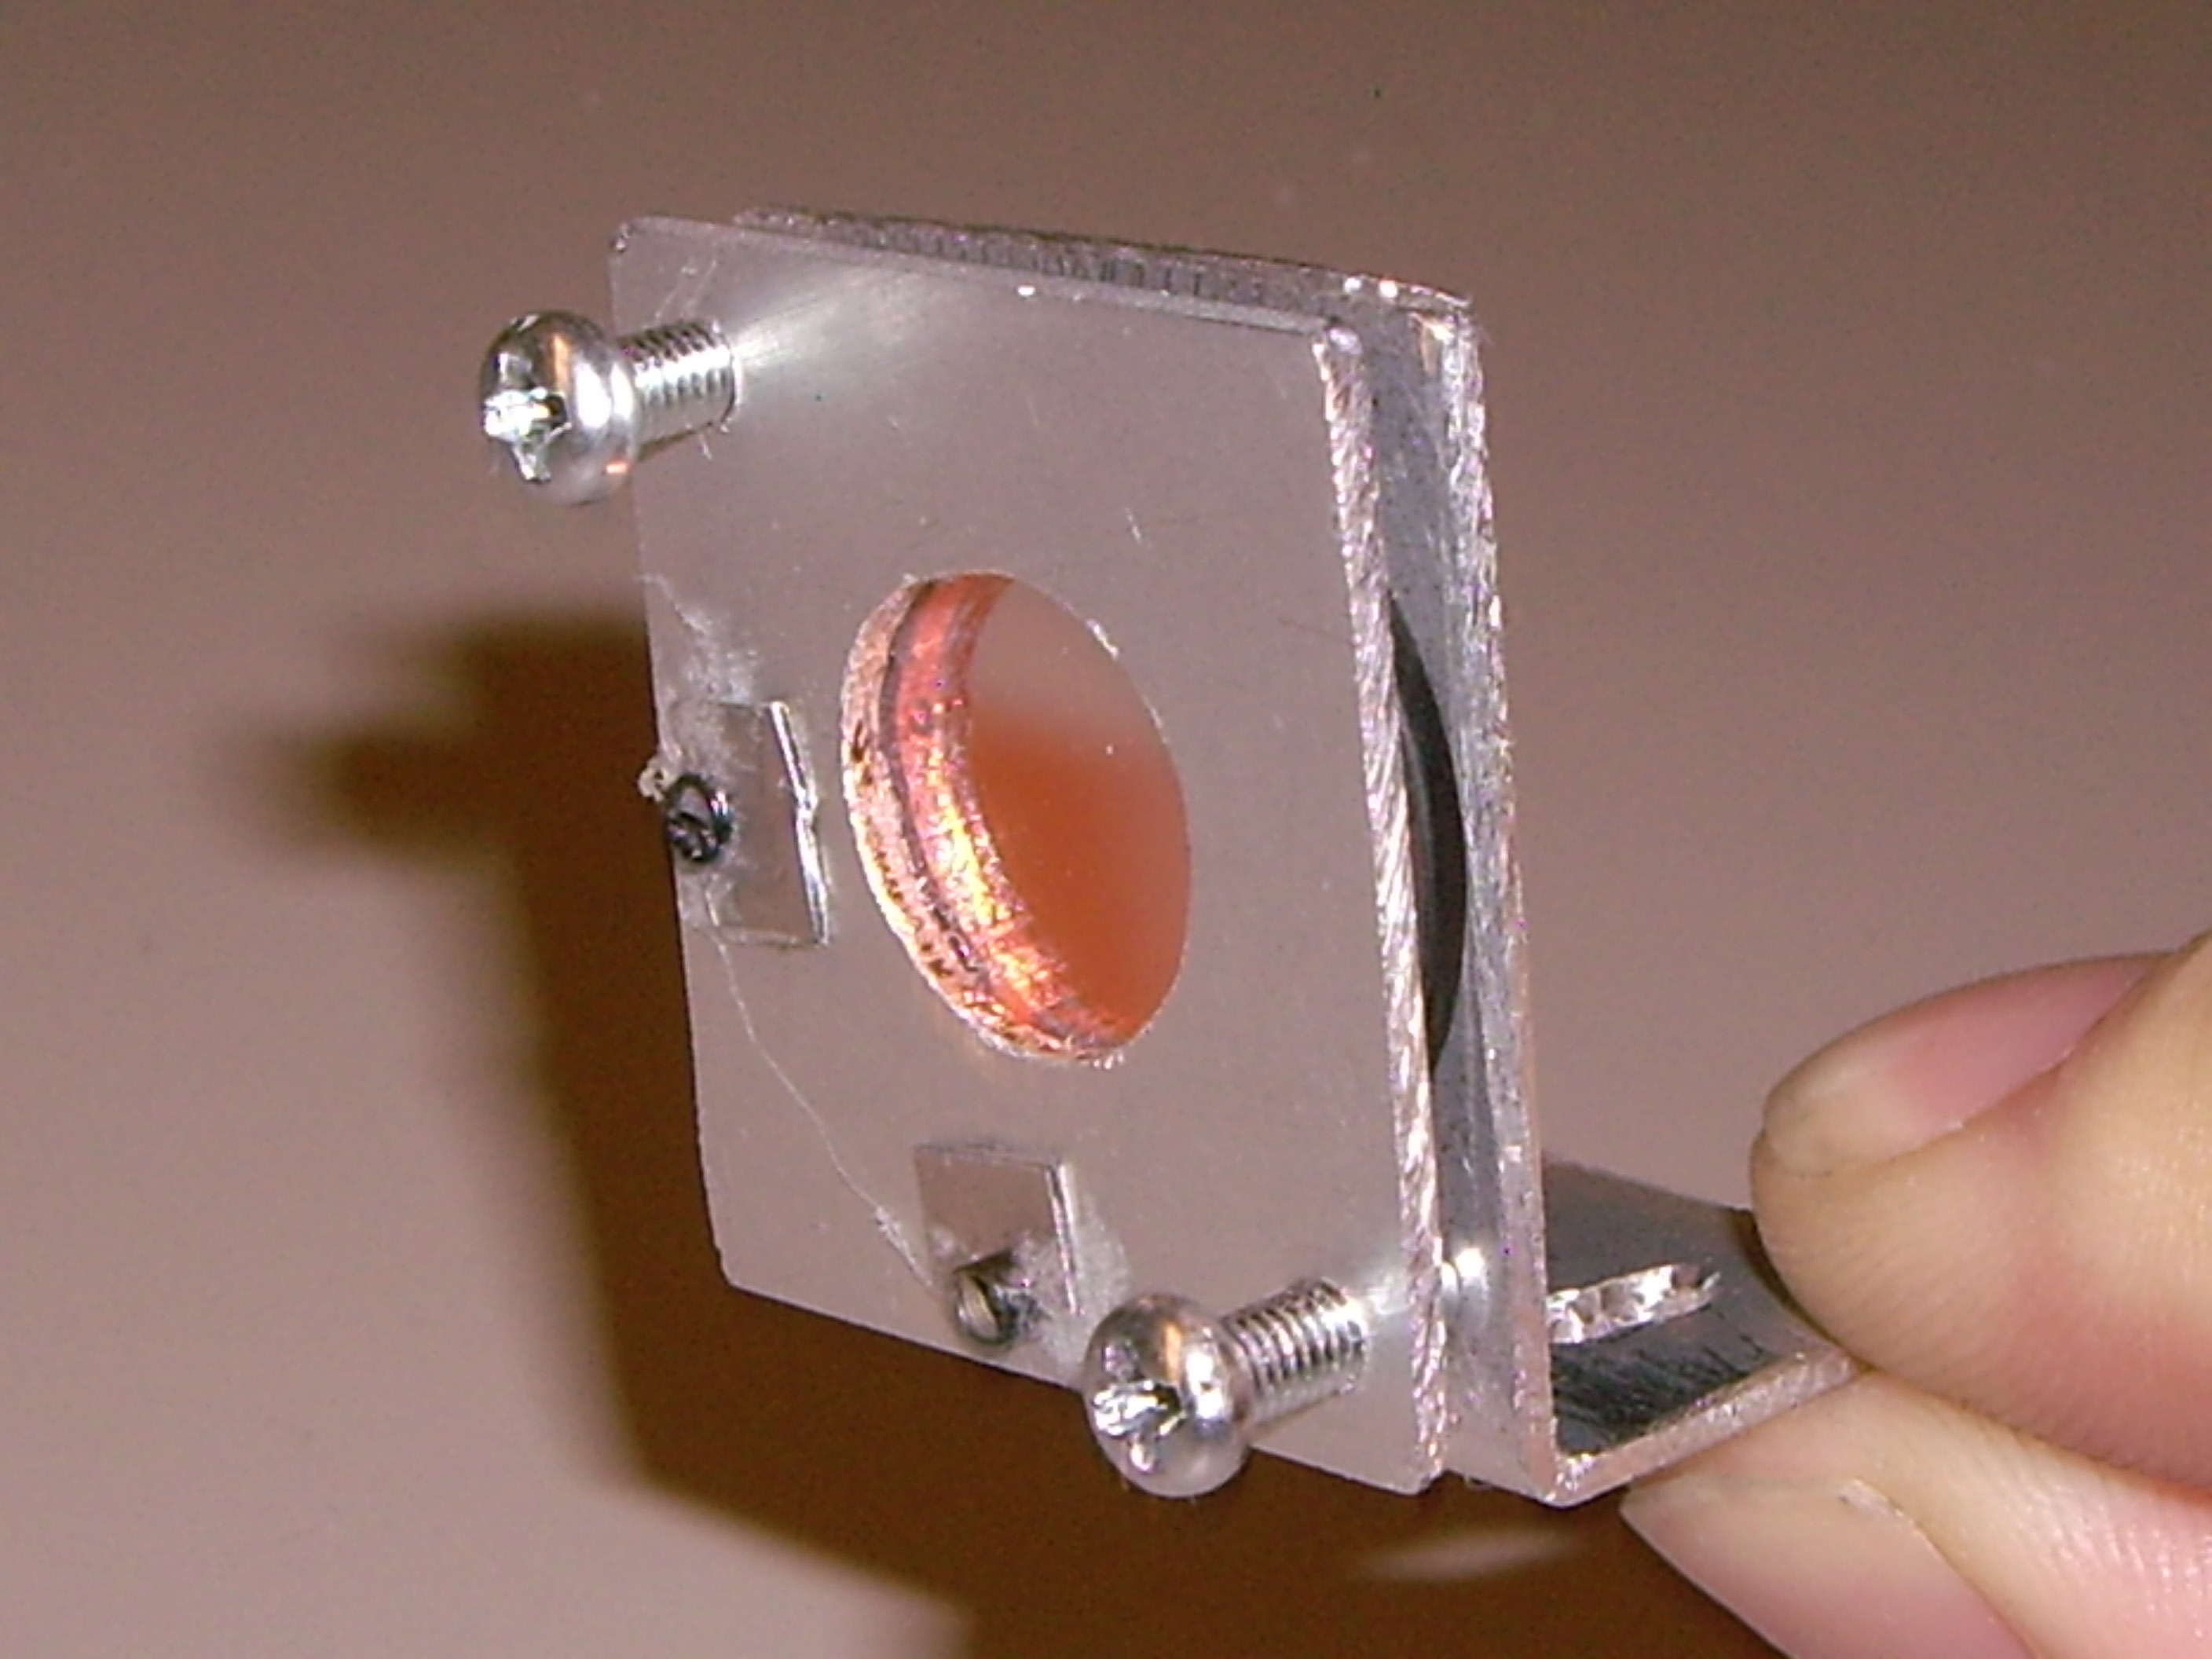
A new filter, refecting 445nm
blue light and passing green and red.
<<====
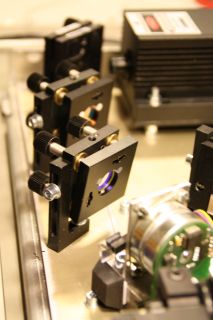
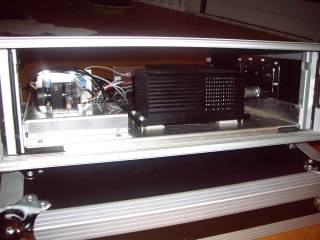
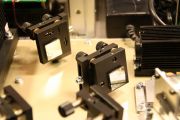 Additional mirrors and adjustable mounts makes the near field adjustment so much easier to do. It also makes it possible to mount all lasers directly on the base plate (for better cooling), without worrying about the hight of the aperture for each laser module.. ===>> Additional mirrors and adjustable mounts makes the near field adjustment so much easier to do. It also makes it possible to mount all lasers directly on the base plate (for better cooling), without worrying about the hight of the aperture for each laser module.. ===>>
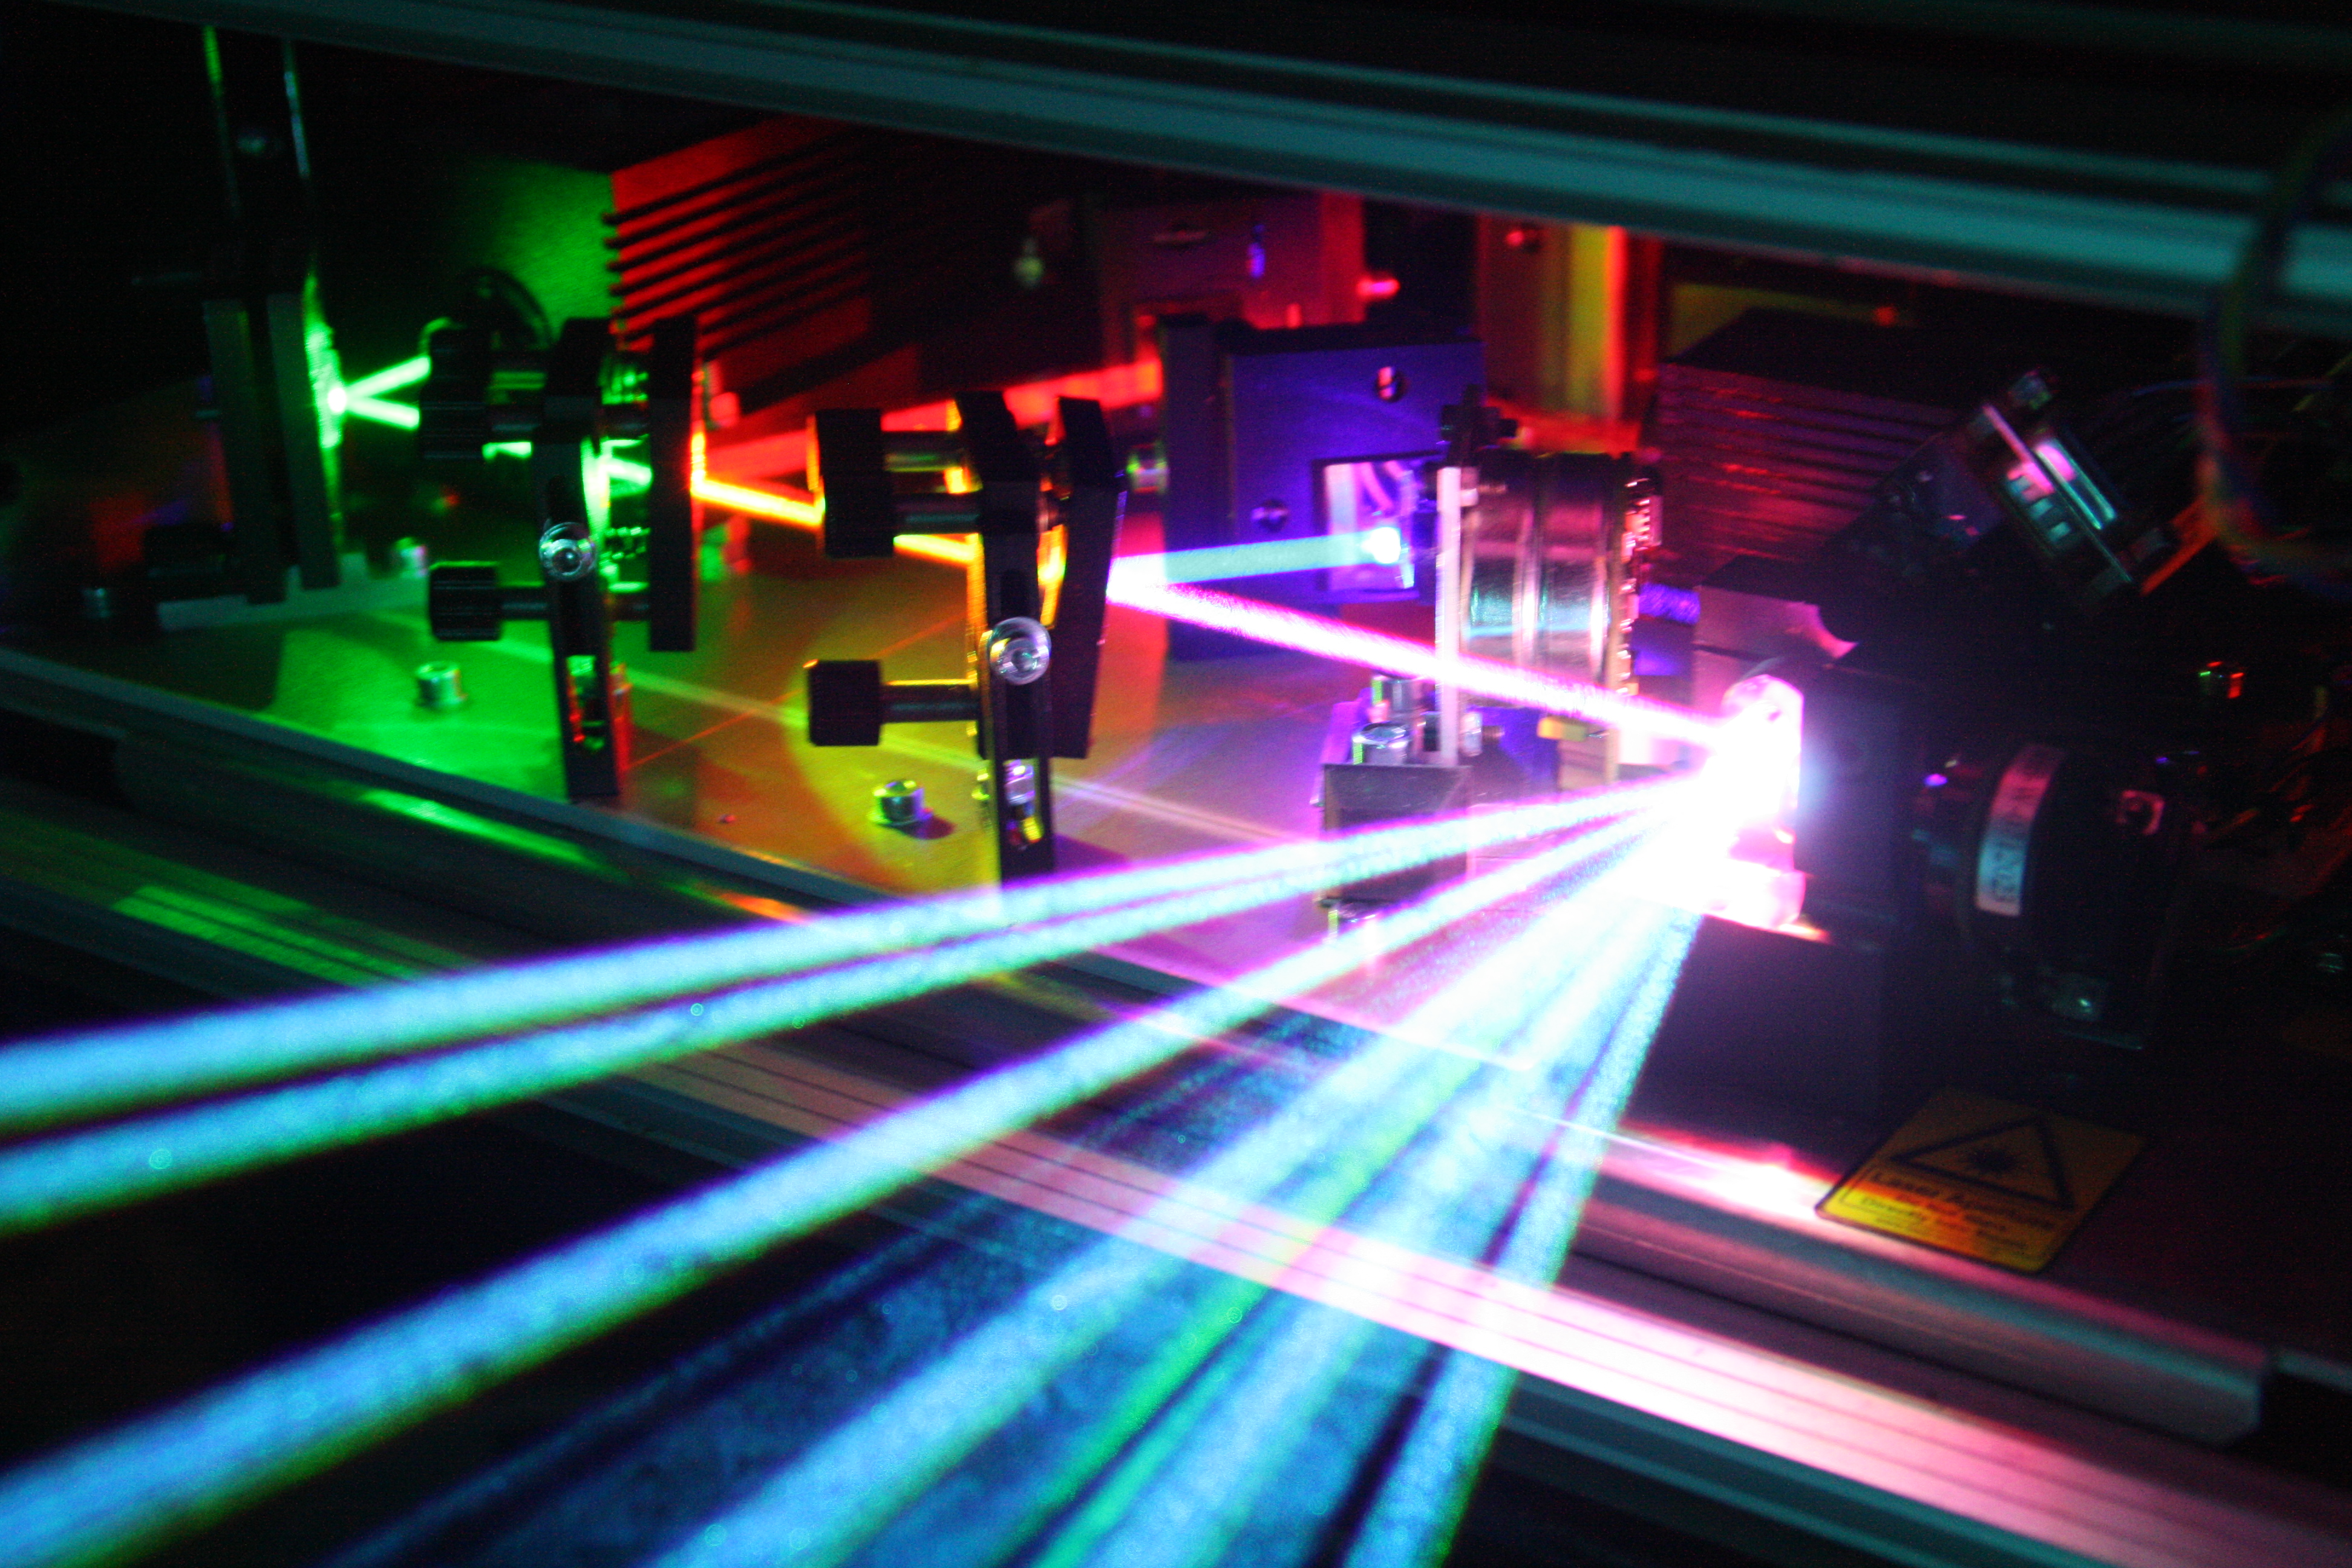
When the laser projector is in "stand by" mode, the blue laser diode is suplied with a bias current to achieve proper modulation response. This produces a faint beam, which is barely visible in dark enviroments.
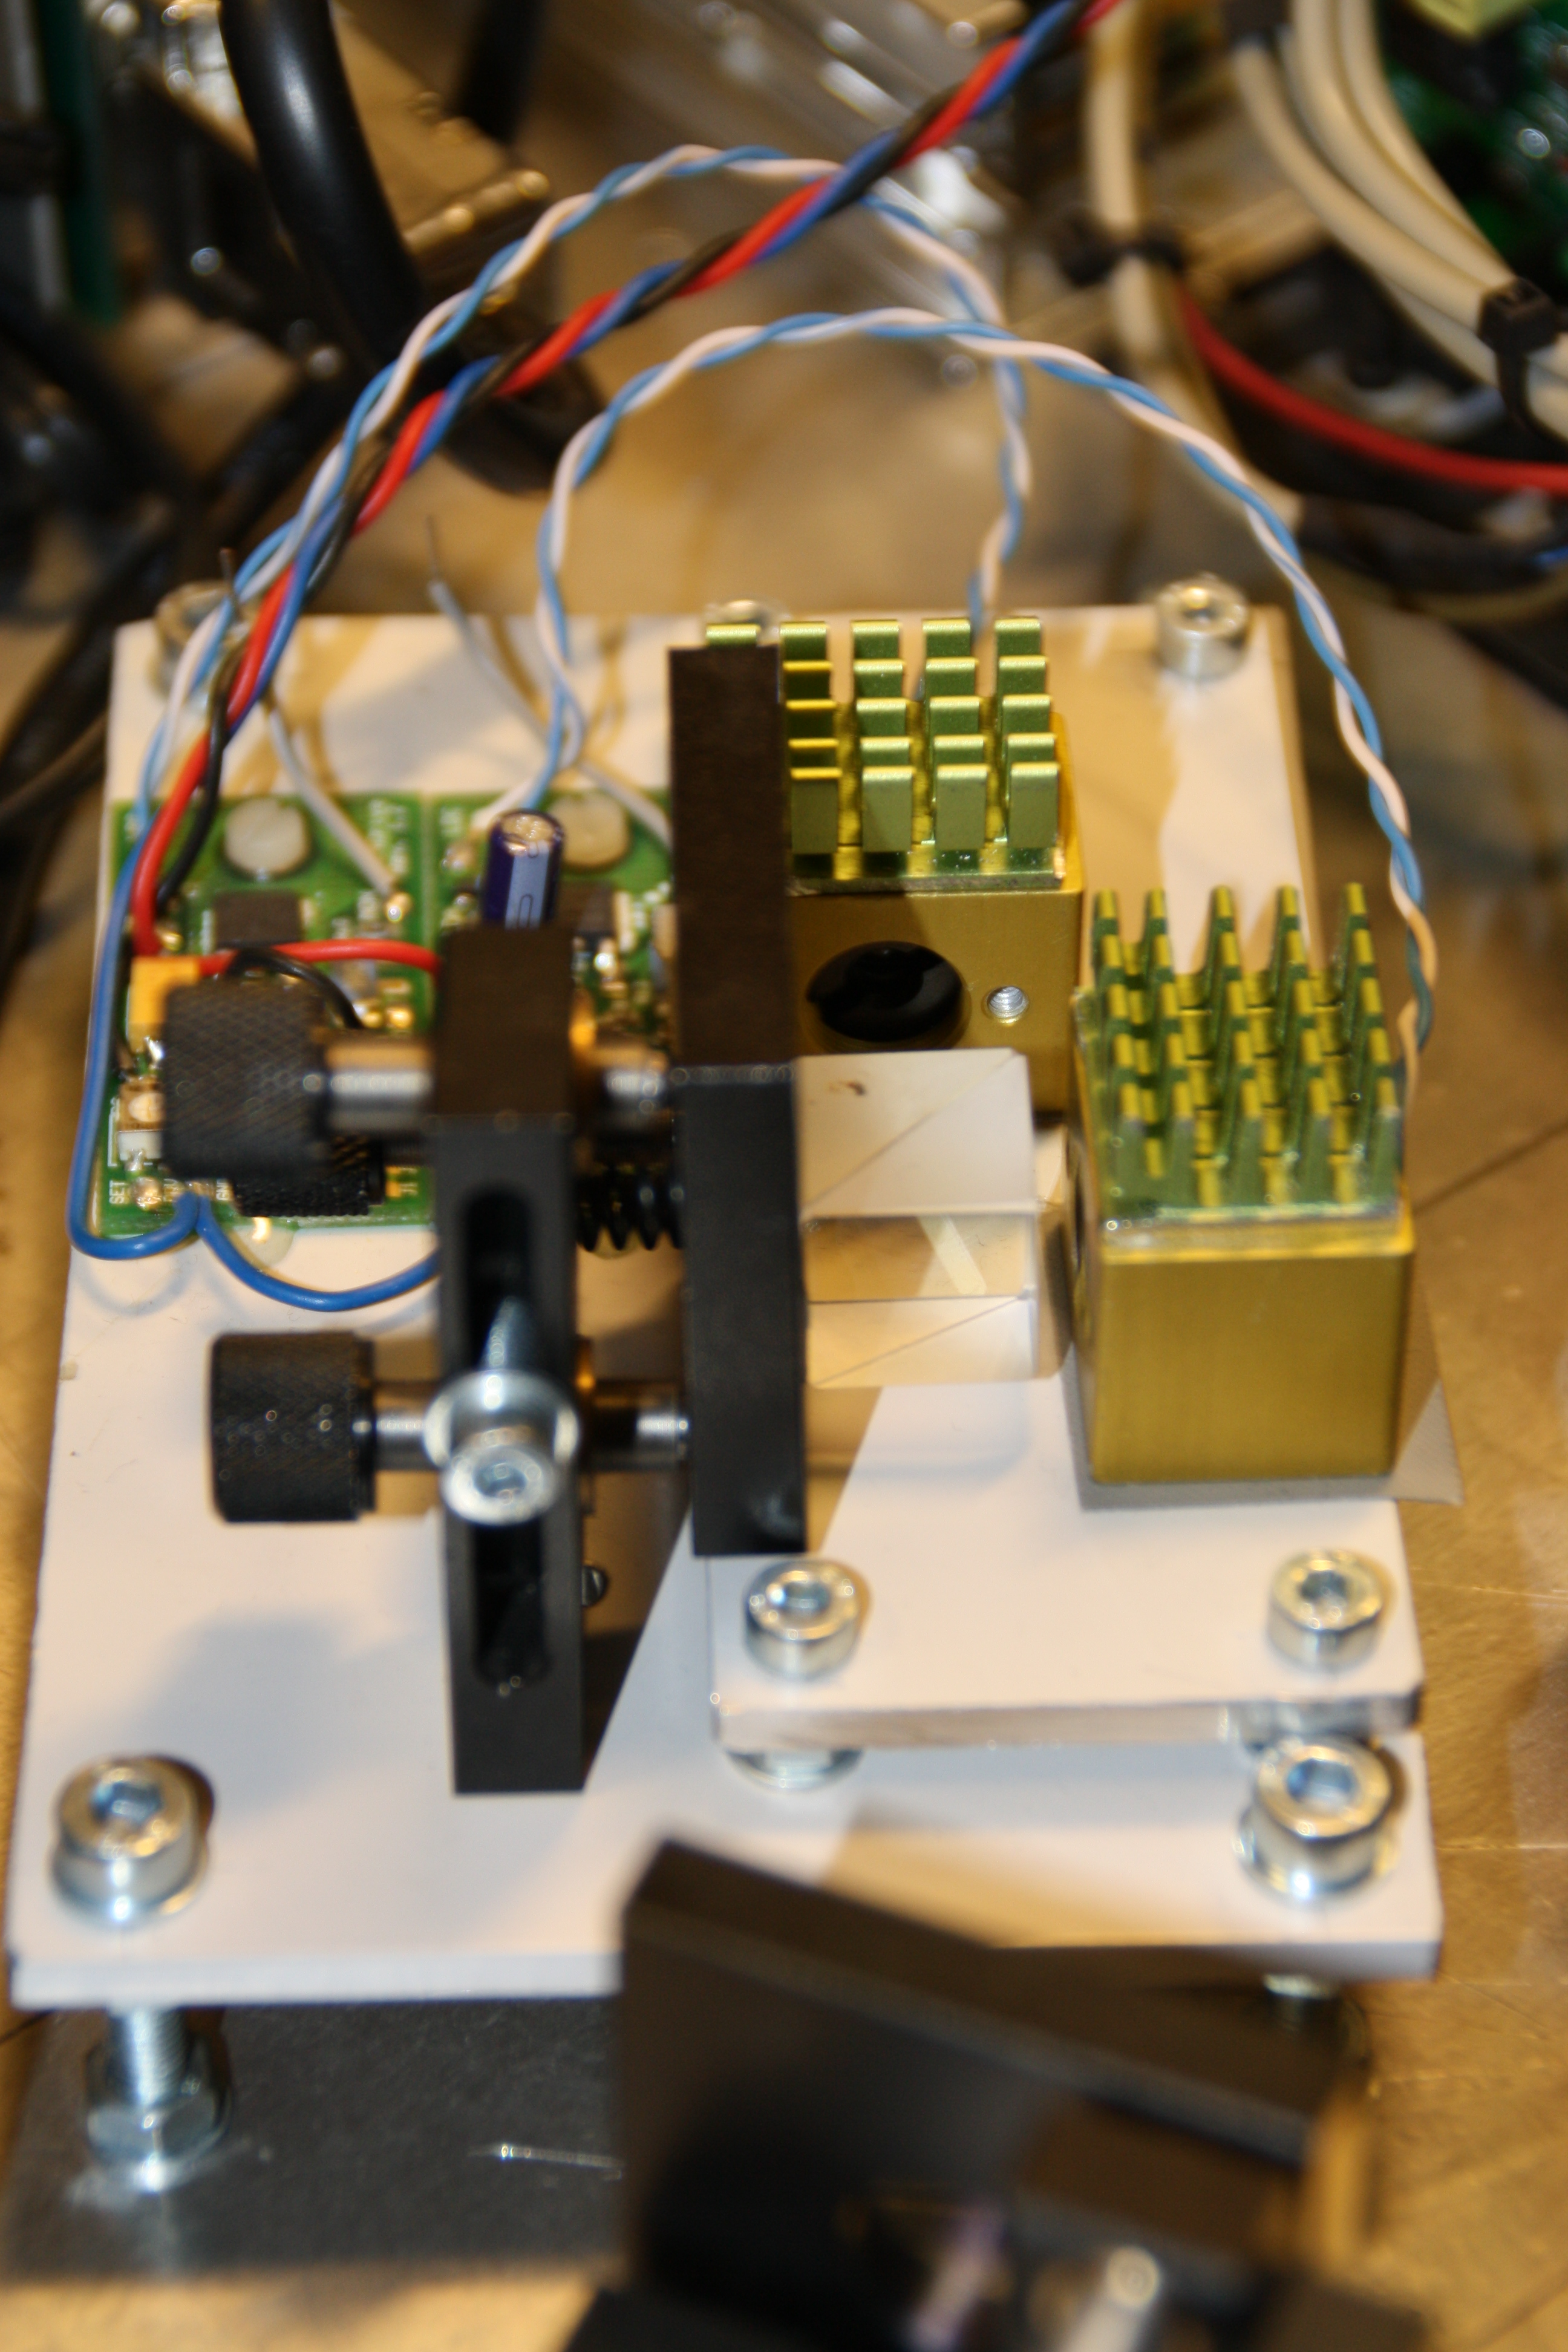
")  So I found my shutter and fitted it next to the galvos. It is controlled automatically by my Pangolin FB3, so when the sexy light is on, the shutter goes up... ==> So I found my shutter and fitted it next to the galvos. It is controlled automatically by my Pangolin FB3, so when the sexy light is on, the shutter goes up... ==>
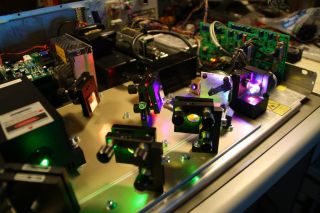
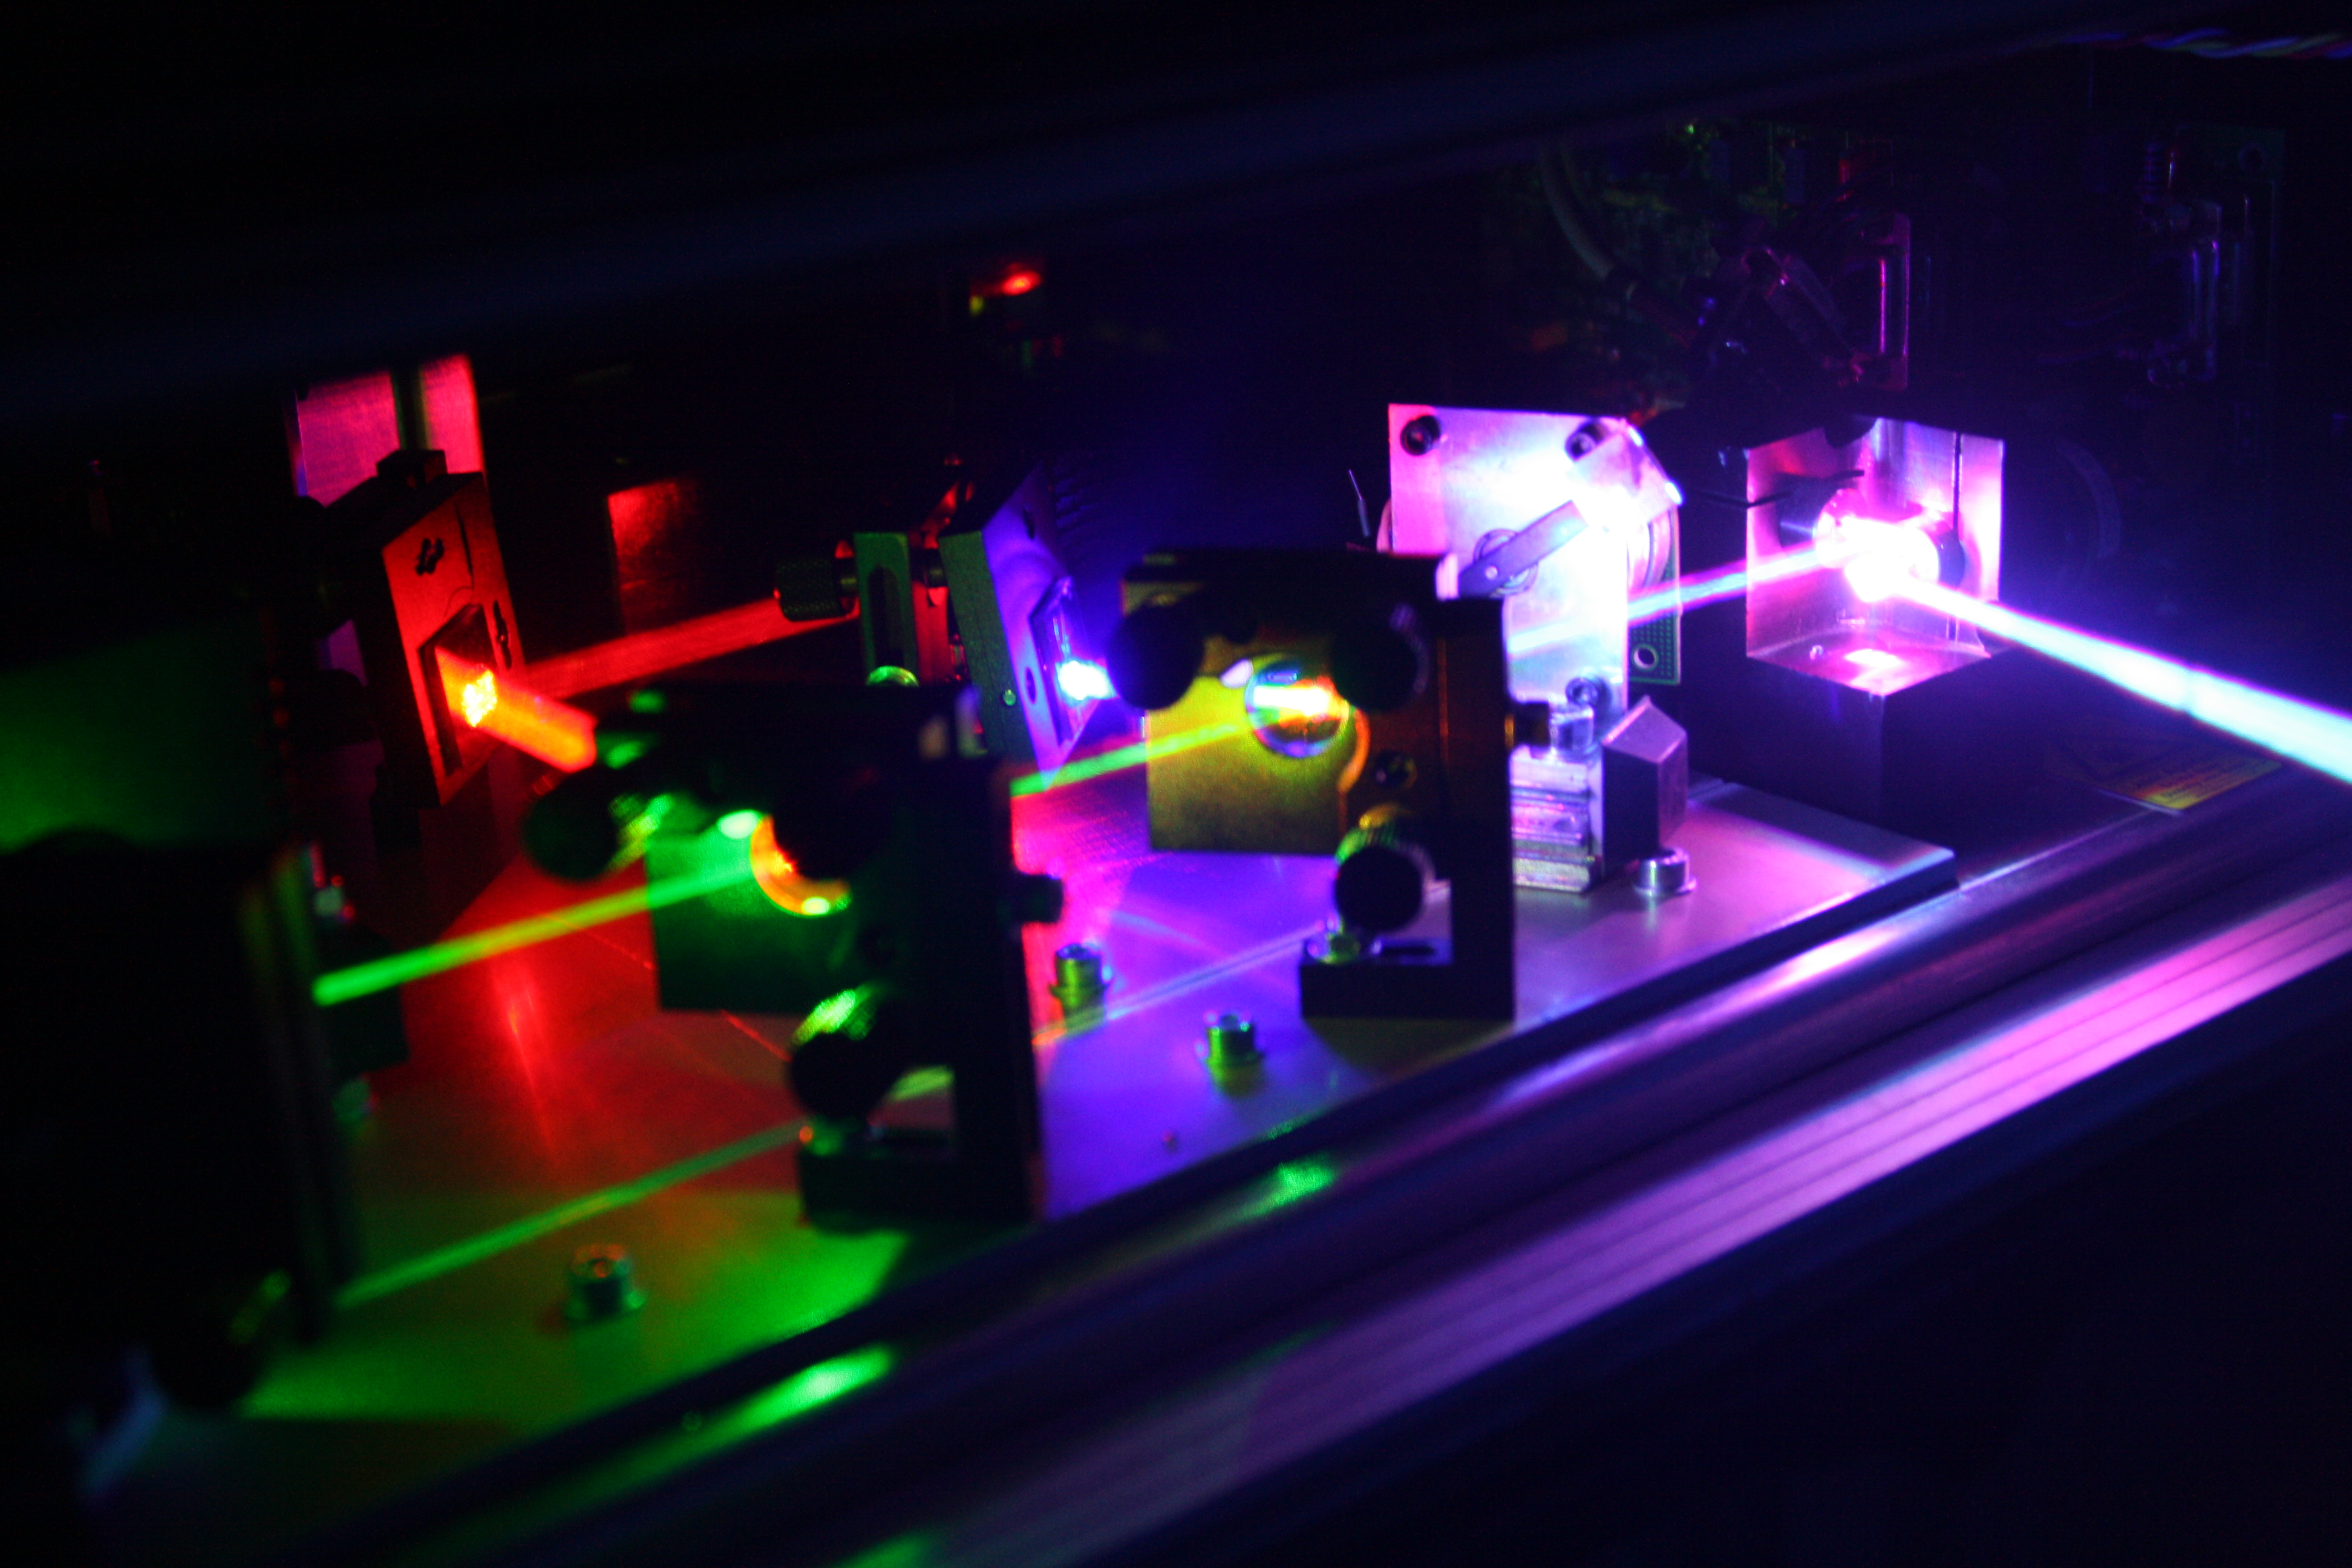
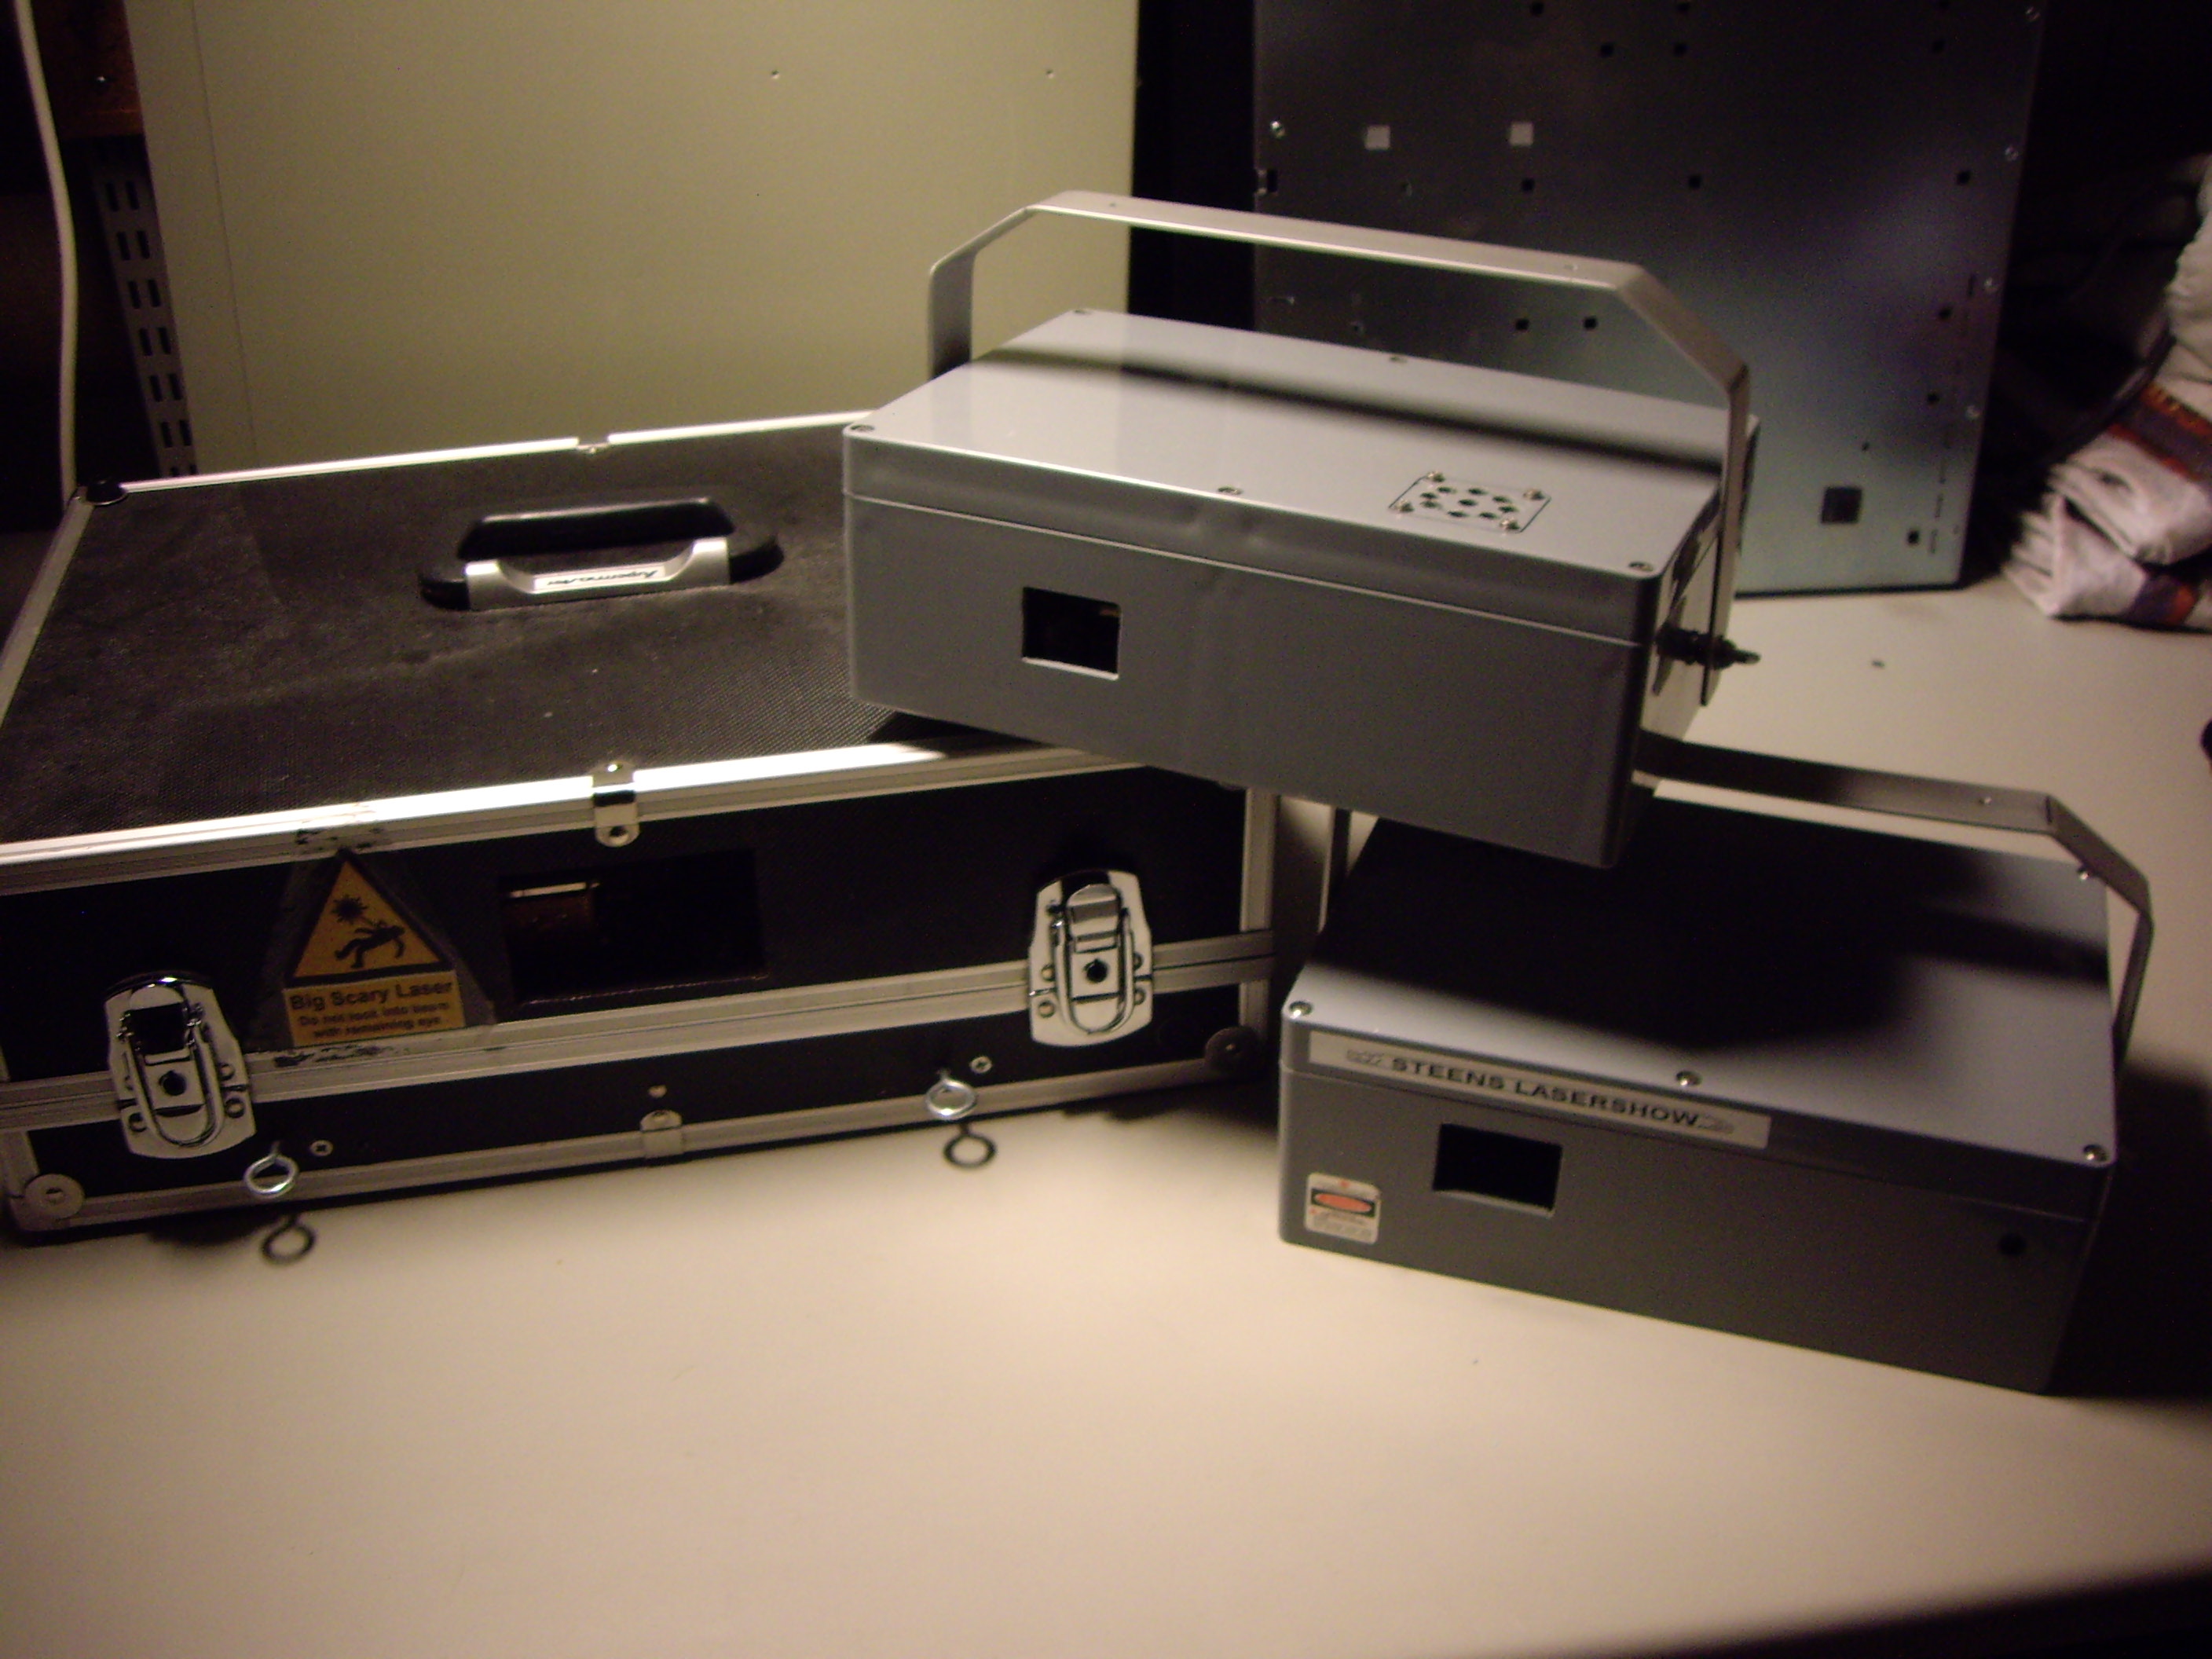
A few more pics - just to show off a little....
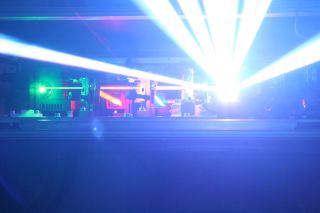 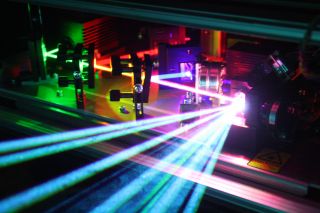
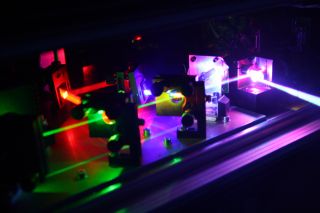 
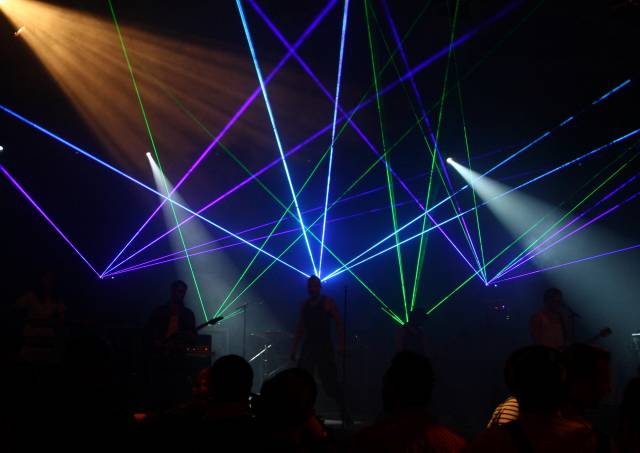
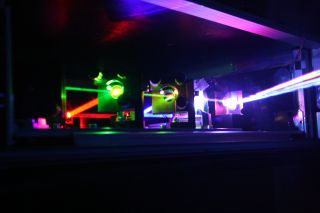
And now finally...... heres a couple of pics from the latest concert gig. A christmas party for the staff working at the "Roskilde Festival". Rammstein Jam is on stage - as well as my new RGB laser projector, my two new GB satellites and my two (boring) "green-only" sats...
Click on the picture to go to the gallery.
19-12-2010. Yet another uptate... number two this year (... what an activity!)
Just want to anounce a third update soon - maybe before new year. This time it's about blue high power lasers, a rebuild of my big laser projector, with a completely new design. Also two of the satellites are upgraded. More about that - and a lot of pictures will come soon. Also a few pictures from the latest job; a christmas party for the Roskilde Festival staff.
Stay tuned....
18-05-2010. I guess it's about time to post an update about what happened the past year.
Here are some headlines from the past year...
- Changes on my RGY scanner, incl. upgrade to RGB
- Dead ˝ Watt green laser - a new ˝ Watt laser head installed in the RGB scanner
- Build two more small satellite laser scanners
- New software: Pangolin Quickshow
- New live setup: one main scanner and four satellites
- New 19" touch screen for easy controling when doing live shows
- Wireless control option
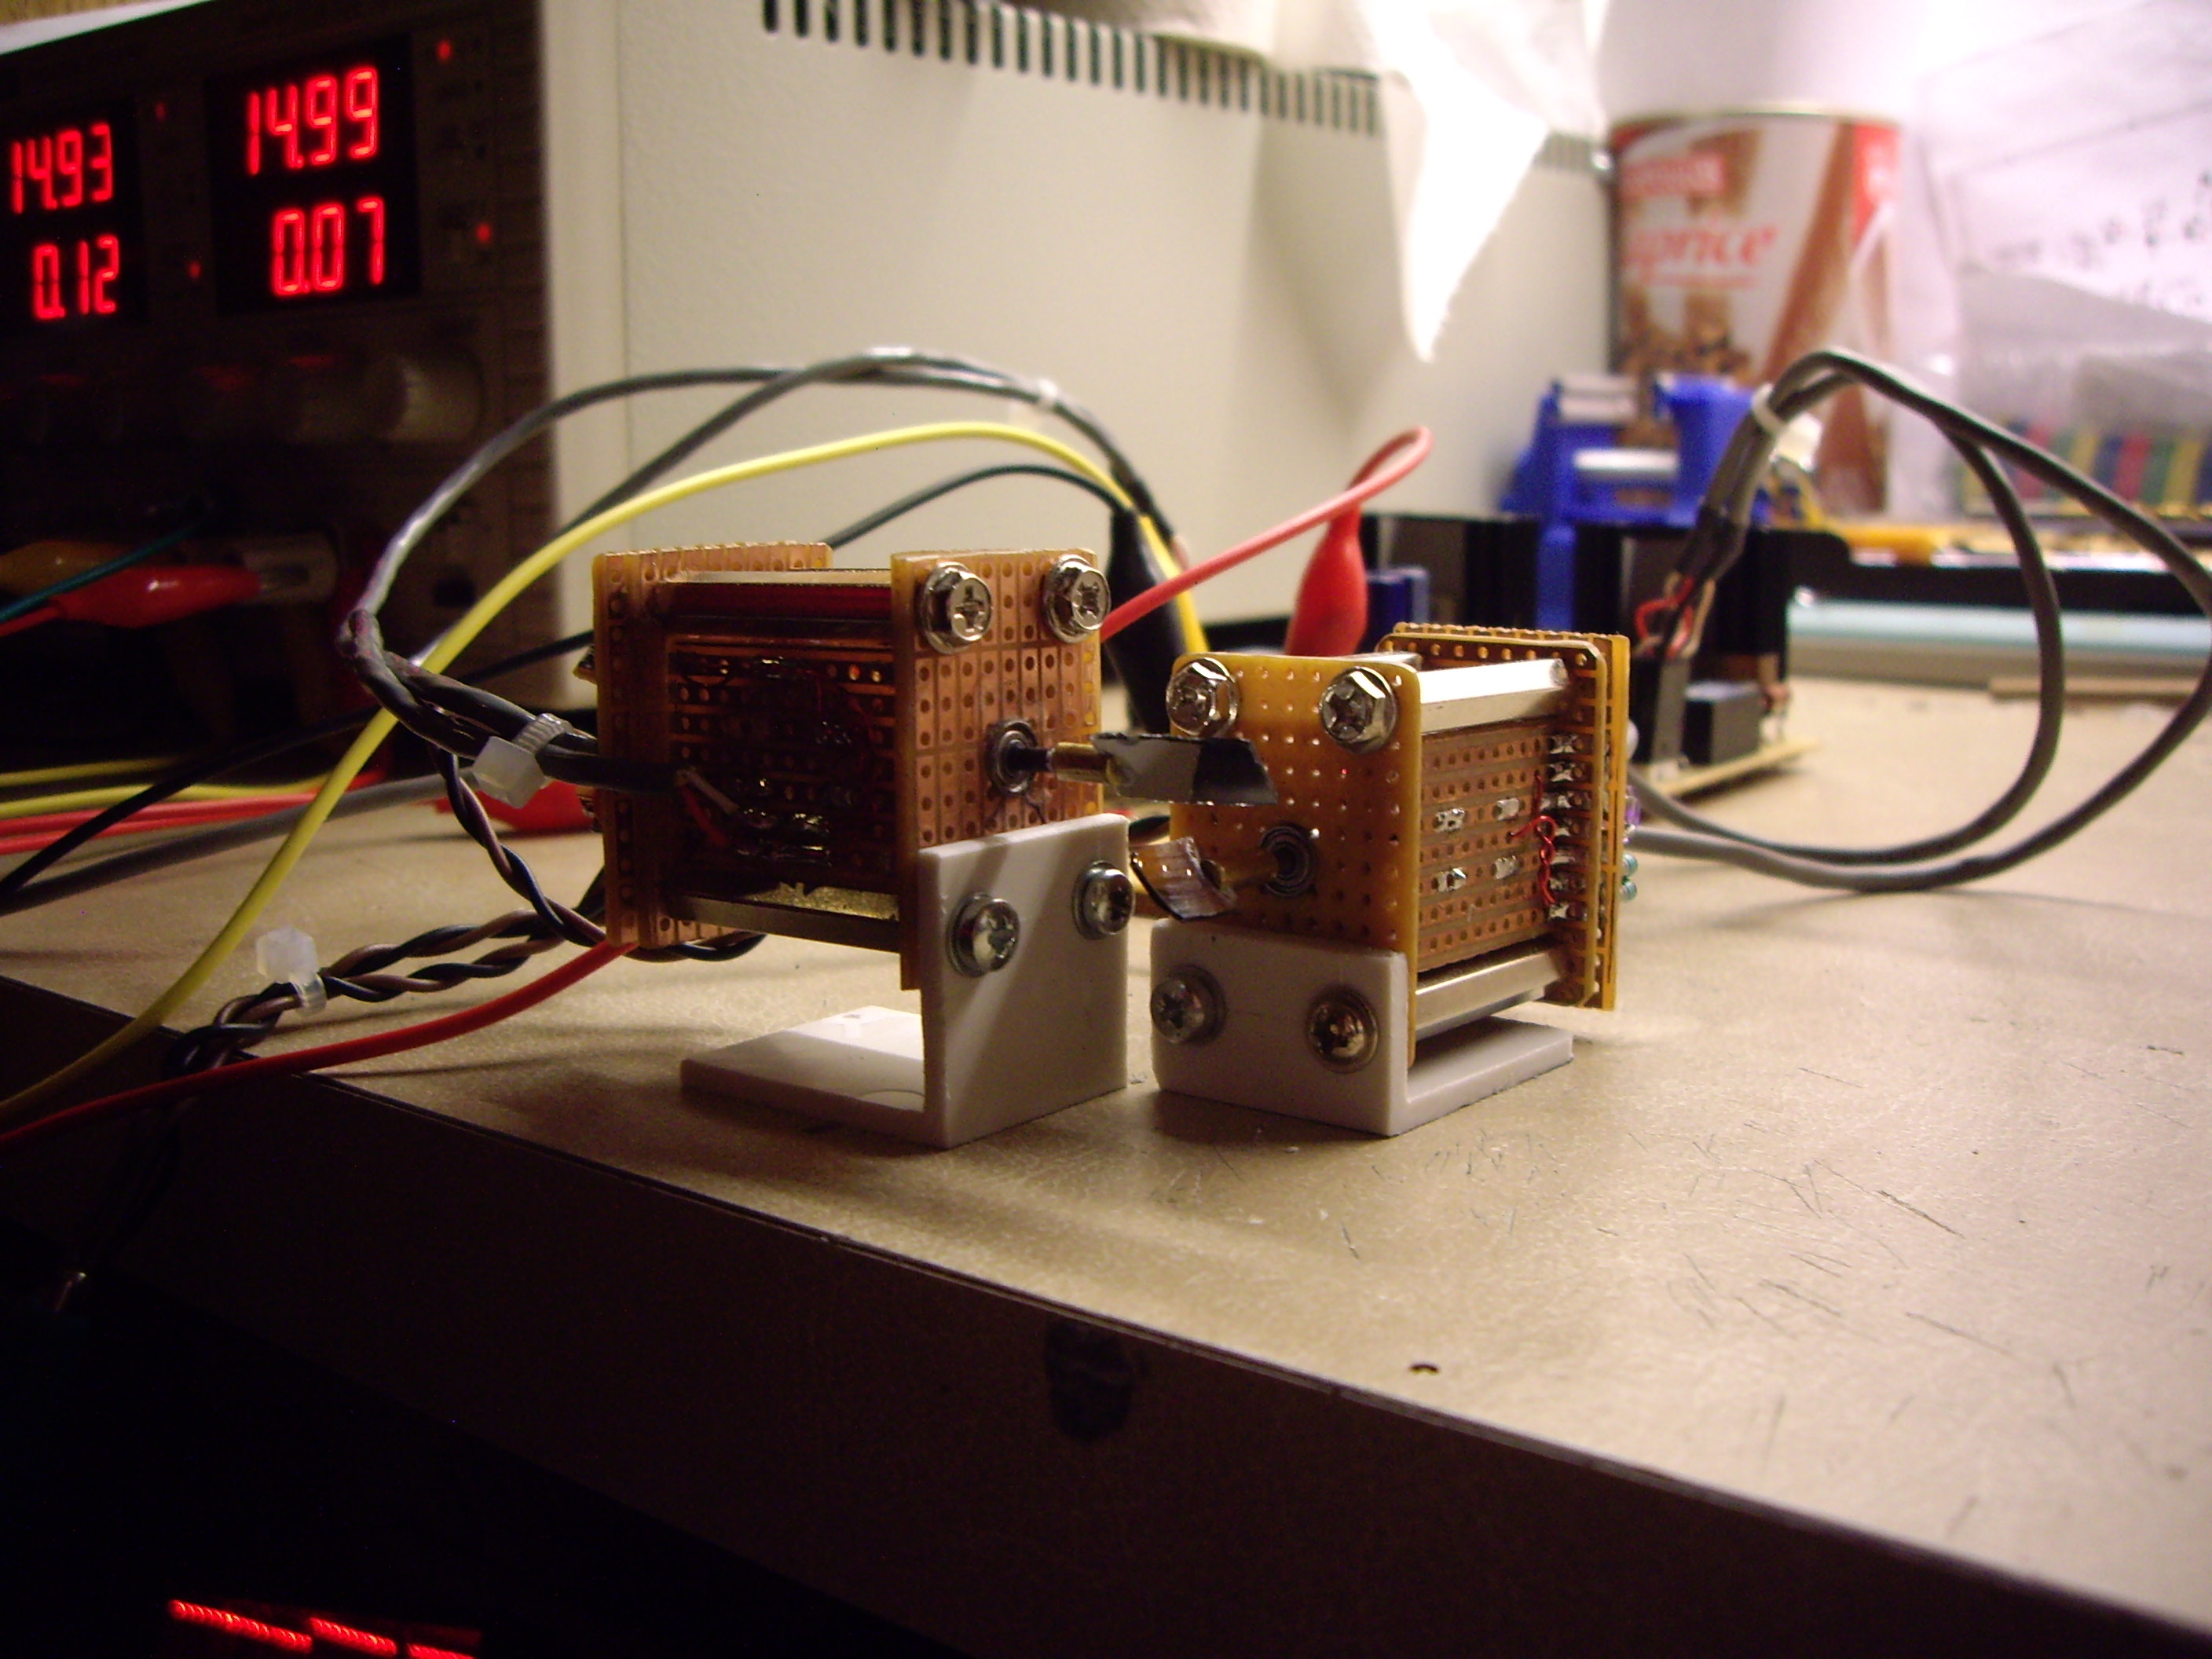
Regarding the changes on my big laser, I build a ~ 400mW dual blu-ray 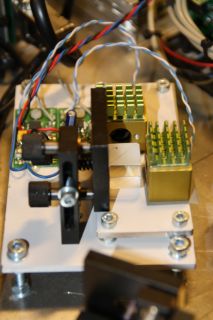 laser module, using two 200mw diodes and a cube from Stanwax Laser (stanwax.co.uk). laser module, using two 200mw diodes and a cube from Stanwax Laser (stanwax.co.uk).
Also the dichros, mirrors and all optical mounts in the scanner were exchanged.

Unfortunately the green laser module past away during a small live show just after christmas. I did know that something was wrong with the module, because over the past year or so, the output has become dimmer and dimmer. I tried to open the laser head, to see what was wrong and found a broken YVO4 x-tal. But replacing it, and specialy aligning it afterwards, is very difficult in that type of laser. So now I've got a brand new, and surely much better one. A Laser-Wave module from Stanwax Laser.
A gallery has been added to the "Home" page, and can also be accessed (in fullscreen) here: http://lasergal1.steenmeisner.eu/#home
26-02-2009. New pictures has been added from the latest joband also "Backstage Pics". For the first time I used 5 laser scanners on the stage. More details will follow soon...
24-08-2008. Four month has passed since last update. That doesn't mean that nothing has happened on the laser front. I've had two concert jobs - and not least, a lot of preparations for them.
The first job was at "Skanderborg Festival", where "Rammstein Jam" played Saturday night. There would be only a maximum of 45 minutes to do the setup. And due to the fact that front of house was almost 50 meters from the stage, I was forced to think in wireless lanes. It would be impossible to drag the cables between front of house and the stage. The easiest solution I could find, was VNC. A lovely small desktop remote program, which I have used many times before, in another context. Since I normally use two laptops to control the laser show (one per channel), a VNC solution require four laptops. Two on stage, and two at the front of house. For the two on stage, I built a flightcase with room for da-converter, FB3 controler, a wireless router and, of course, the two laptops with laser 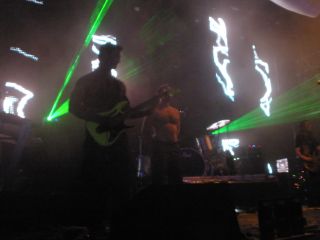 software installed. In this way, it was easy and quick to set up. Only mains power input and 2 x ILDA output to take care of. At the other end, FOH, I only needed a wireless router and two laptops with VNC installed. I did a lot of testing at home, and found no stability problems at all. software installed. In this way, it was easy and quick to set up. Only mains power input and 2 x ILDA output to take care of. At the other end, FOH, I only needed a wireless router and two laptops with VNC installed. I did a lot of testing at home, and found no stability problems at all.
The concert went completely smoothly. Of course my lasers could well have been ten times stronger for outdoor use like this. But I think it looked nice anyway (Actually I was a bit surpriced). And together with over 40 moving heads, a great LED wall behind the band, fireworks and lots of other effects, this job was the biggest and most exiting gig I have ever been a part of. Photos and videos are soon avialable.
The second concert was in a large tent. On the other hand, it was early in the evening, that means daylight here in the summer. But there was plenty of power in the lasers to handle the case. The setup was the same as the week before, and it worked great. Pics and maybe a small video will come soon.
30-04-2008.Pictures from the last concert has now been added to "the pictures".
I had another job last weekend at a disco party. Big setup - pictures here
18-04-2008. Well, look at this...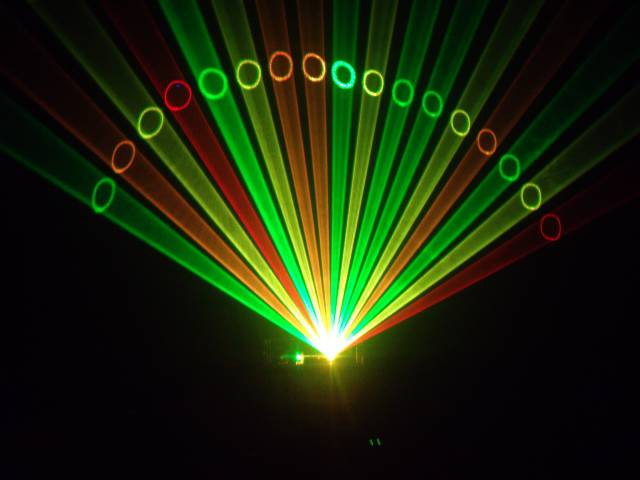
This is how it looks now, after I got the red laser back from repair, and put it in the big laser scanner.
Here is another one from the work bench...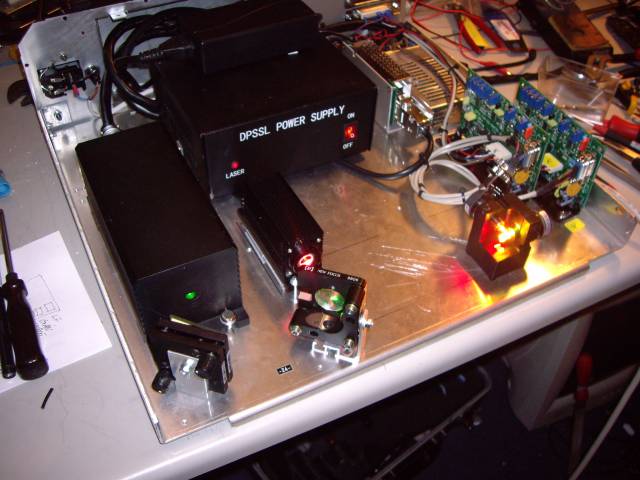
Still space enough for a blue to come. But that will be LATER. Now I'm really happy with the setup. My first "high power" RGY scanner.
But even more has happended in my basement. I've build two new satellite-scanners. They are almost configured the same way. One contains a ScanEco30 galvo set, and the other has a ScanPro20. Both of them has a green 150mW laser diode.
Last weekend I had another concert job, where I used the three new scanners. Some pictures will soon be uploaded to "The Pictures" section.
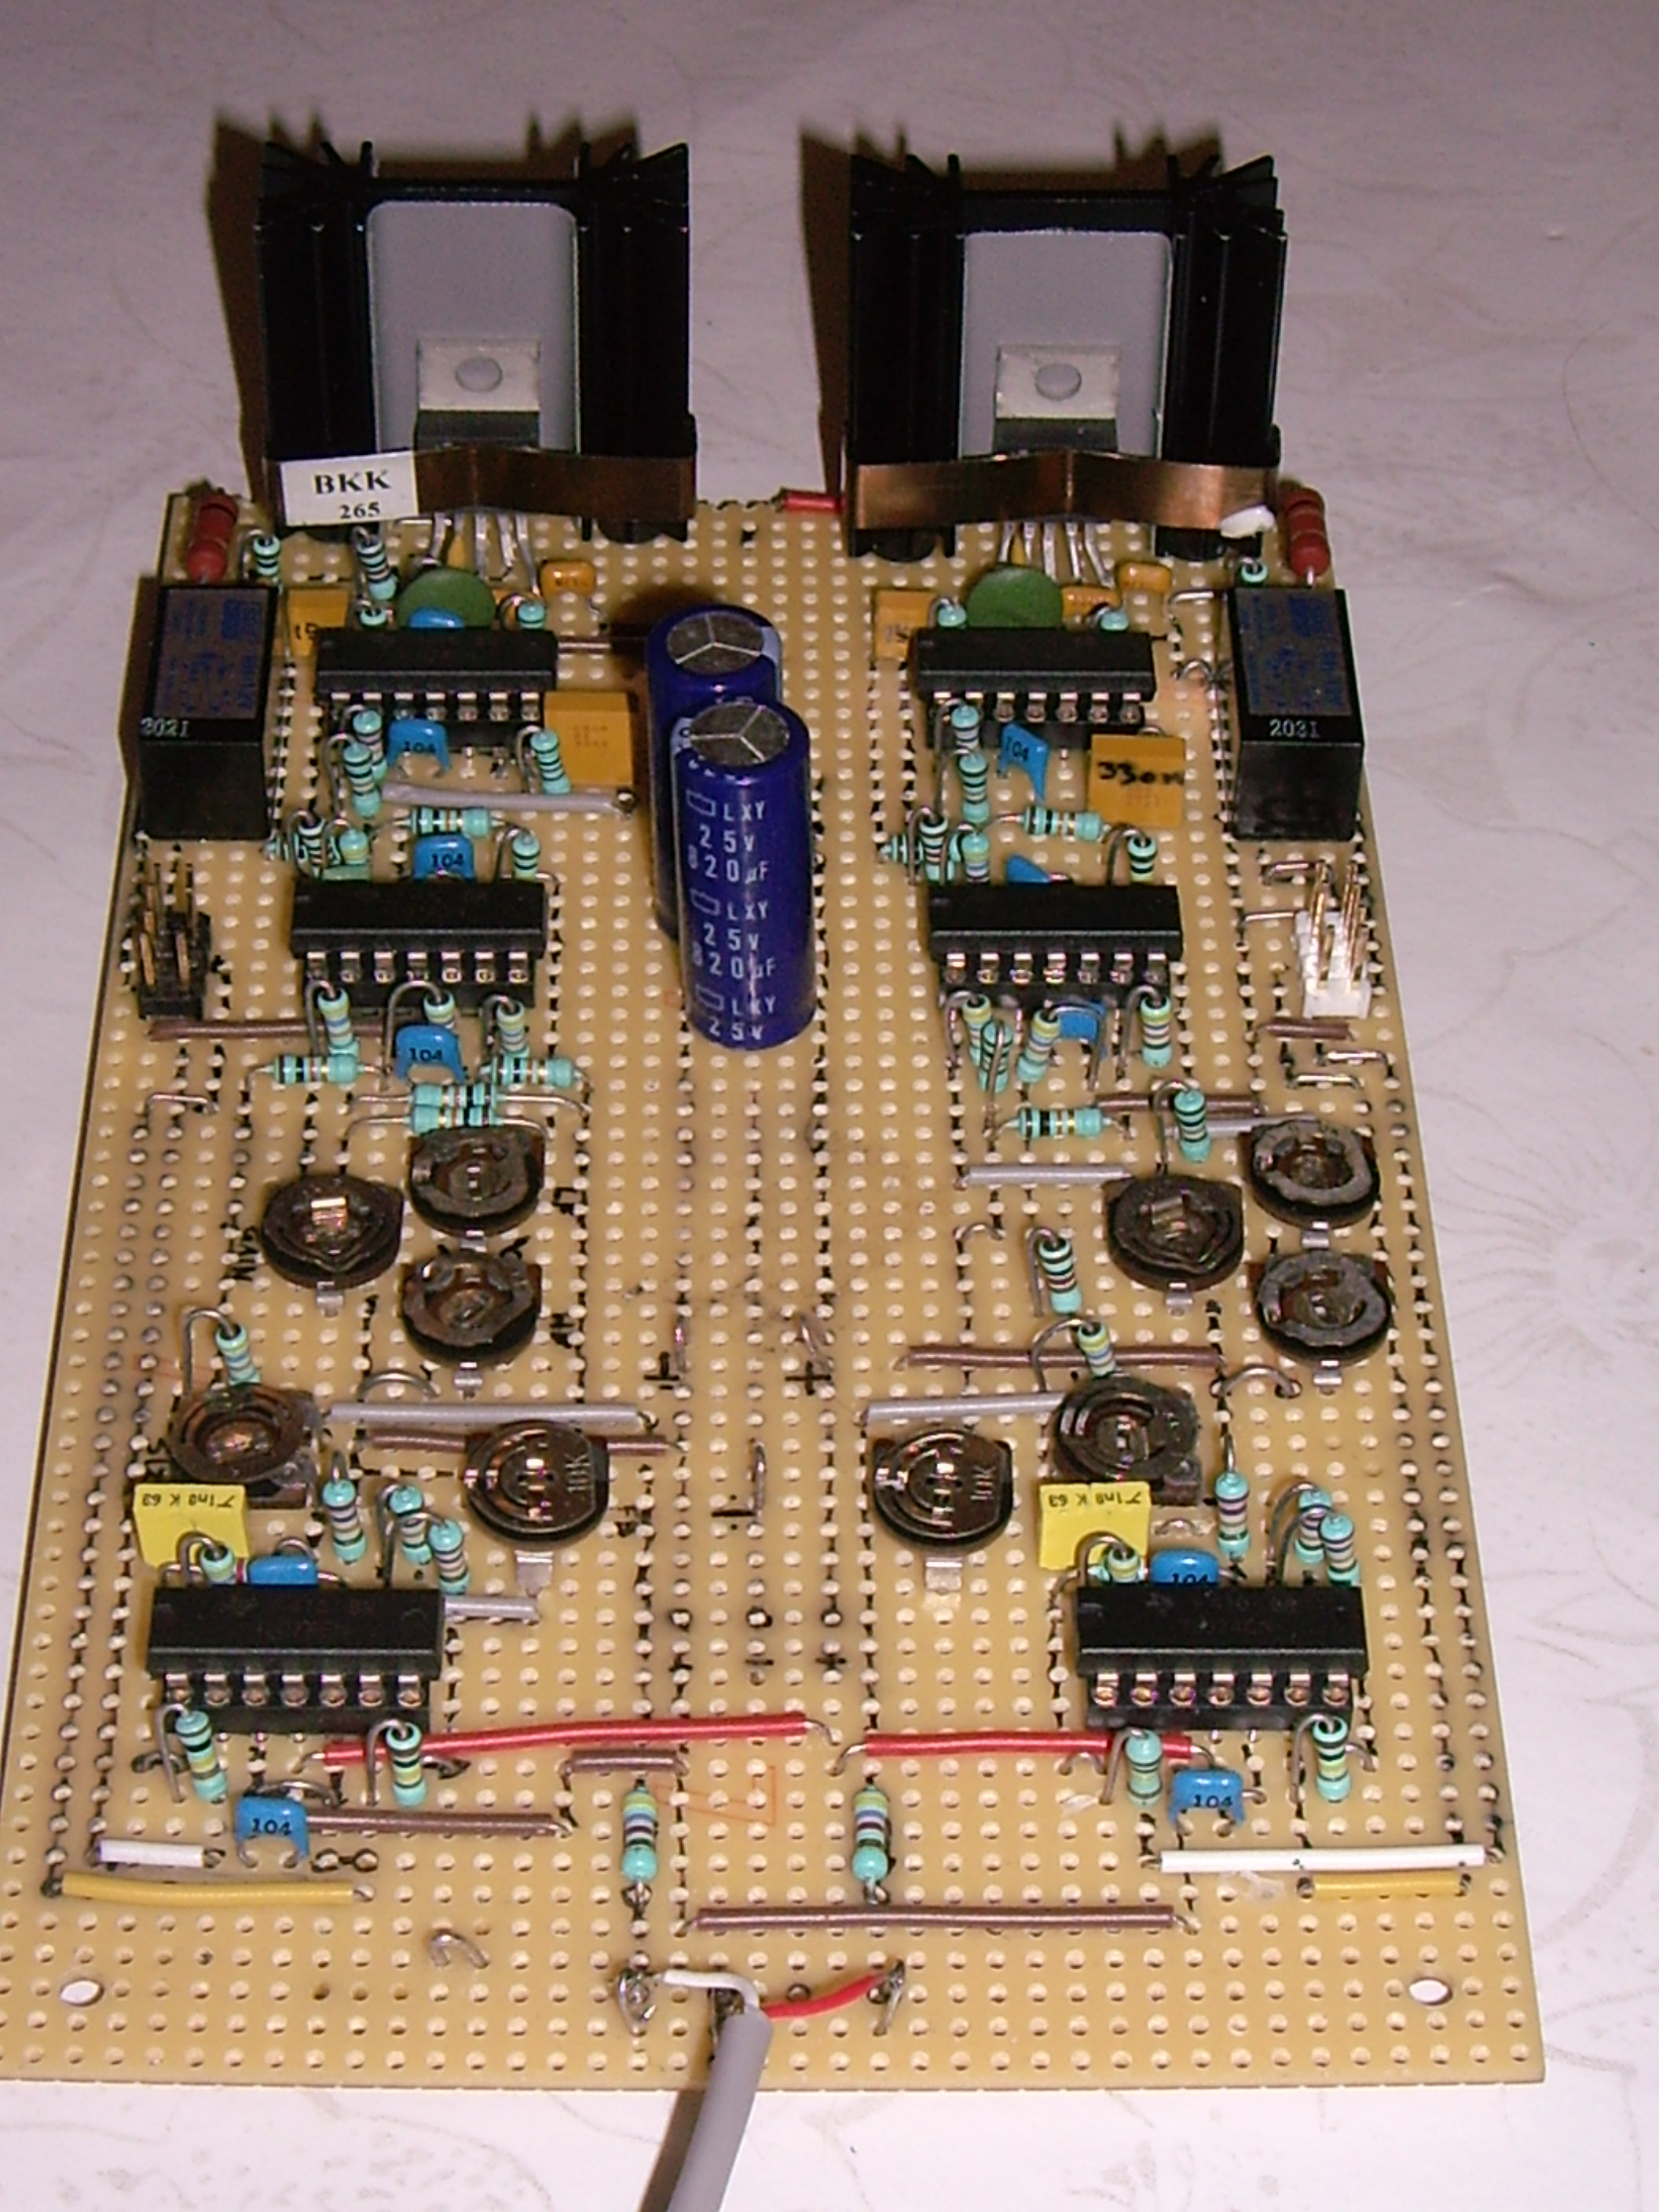
23-03-2007. The work has begun. A lot of changes are, and will be made. A complete new layout. Only the green laser module, the aluminium plate and the flight case are the same. Some weeks ago, one of the galvos burned. I guess it was caused by a defective bearing that somehow locked the shaft. Anyway - smoke came out of the small motor, and now it is sent for repair.
In the meantime I got another galvo set. A ScanPro30 kit from Lasershowparts.com. These galvos and drivers look a little different to the ScanEco30, and are tuned better from the factory.
 I got the kinematic mirror- and dichro mount very cheap at eBay. The quality is brilliant, and not at all comparable to my homemade mounts in my small RGY scanners. I got the kinematic mirror- and dichro mount very cheap at eBay. The quality is brilliant, and not at all comparable to my homemade mounts in my small RGY scanners.
For the safety matter, I also get a safety shutter to cut the beam in case of any scanning errors happens.
The red laser came also some weeks ago. But unfortunately it was broken when it arrived. The power was low, and the spot looked wrong with two small dots on each side of it. So I had to return the module for repair/exchange. A few days ago I got a mail from David/Lasever. He wrote that my laser is already on the way back now. So next week I should be able to finish the upgrade of this scanner (...so far!).
31-01-2007. Not many updates the past couple of months. To be honest, I nearly haven't even touched a laser this month. But this will change very soon. More about that later.
First a "little" update on my RGY scanners. The word "Little", is because not much has happened. I wanted to exchange the green laser units, as they were not that good. I ordered two new 50 mW modules at Aixiz, but received only one, which I installed in one of the scanners. Now, two month has gone, and I'm still waiting for the last one to arrive. Maybe next week...
Now, concerning my 500mW laser scanner, I think it's about time to put up a little more pictures, just to show off a little.
Take a look at the ScanEco30 galvo set, and the biiiiiig laser module... 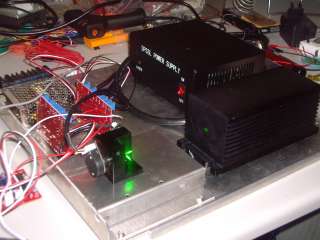
 As you see it is mounted on a 19" aluminium, plate As you see it is mounted on a 19" aluminium, plate
which fits to the
3U rack flight
case.
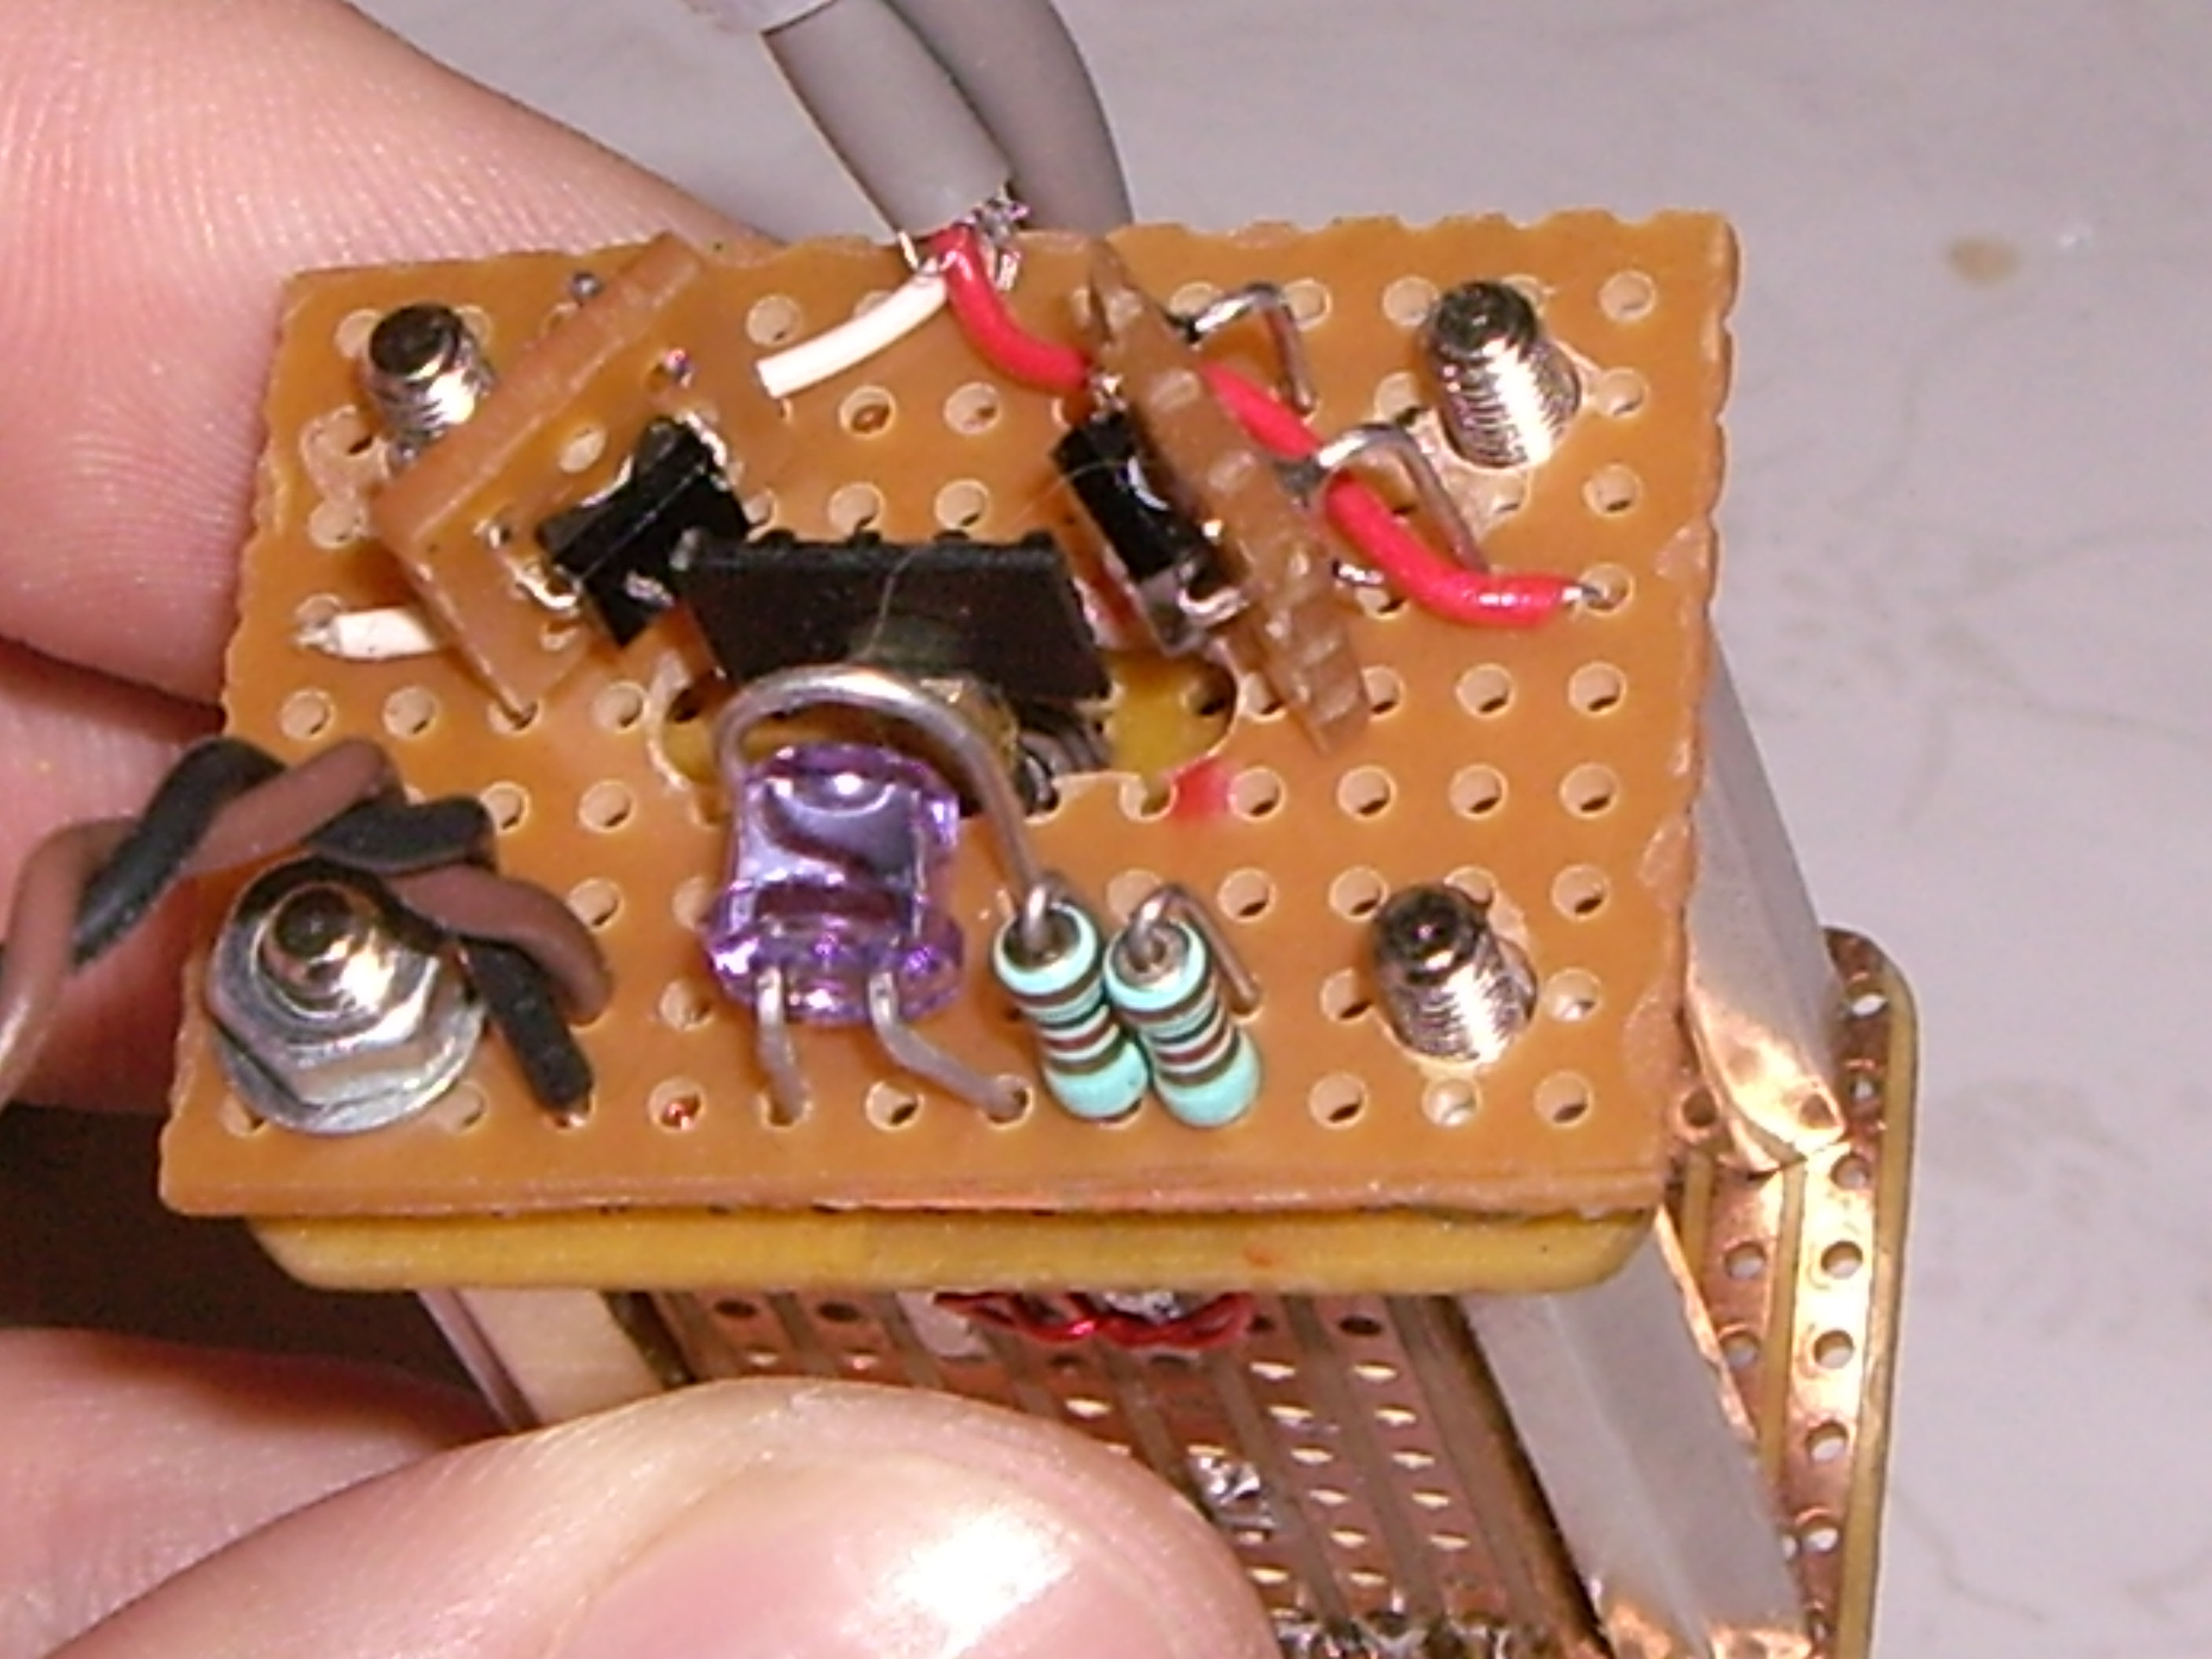
BUT, very soon this has to be all rebuild. The green beast will have to move a bit, to make space for its new neighbour - a nice red (635nm) laser module rated at 300mW. I expect it to arrive within the next few days, so I have to look after a dichro and a kinematic mount for it. Normally in RGY scanners the red laser has to be about 4 times more powerful than the green. But the colour of this red laser is a little brighter - more orange-red - than normal red lasers at 650nm. I know that 300mW of 635nm isn't enough to make a descent yellow together with a full powered ˝ watt green. But surely I'll find a solution for that.
Talking about Photonlexicon.com, I've also read about a USB controller from Pangolin. The Flashback 3 controller. Actually I'm also waiting for such one now (I got an email 5 minutes ago from FedEx with some shipping details). I nearly can't wait to get my fingers in the new hardware - and software as well. This controller comes with different kind of software for 3D graphic shows creation and live show performance.
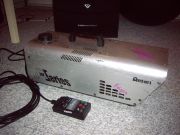
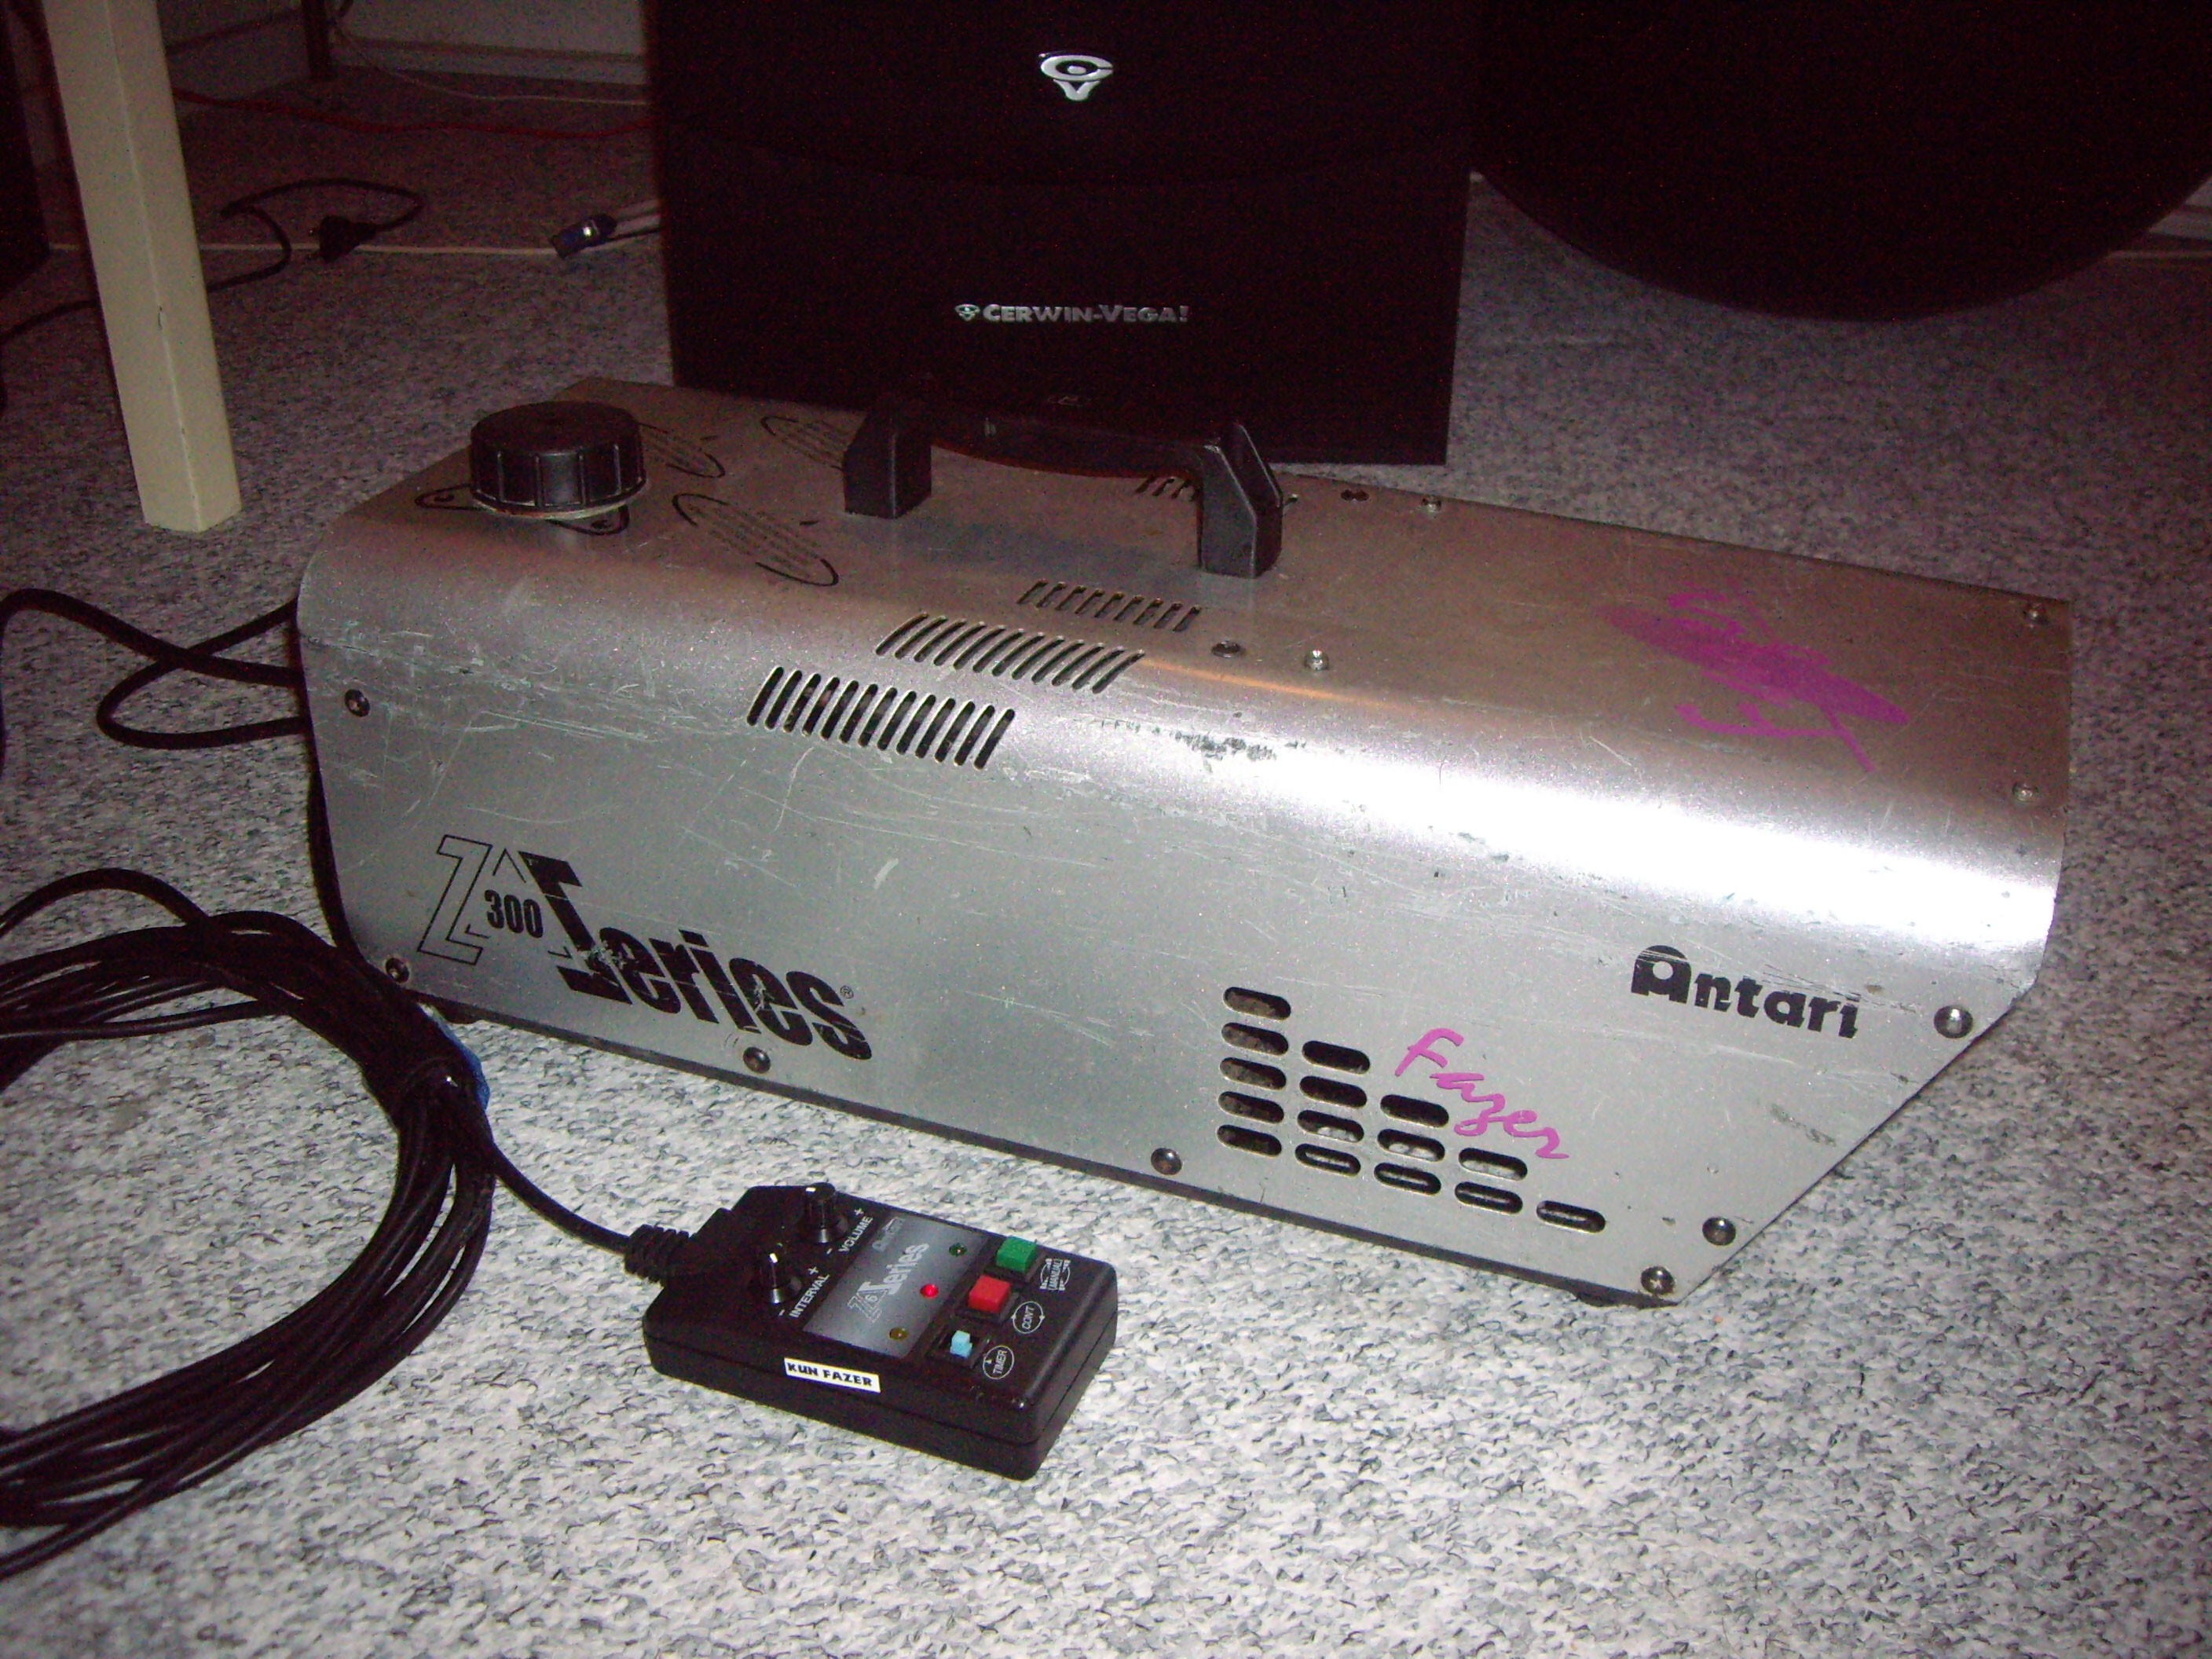
I almost forgot to show You this baby. Antari Z-300. A real HAZER. This thing makes very "thin" smoke - almost invisible in the air. Perfect for beam shows.
21-01-2007. Added some new pictures from my latest concert job. A video clip is also available on "the Pictures" section.
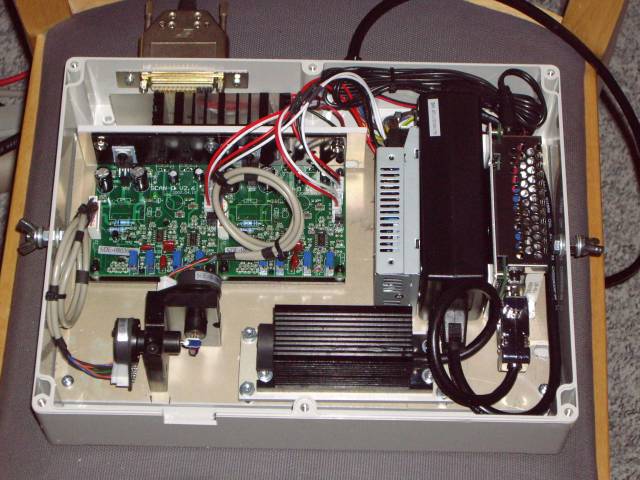
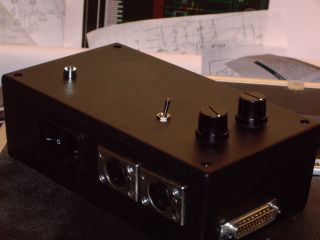
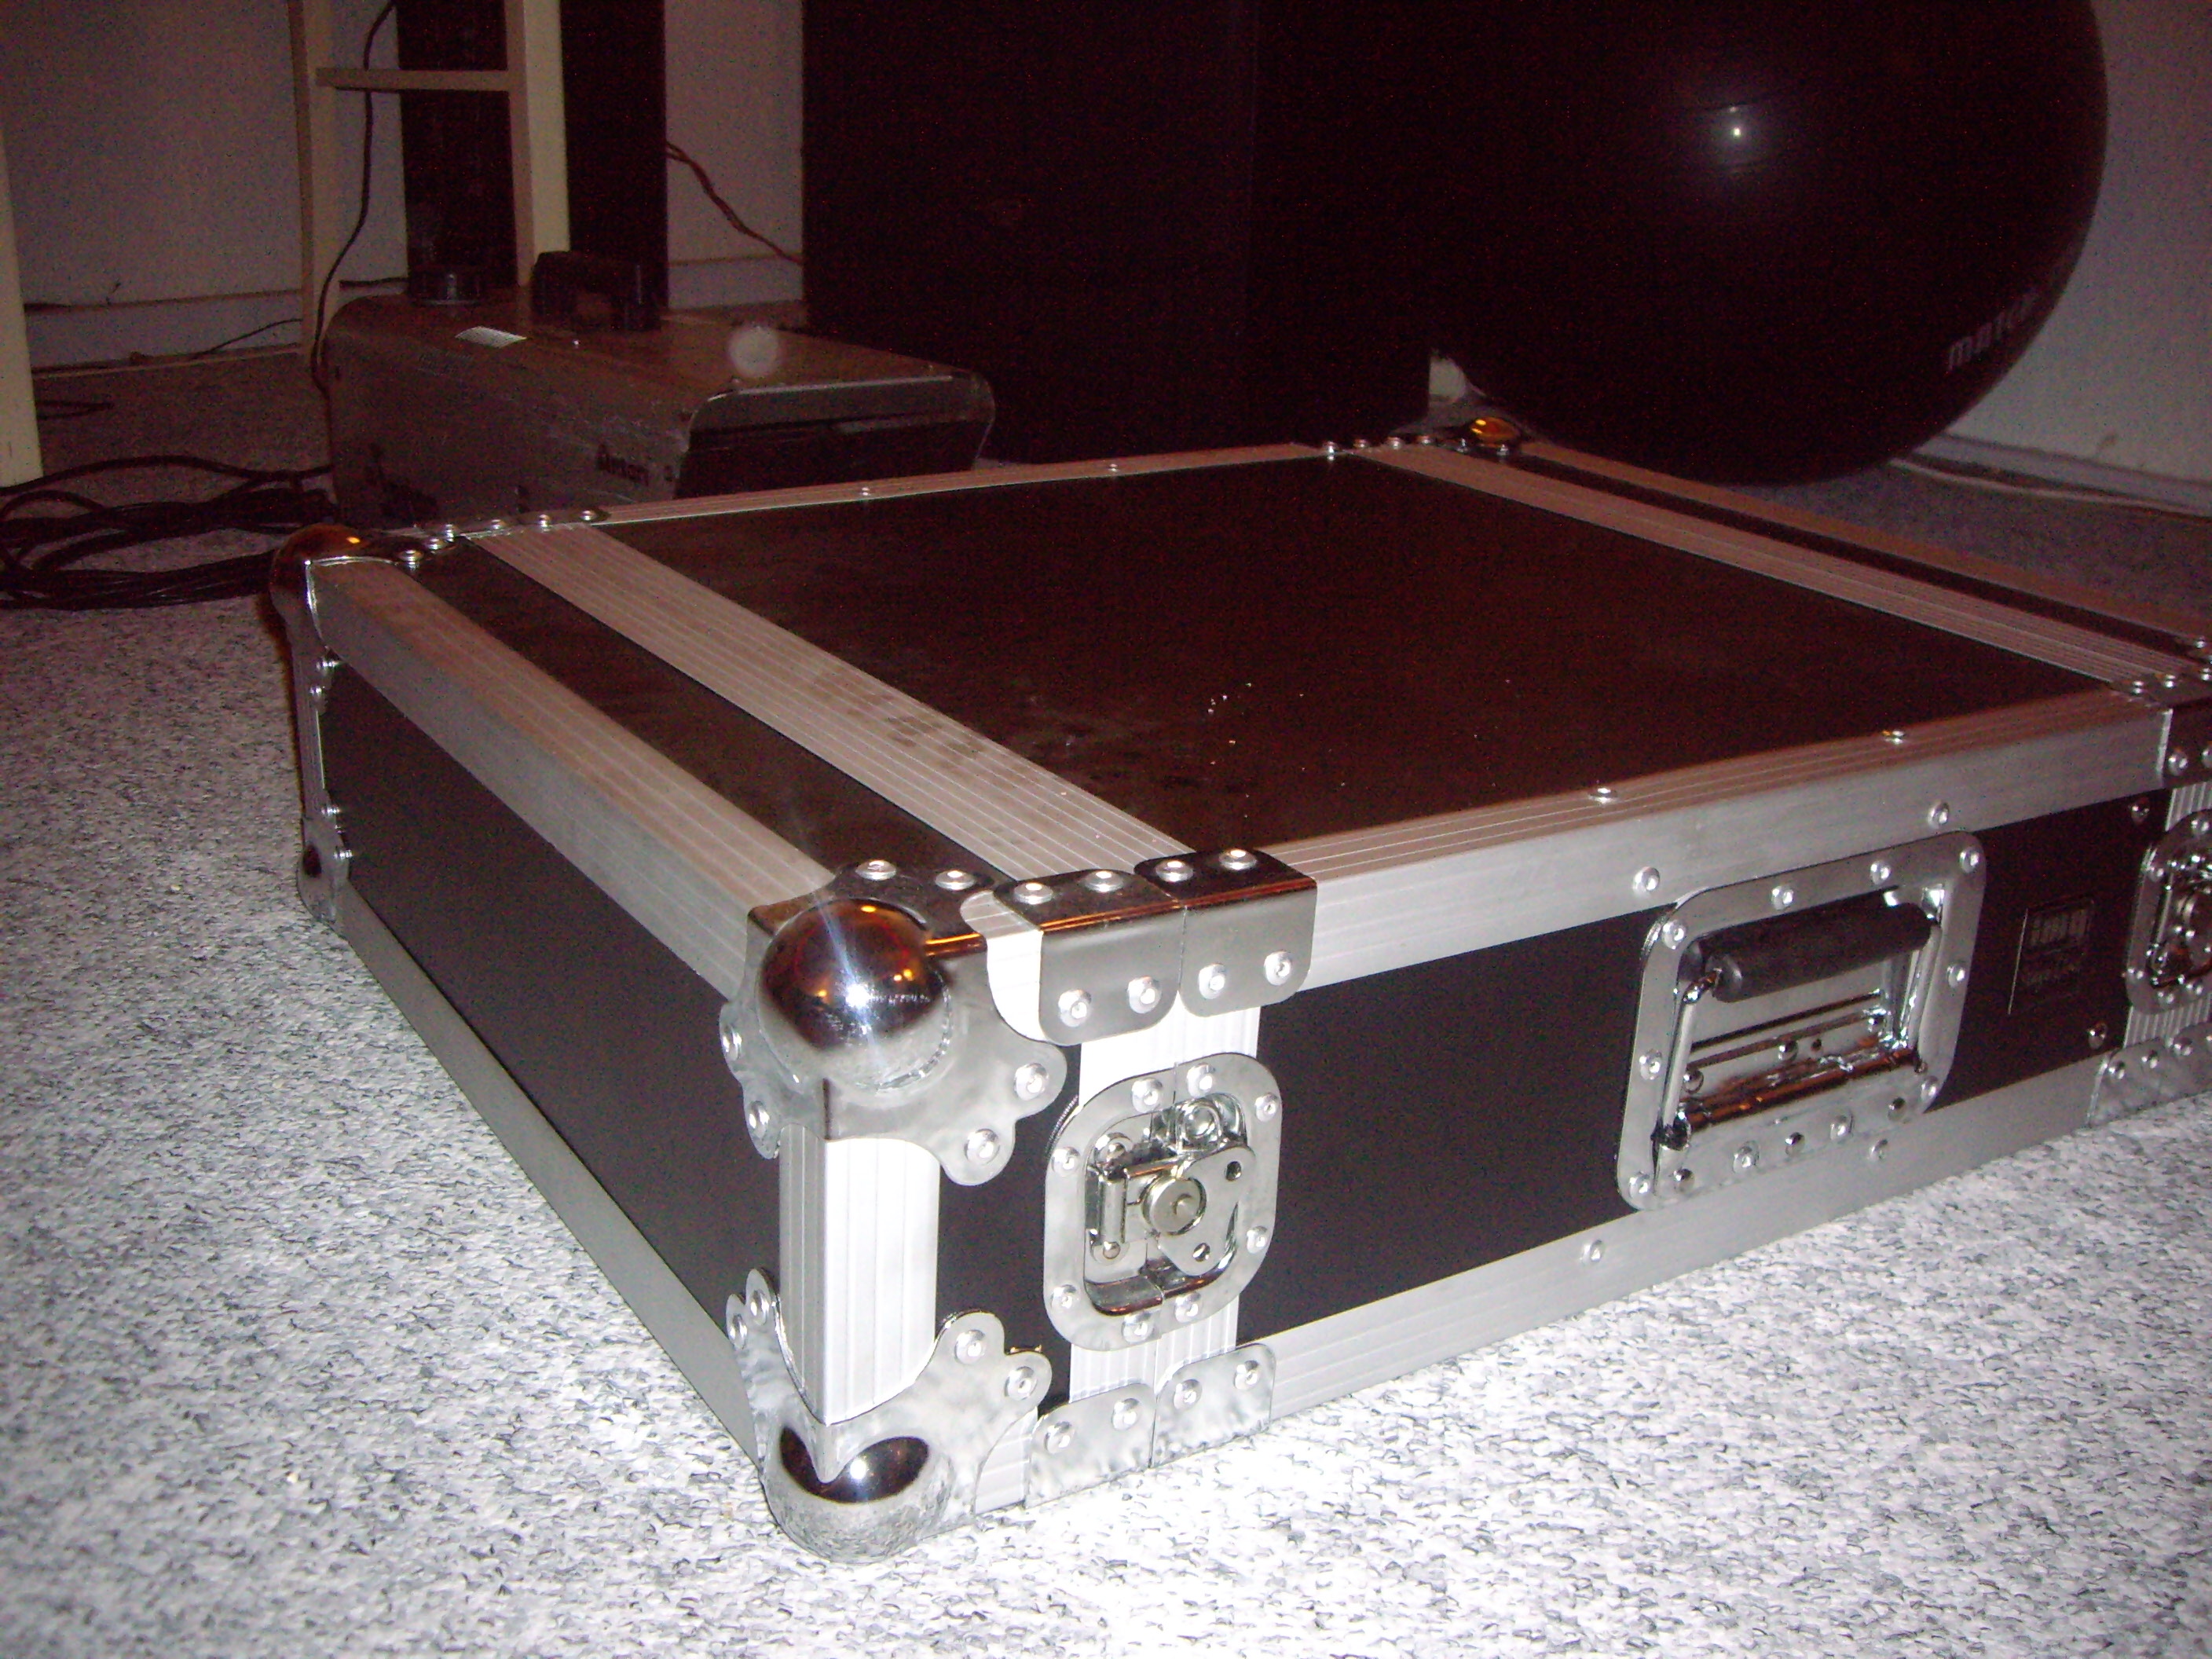
 03-12-2007. Last week I got a 3 unit flight case for my new ˝ Watts laser system. The aluminium plate fits perfectly into it. I also build in the DMX controller board, which comes with the galvos from Lasershowparts.com. On a switch I can choose between the input from the D/A converter, which I normally use, and the DMX board. The only thing still missing is a front plate with a mains switch. 03-12-2007. Last week I got a 3 unit flight case for my new ˝ Watts laser system. The aluminium plate fits perfectly into it. I also build in the DMX controller board, which comes with the galvos from Lasershowparts.com. On a switch I can choose between the input from the D/A converter, which I normally use, and the DMX board. The only thing still missing is a front plate with a mains switch.
Next week I will also fix my two RGY scanners. Currently I'm on a trip to Munich, but I got the information that the 50mW laser modules has arrived to day. Hopefully it will not take long to replace them.
22-11-2007. Long time since last update, I know. I've been a little busy the past month, and obviously updating the web site had a lower priority. I had another concert job four weeks ago, and after weeks of fighting with the two RGY setups I got it finished only two or three days before the gig. (Btw. A small video will be available here soon - promise!)
The biggest problem I ran into was the lack of space. The boxes I use for my three scanners are only 24 x 16 x 10 cm. I can only say that it's not easy to place a power supply, a driver board, connectors, galvos, 2x lasers and the dechoic filter in such a small box. For sure I will choose a larger case next time. I had another problem with one of the green lasers. The beam wasn't collimated. I tried to fix it, but the result wasn't that good. That's why point 5 on the list above, is added. At the moment I'm waiting for two new 50mW laser modules to arrive from Aixiz.
In the meantime I got another (crazy) idea. Compared to others, I have only worked with low cost - and low performance - hardware. I realized long ago, that in connection with the concert jobs, I really need more power on the lasers and more speed on the galvos. So I decided to move up one step. Now I'm almost finished building yet another laser projector. This time I only used OEM products - no home brewed stuff. The new galvos are doing the ILDA with over 30.000 pps. And the green diode laser is rated at 500mW. (Now we're talking - huh! ). It’s build on a 19" aluminium plate. Now I'm looking for a cheap flight case for it. I just can't wait to see this baby in action at the next concert job (22. December).
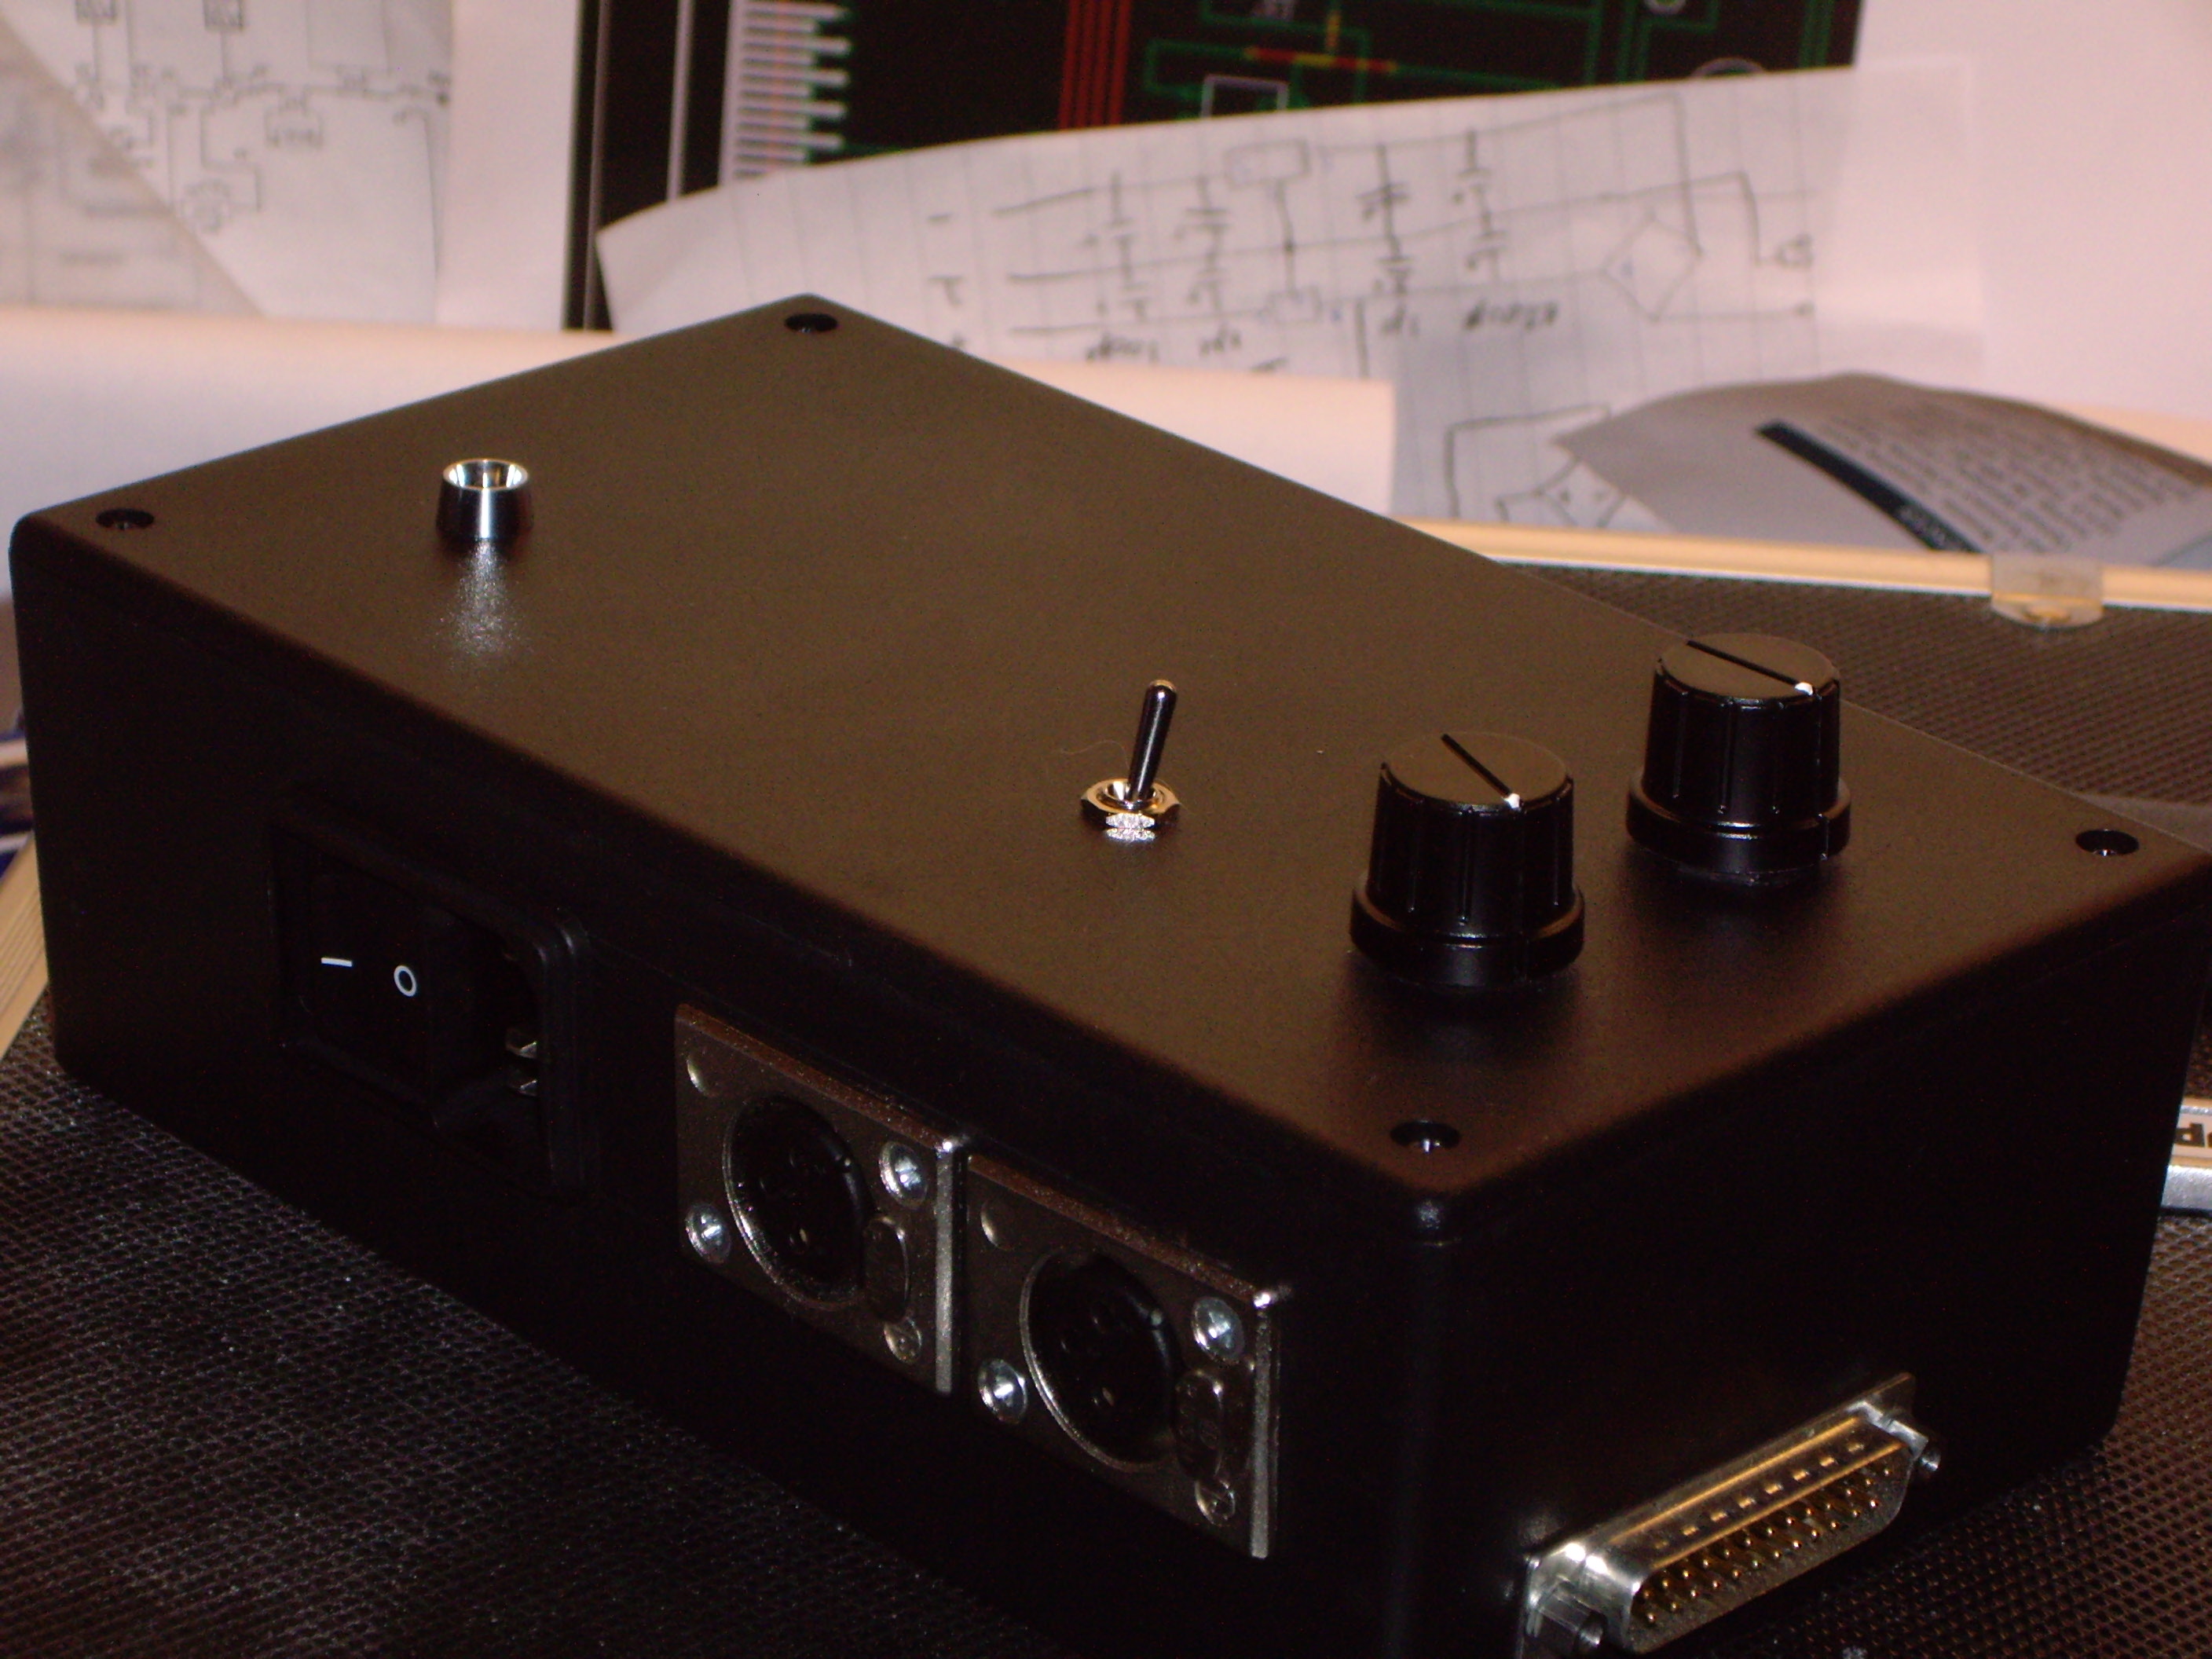
 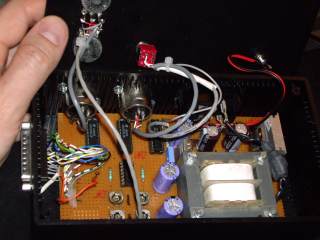 30-09-2007. Of course a new D/A Converter is needed for RGY. So I made one with build in power supply. 30-09-2007. Of course a new D/A Converter is needed for RGY. So I made one with build in power supply.
More updates soon... In the meantime - check out the videos.This one, and this one.
26-09-2007 Had some hours of work this weekend. Some days before I decided to get some new diode drivers for my green lasers. I've had good experience with the drivers from "Die4Lasers". So 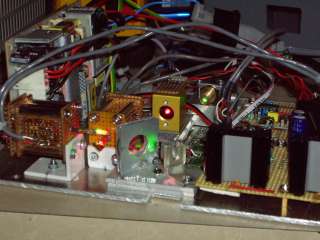 last week I ordered a pair of them by mail, and got them a few days later. (Thanks Robin. I can only say good things about your stuff.) last week I ordered a pair of them by mail, and got them a few days later. (Thanks Robin. I can only say good things about your stuff.)
It was not easy to set it all up on the small aluminium board. But late Sunday evening I saw the yellow light for the first time =) . Here's a small video of it... Okay, I'm a little proud of it. Here's another one...
03-09-2007 I nearly forgot to do an update on this site. Here is the final result.
 Here is my baby. My 3rd. Laser Scanner... Here is my baby. My 3rd. Laser Scanner...
 The family is growing. How sweet... The family is growing. How sweet...
Some pictures of the Ilda test pattern are still missing, I know. But in fact I've started a new project - or to be more correct, a "low budget" extension to this laser box. Now I go for three colours. Red, green and yellow.
My plan is to upgrade my two red laser scanners to RGY. For that, I have bought two new green lasers from eBay (pkunlimited). According to the seller these two lasers will operate at 20mW without heat sink and can be turned up to 30mW but will require a heat sink or fan mounted to the front end. I will definitely add a heat sink and a fan to it.
 The seller also say, that they have the option on the chip to be pulsed. I think this can be done at pin 4 on the small chip. But I have to ad an inverter, because the laser lights up when this pin is low. Opposite compared to the blanking signal from my DA-converter. The seller also say, that they have the option on the chip to be pulsed. I think this can be done at pin 4 on the small chip. But I have to ad an inverter, because the laser lights up when this pin is low. Opposite compared to the blanking signal from my DA-converter.
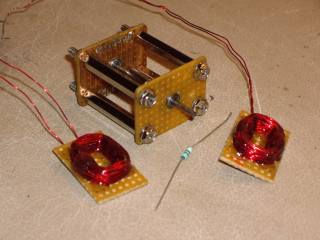
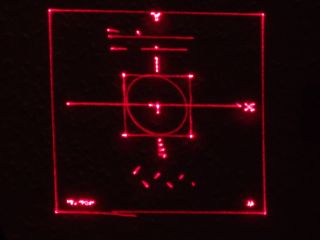
Now - some of you might say "Hey - red and green. That's only two colours". But when is comes to lasers, it is aloud to say that 1 + 1 = 3. The yellow comes when the green and red light are combined. To mix such two beams an optical filter, called a dechoid, is used. Here is a little drawing that shows exactly how it works.
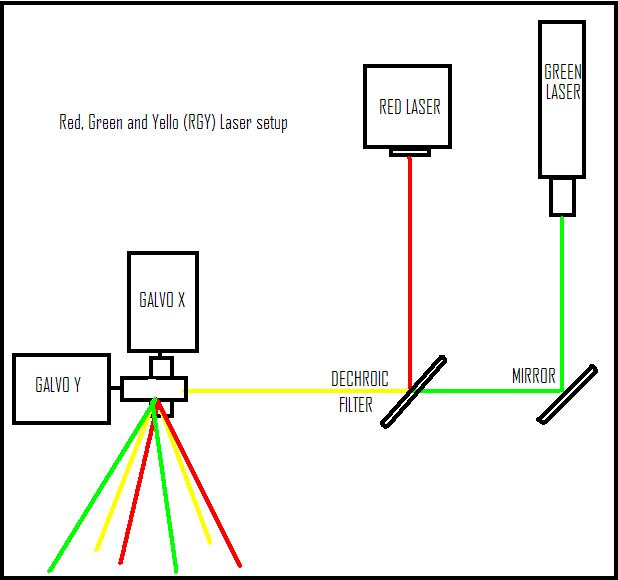
The green light can pass thru the dechoic filter. But the red light will be reflected. Just like if it was a mirror. When only the red laser is on, the output beam will be red. When only the green is on, it will be green. And when both lasers are lit, the output is yellow.
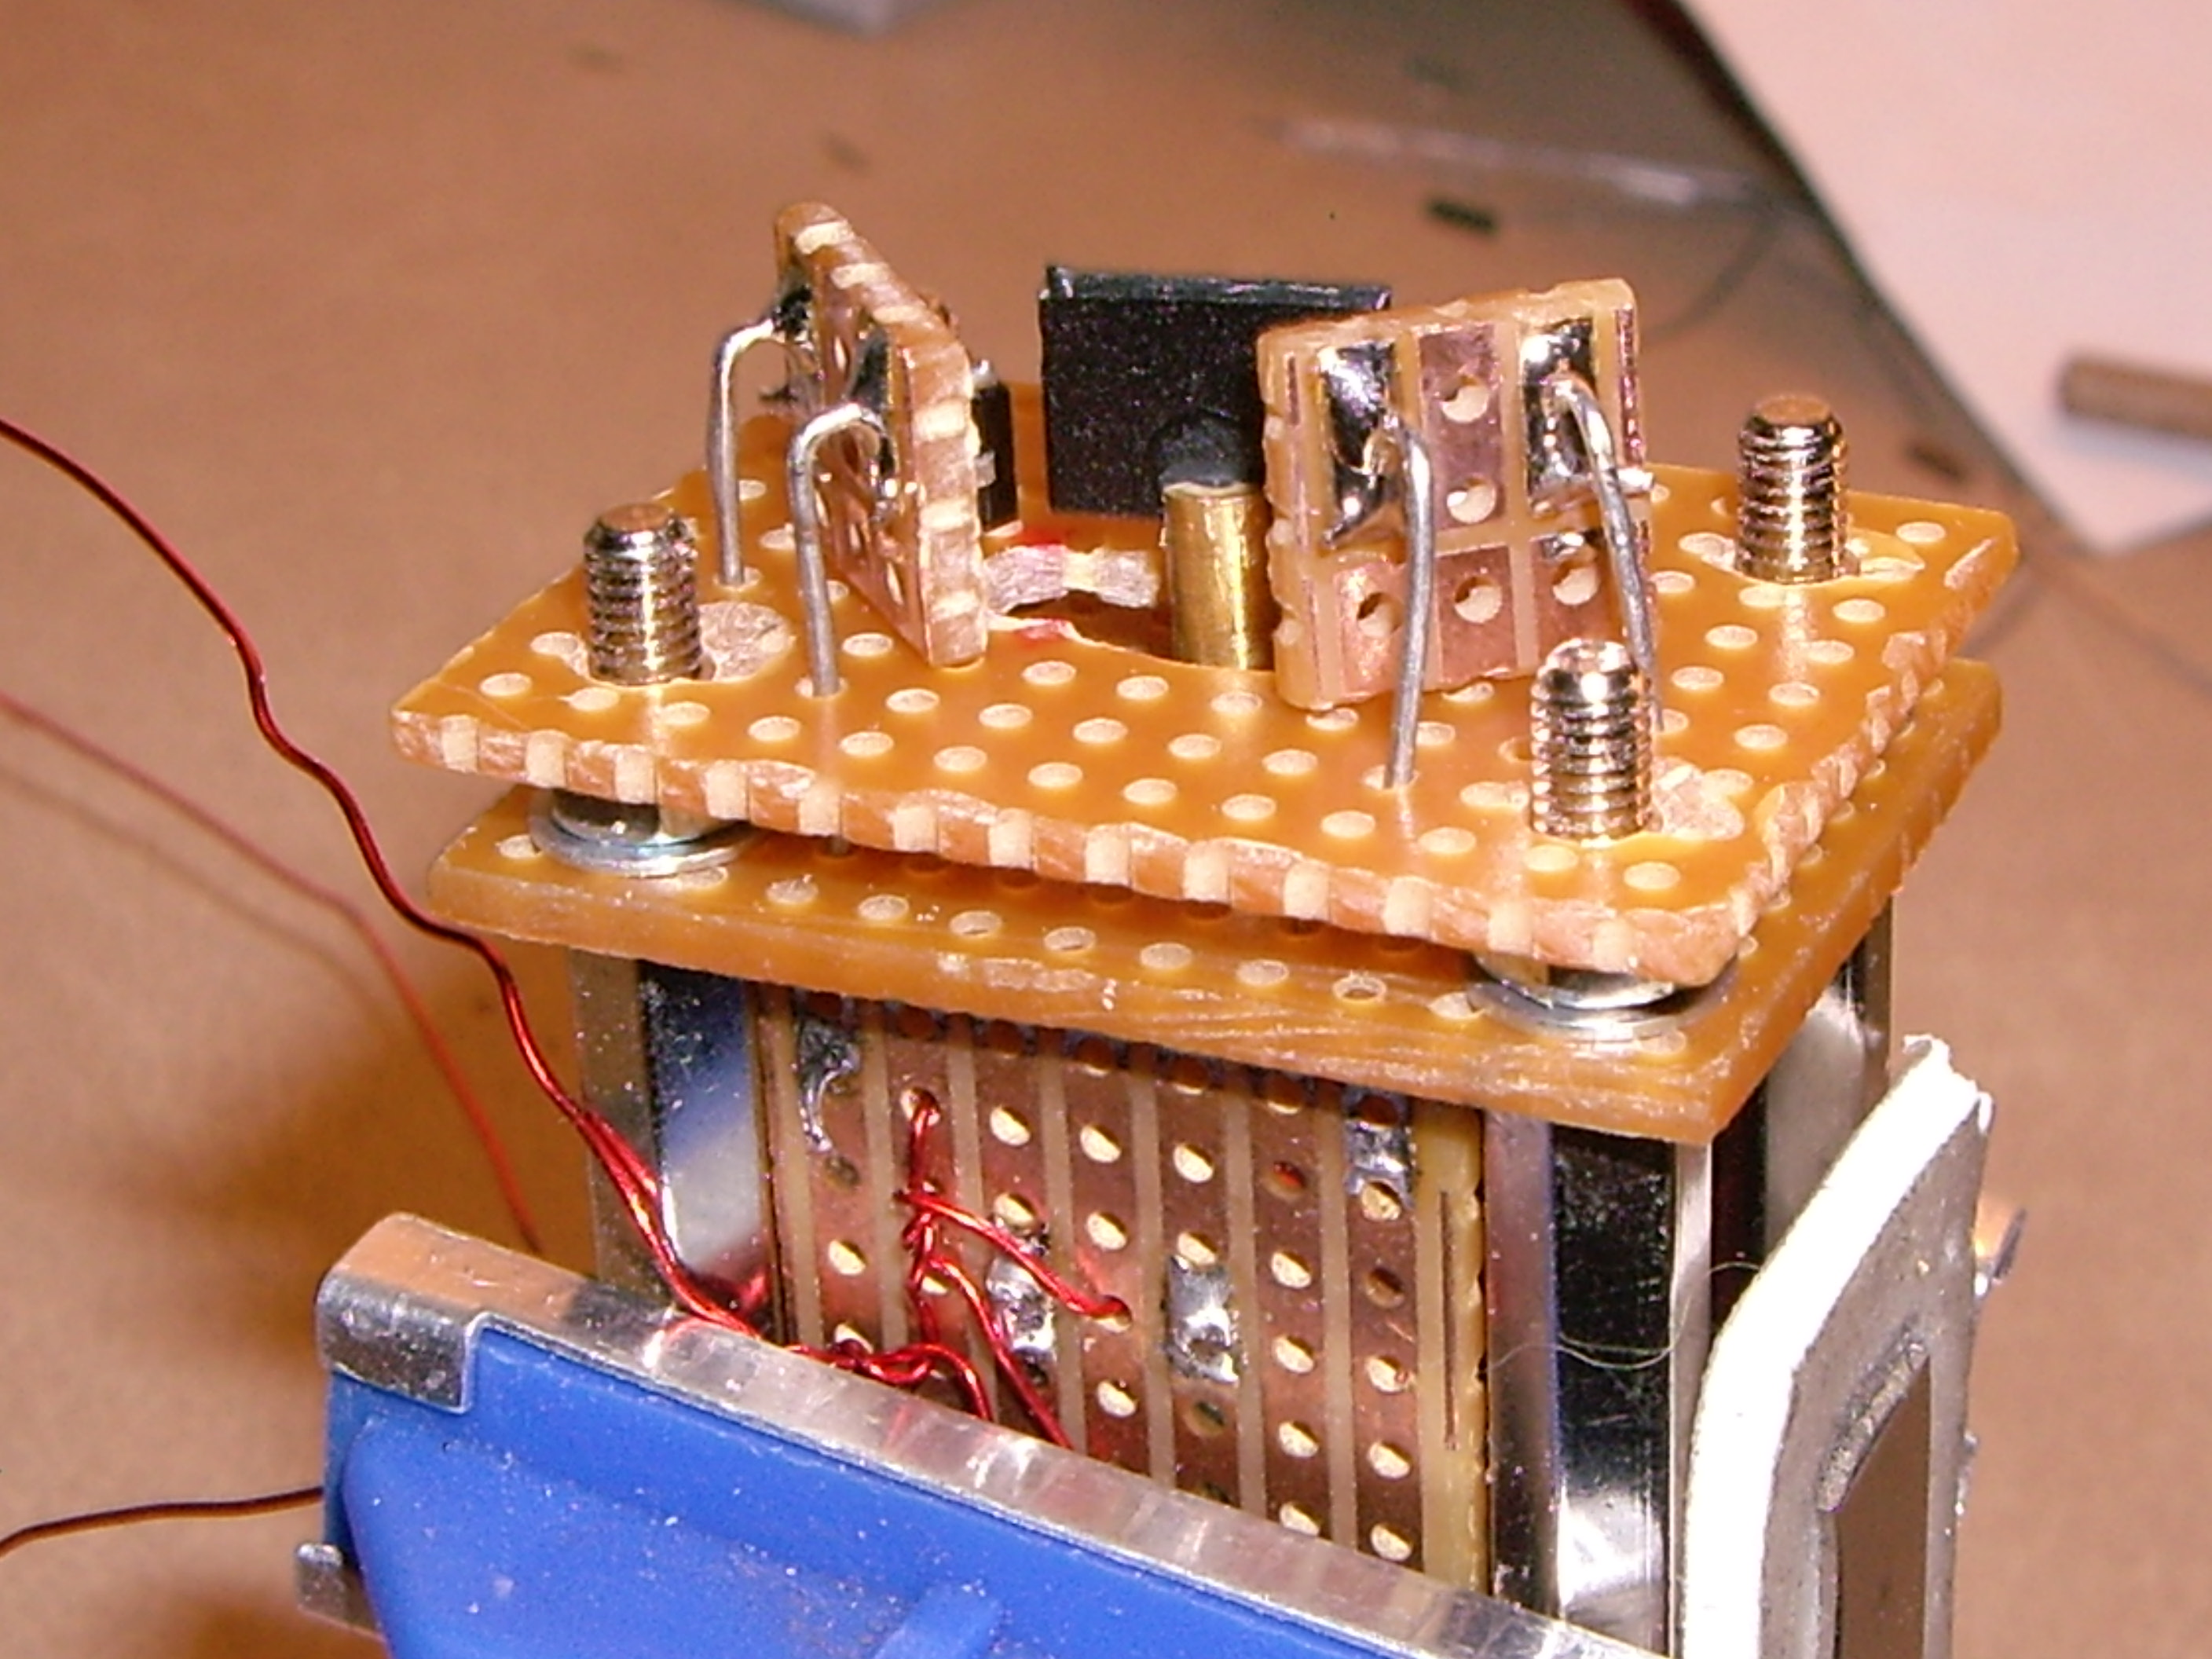
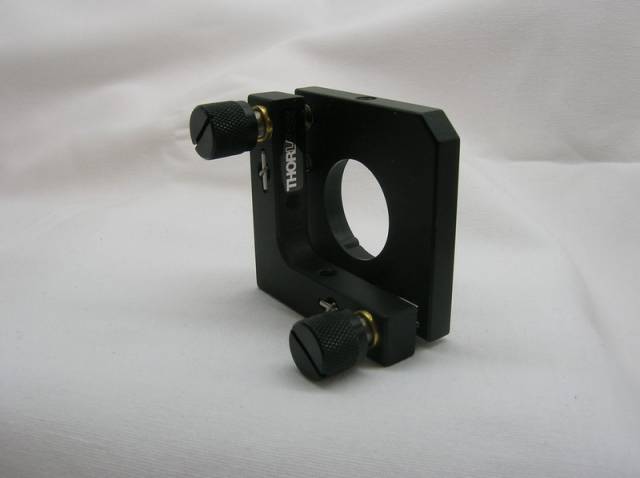  But to make this yellow beam, it's important, that the green and red beam hits the dechoic filter exactly at the same spot and in the same angle. To be able to fine adjust this I've made a kind of kinematic mount for the filter, adjustable in X and Y (pan and tilt). Of course it's possible to buy stuff like that for money. But then you have to pay for it. =====>> But to make this yellow beam, it's important, that the green and red beam hits the dechoic filter exactly at the same spot and in the same angle. To be able to fine adjust this I've made a kind of kinematic mount for the filter, adjustable in X and Y (pan and tilt). Of course it's possible to buy stuff like that for money. But then you have to pay for it. =====>>
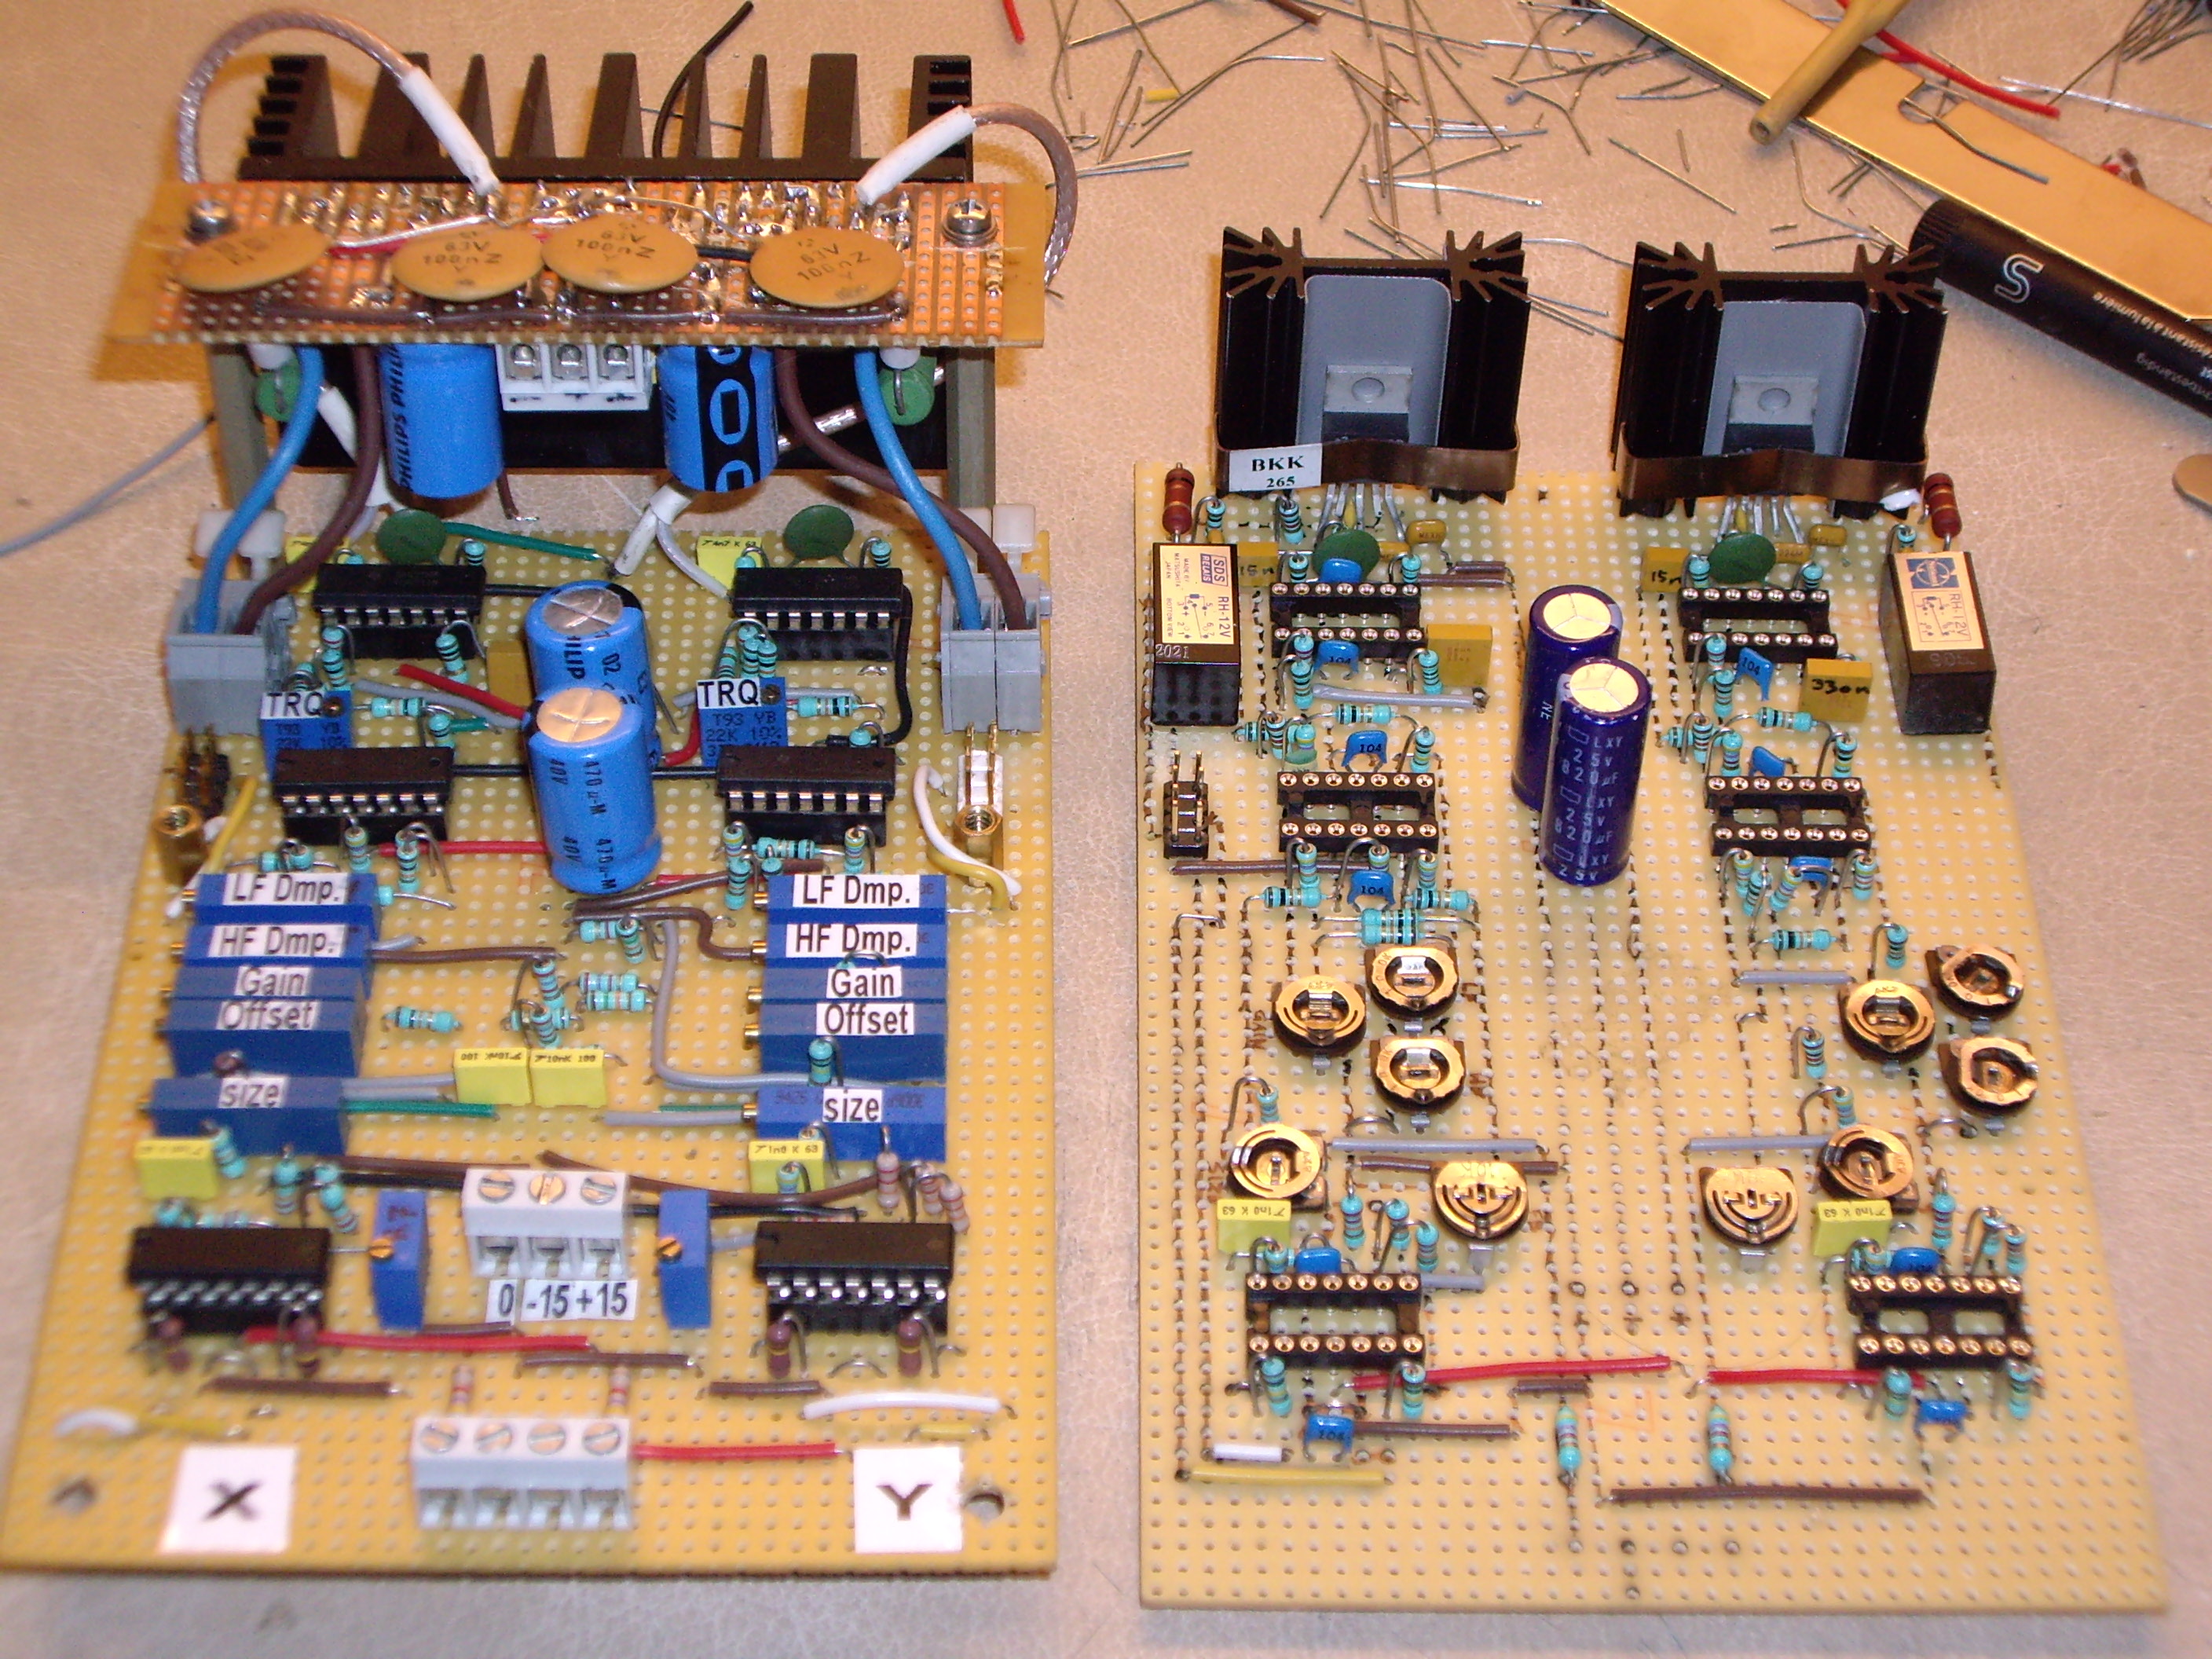
06-08-2007.Once again I made the mirrors out of a broken hard disk. But this time I used a diamond cutting disc for my Dremmel to cut the pieces. In that way it took only 5 minutes to make two of them. 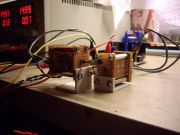 The Galvo driver board works just perfect. At full gain, it makes an almost perfect Ilda test pattern at 10kpps, with the new galvos. It makes only a little overshooting in the corners on the X channel. I can't get rid of it by more adjustment. If I try it starts to oscillate. Later on I'll try to change some values in the "LF dumping" part. (A picture of the Ilda test pattern will be added soon.) The Galvo driver board works just perfect. At full gain, it makes an almost perfect Ilda test pattern at 10kpps, with the new galvos. It makes only a little overshooting in the corners on the X channel. I can't get rid of it by more adjustment. If I try it starts to oscillate. Later on I'll try to change some values in the "LF dumping" part. (A picture of the Ilda test pattern will be added soon.)
 The heat sinks on the output stages maybe looks a little too small. And so they are. But I like the size of them. They makes it possible to put it all in a box, like the one I use for my green "China" laser scanner. An additional fan can do the rest. The heat sinks on the output stages maybe looks a little too small. And so they are. But I like the size of them. They makes it possible to put it all in a box, like the one I use for my green "China" laser scanner. An additional fan can do the rest.
I found a couple of small switching power supplies at the electronic shop I use. They fulfil the needs in every way. Size, weight and of course voltage and current (+/-15V plus 5V for the laser).The best part was the price: DKR. 49,- (about USD 9,-). But the size and weight was also important. I could have 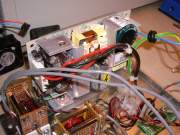 build the PSU like I did for my first laser scanner. But the transformer only would take too much space in the small box, and maybe it would be placed too close to the galvos, and created magnetic distortion. build the PSU like I did for my first laser scanner. But the transformer only would take too much space in the small box, and maybe it would be placed too close to the galvos, and created magnetic distortion.
Now everything is mounted on a aluminium plate and put into the box with four XLR plugs. Two for X/Y input and output, and two for blanking input and output. That makes it possible to link from this box to another. I know XLR connectors are not the "standard" for this application. But I have almost a closet full of them, from the time when I played around DJ'ing with my own mobile disco.
 25-07-2007. FINALY !!! 25-07-2007. FINALY !!!
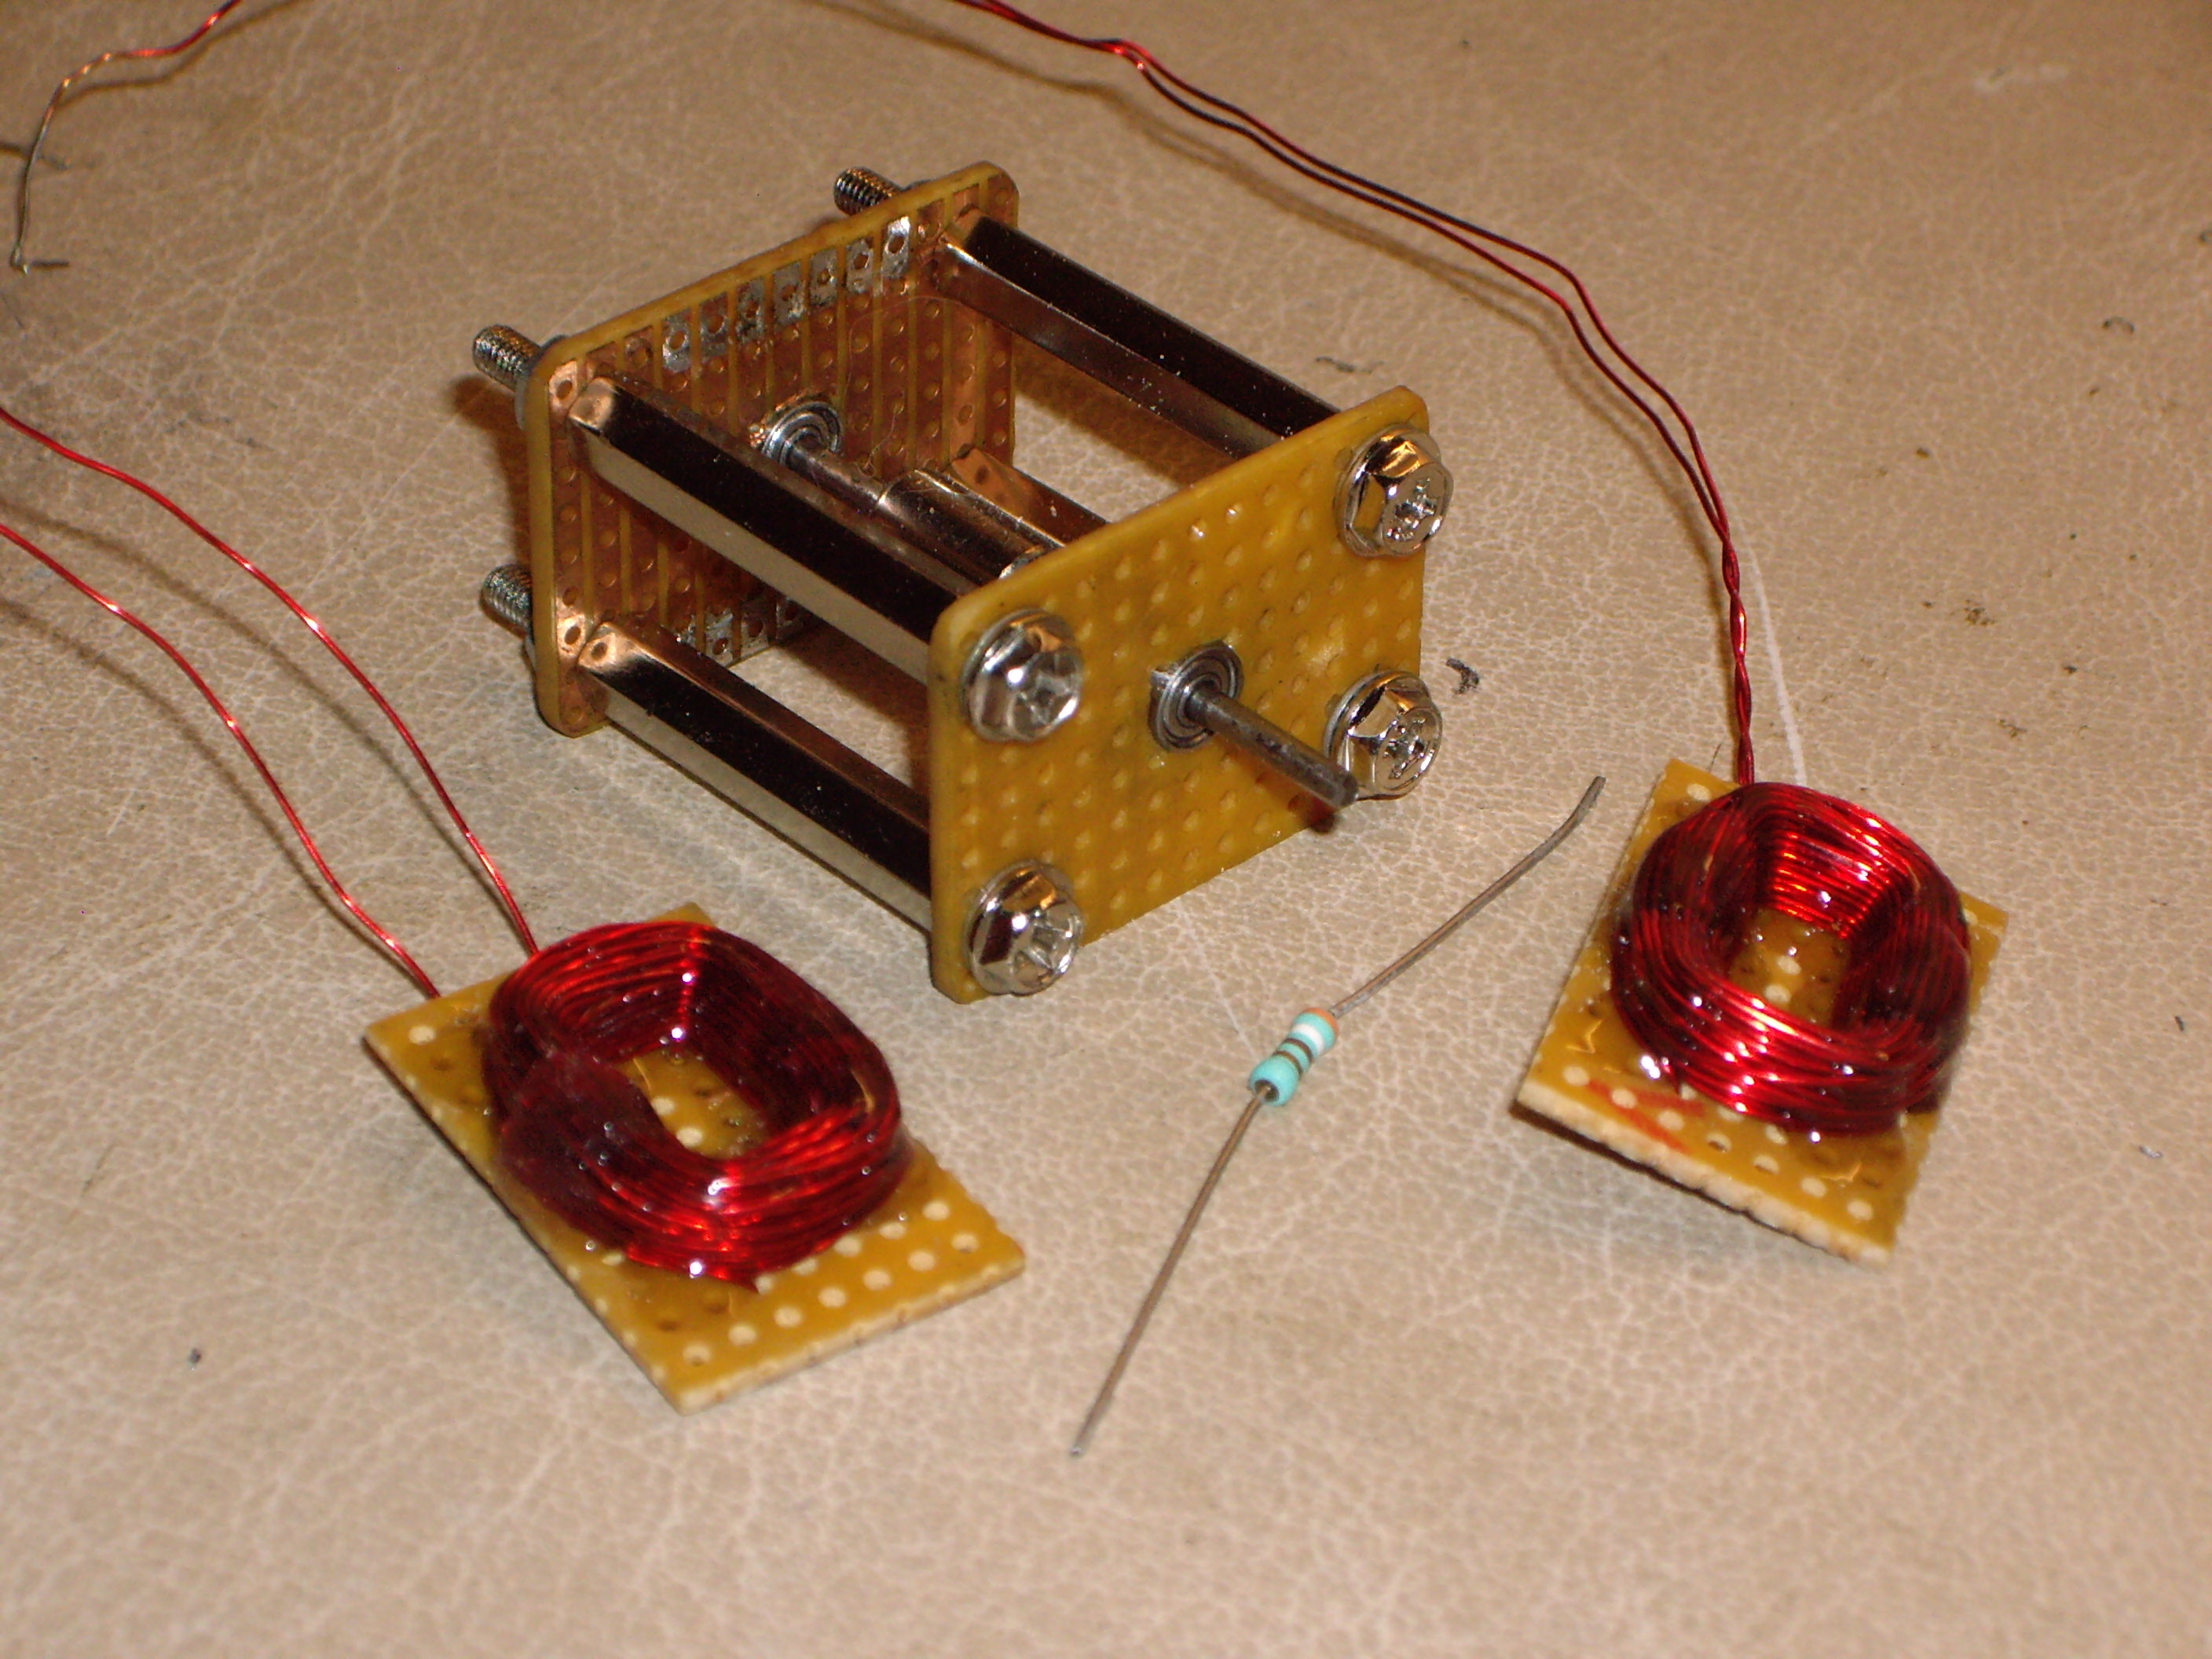
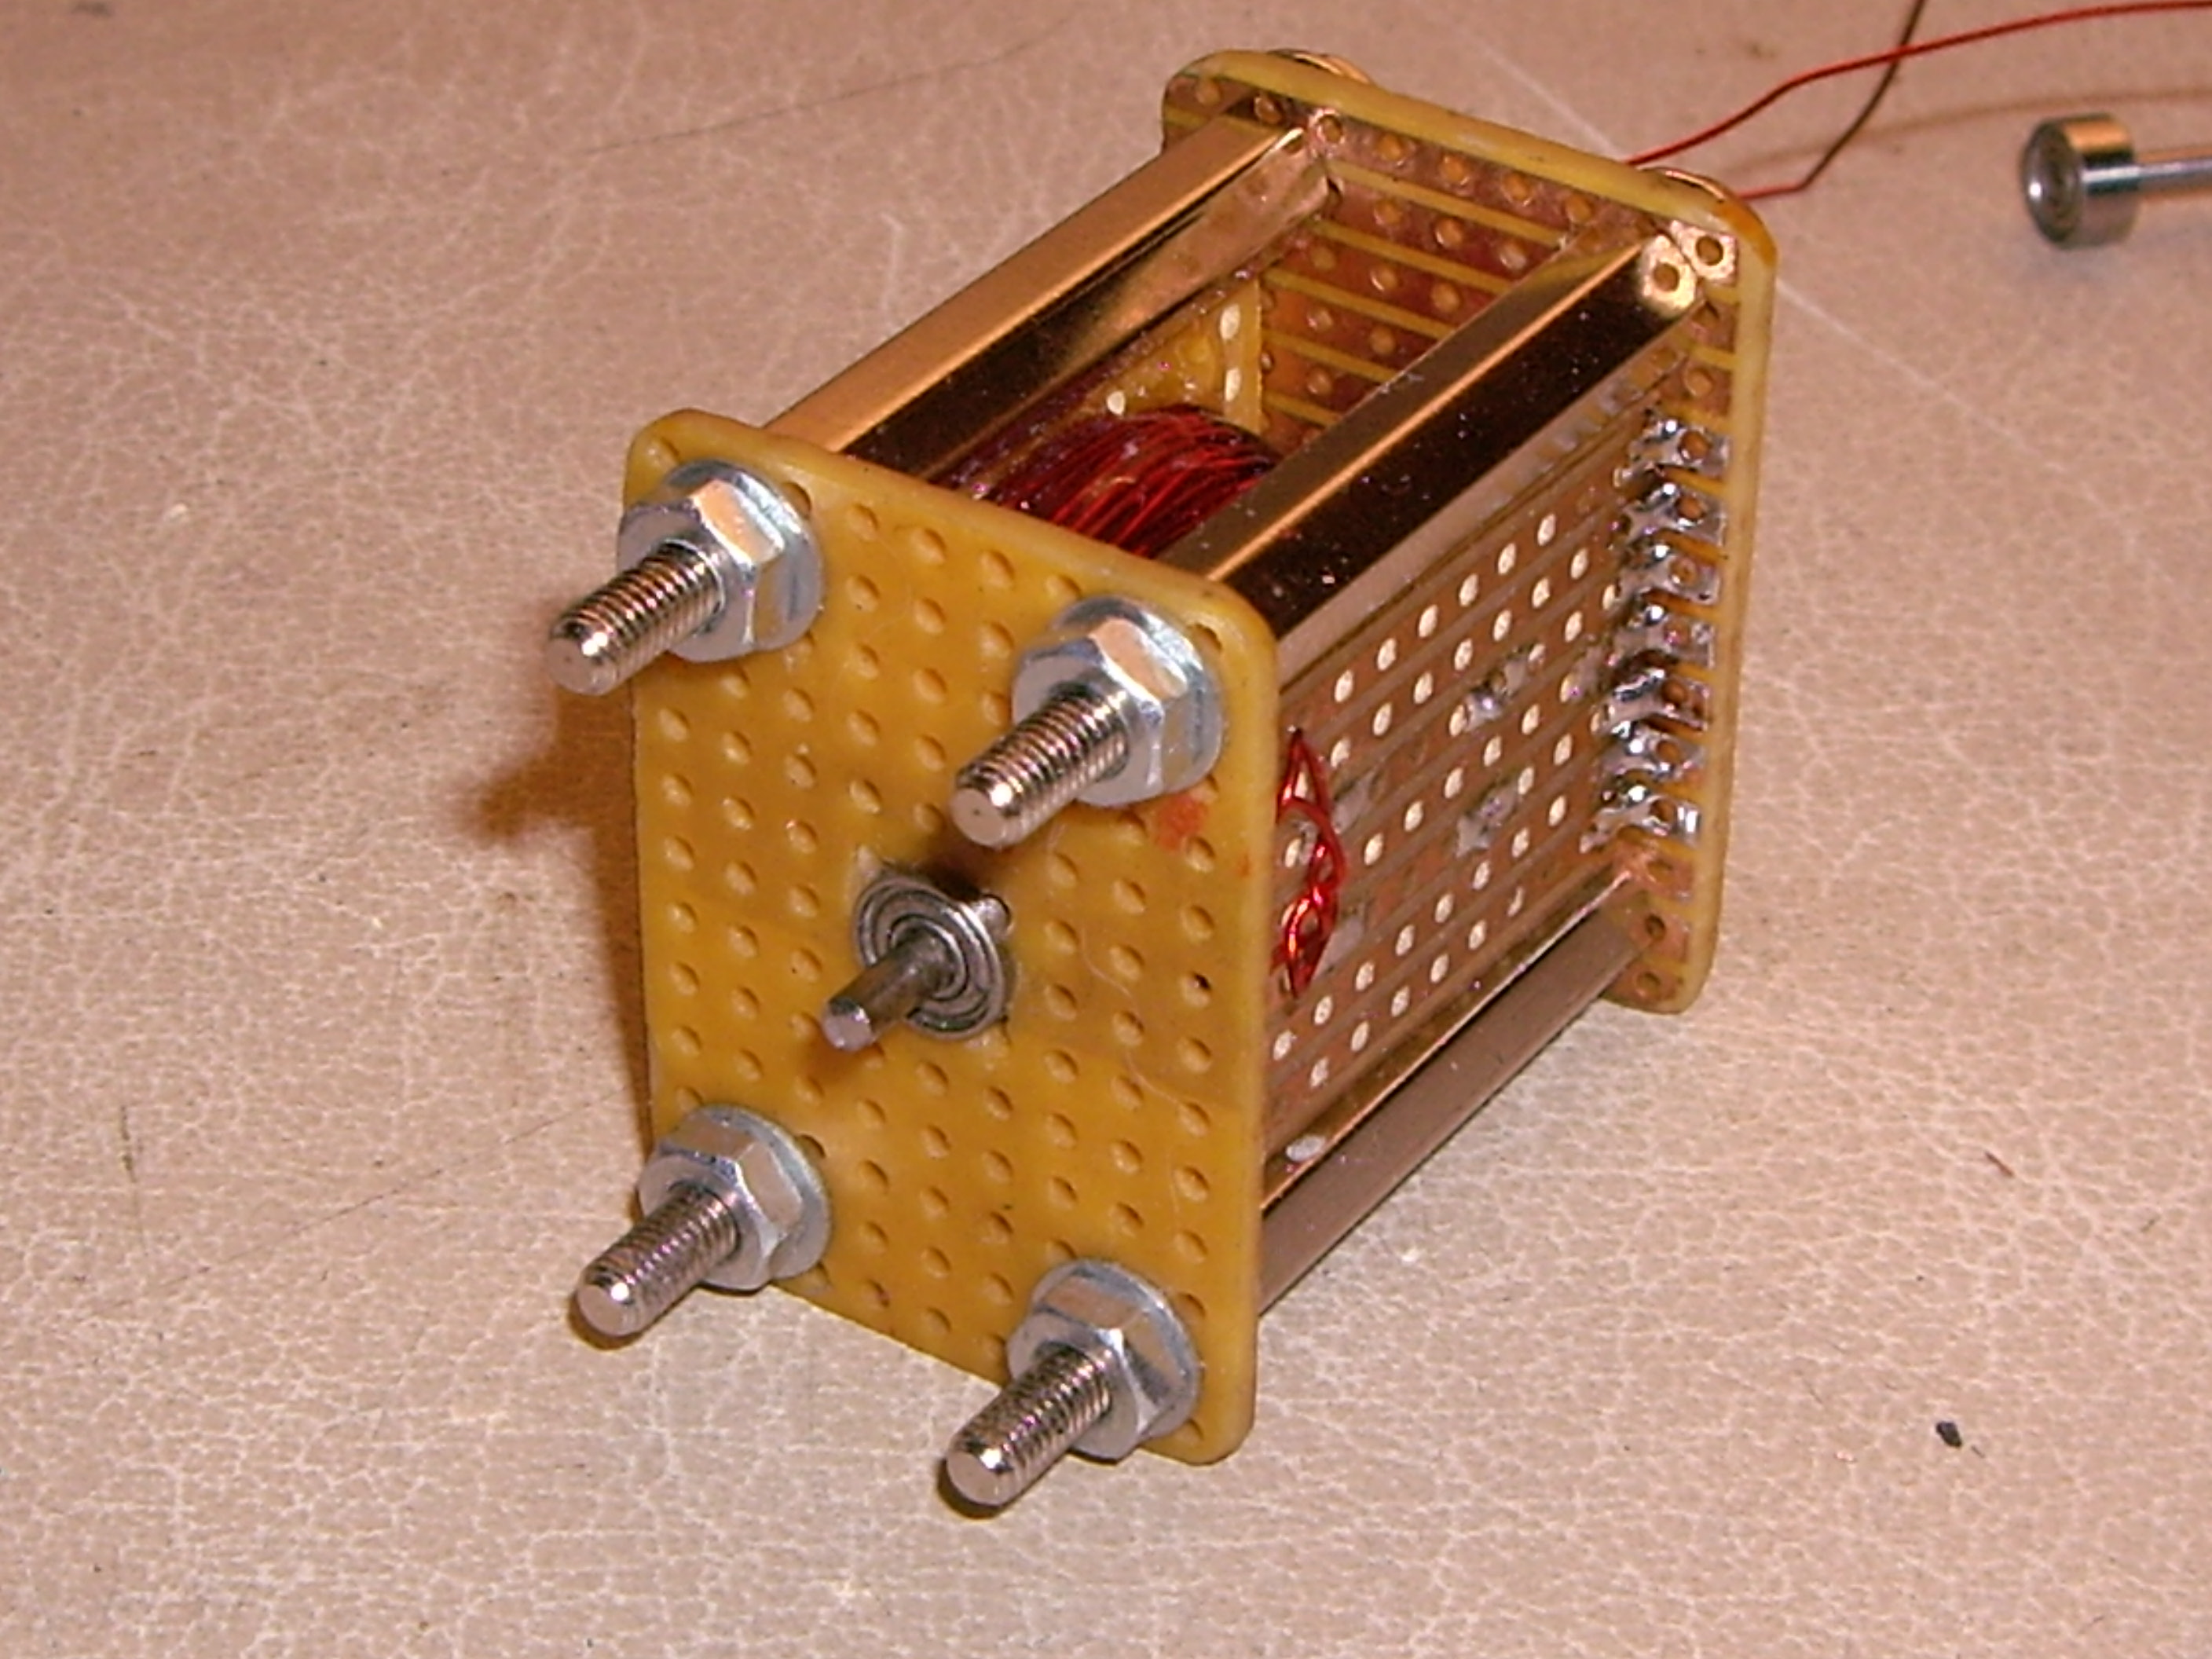
The board is finished. Actually it has been finished for some days now. I just didn't had the time to update the website. The two galvos are also made. This time the coils are made with only 100 turns (instead of 140 one the others). The optical position detector is made a little better. The photo diodes are placed on small pieces of PCB. This makes it much easier afterwards to adjust the position of them.
 
More about the test of it soon...
23-06-2007. As some of you maybe know, the galvo driver circuit is mainly based on Chans design. Some changes have been made with a great help from Norm and the guys on his discussion group. Unfortunately this page is not working at the moment due to technical reasons. Hopefully it will work again soon.
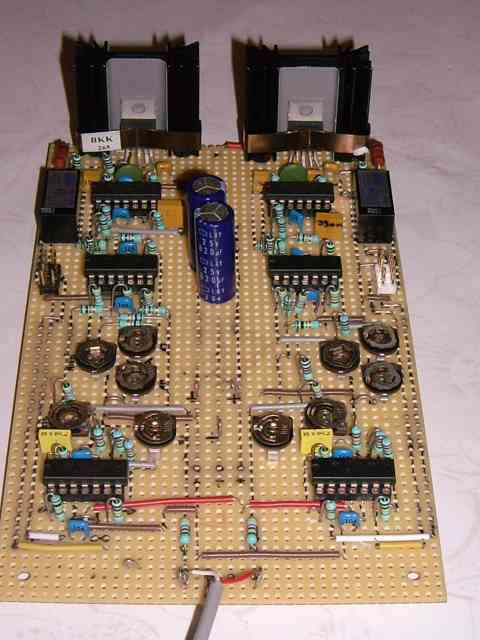
Actually I've already started building the galvo driver board. I surely remember what a nightmare it  was to build a circuit like this on a prototype PCB. But on day one, I realized how much easier it was to build, when I already had a working board to copy. On day three, the first channel was almost done. was to build a circuit like this on a prototype PCB. But on day one, I realized how much easier it was to build, when I already had a working board to copy. On day three, the first channel was almost done.
This time I use a little cheaper components. As you can see the pots are not the multi turn type and the output amplifies are some LM675, instead of the more expensive OPA541. I also try to put the output amplifiers on the same board as the rest of the circuit, instead of on a separate board. If it makes noise problems I can change it.
  The work with the galvos has also started. All four coils are made, and one complete galvo is nearly finished. The work with the galvos has also started. All four coils are made, and one complete galvo is nearly finished.
23-06-2007. The only thing left to do on my home build laser is to install it in a smaller box. I decided not to do the RGY setup on this scanner. It would take another green laser to create the red, green and yellow beams. Instead I will concentrate on making another laser scanner exactly like this one. After that, I will make one more. But this time it will be the galvo kit from Norm. I'm sure that the quality and performance of this product is great. So I have to try that. All in all this will be four laser scanners, which will be controlled by two different DA-converters (one for beam show and one for graphic and bouncing mirrors). I think, that would be enough for a nice show for the small concert jobs I sometimes get.
17-06-2007. Well, I forgot to mention that my small stepper motor scanner, which I use as satellite for the concert jobs, broke down last time. I don't know what exactly happened, but the mirrors didn't move and no laser beam came out of the box. I really think it's about time to make an upgrade. And now, when I've had such a success with this home made project, why not do it again? I mean - I almost have all parts for another one. It's "just" a matter of work ;-)
28-05-2007. I had another concert job this weekend. "Rammstein Jam" at "the Rock" in Copenhagen. Almost same setup as last time. But this time I made 8 bouncing mirrors, and put them all on the stage. I also made 20 meters of extension cables for each laser scanner. I was a little worried about such long cables - up to 30 meters. But there were no problems at all. They made it possible for me to sit more front house, so I could actually see how it looked. You can see the pictures here.
02-05-2007. I found out why I had to readjust after turning off and on the power. The magnet on one of the galvos was loose, so the offset was wrong, and sometimes the linearity was very poor. This is all fixed now. And now I get the 10.000 points per second I was heading for. If I add more gain, I get a problem with cross talk between the two galvos. I think the solution for this, is another galvo design, like Norms.
11-04-2007. YES !!! 8KPPS !!! Today I readjusted the driver. This time with a much better result...
... and I could just feel that there was more to go for. But then one of the galvos started to go out of control. It happened with so much force, that the shutter went loose. It just needs an extra drop of glue to be ready again.
But then I have to re-adjust once again. When the system it tuned to its "top performance" like this, I have to do it all over again next time I turn on the power. So, I think I'll see how good performance I can get, and then decrease the torque or gain a bit.
10-04-2007. I made the shutters the same way as the mirrors. Much more easy to glue on the shaft this way. The optical PD boards are fixed.The IR LED and the sensors are placed more symetrical now. Maybe the IR LED has to be a litle closer to the shutter. I'll play with it later on.
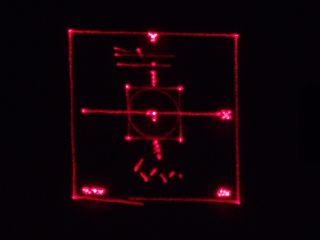
What's more interesting is the result so far. Have a look at this...
Isn't that beautiful ! The ILDA test pattern at 6Kpps.
Remember my first result with these galvos. Some weeks ago they could only just reach 2Kpps. I am really happy with this result, and I'm sure I can get it just a little better with some more tuning.
  29-03-2007. Mirrors with mounts are finished. Simple and easy to produce. I think I'll be happy with this solution. Looks nice on my home build galvos. Specially with my greasy fingerprints on them. And I'm sure that they will improve the speed a bit. 29-03-2007. Mirrors with mounts are finished. Simple and easy to produce. I think I'll be happy with this solution. Looks nice on my home build galvos. Specially with my greasy fingerprints on them. And I'm sure that they will improve the speed a bit.
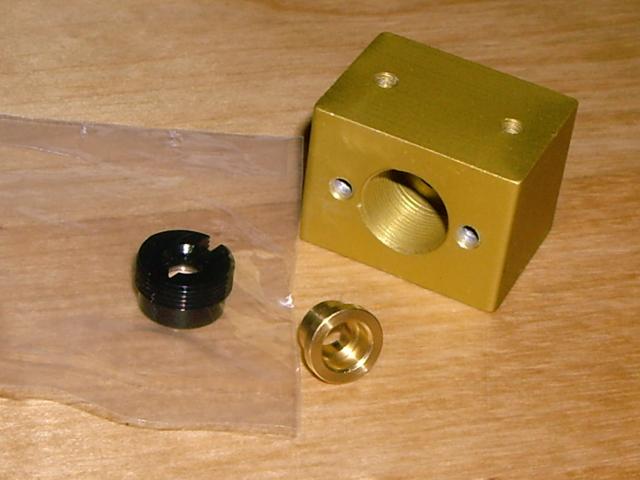
 BTW; Have a look at this laser diode mounting block. They are really cool and perfect for DVD laser diodes. I found them at "Meridith Instruments". BTW; Have a look at this laser diode mounting block. They are really cool and perfect for DVD laser diodes. I found them at "Meridith Instruments".
27-03-2007. I started to work with my home build galvos again. I have had some problems with oscillation and - of course - speed, since September last year when I tightened the screws on the box last time.
These are the issues to work on:
1. Galvo shafts has to be cut shorter
2. New mirrors and mirror mounts
3. Mechanical optimisation of the optical feedback
4. Shielded cables for feed- and feedback signal
5. New X/Y setup
Maybe it's easier just to build a complete new pair of galvos. But now I’ve already started, so I think I will stick to the modifications.
The shafts are already cut. They were too long and that created "mechanical" oscillation. Now I've cut about 2cm. of the length. I thought that long shafts was a solution for the cross talk between glavo X and Y. Maybe it was, but the price was too high, when the oscillation started already at 2Kpps.
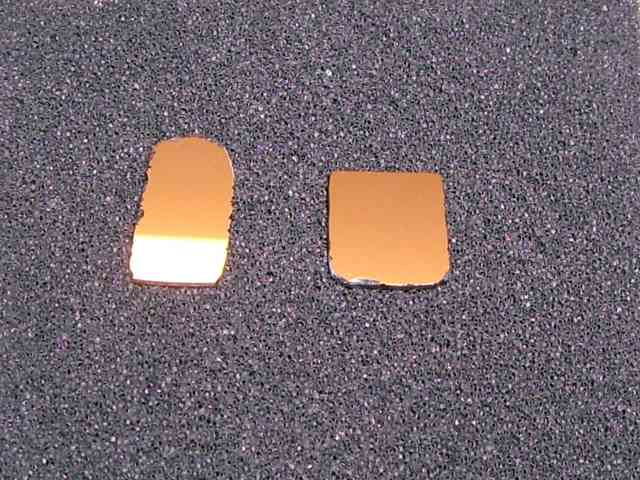 The mirrors are also ready. This time I try with pieces of a hard disk plate. I know that a hard disk is not mend to be a mirror, but it is very thin (0,6mm) and very cheap (if you already have a broken one, of course). The mirrors are also ready. This time I try with pieces of a hard disk plate. I know that a hard disk is not mend to be a mirror, but it is very thin (0,6mm) and very cheap (if you already have a broken one, of course).
It was very difficult to cut two pieces, but after hours of hard work with the glass cutter and the Dremmel, I succeeded. One for horizontal and another for vertical.
Initially it was mend to be two mirrors of the same size. But just try make them yourself, and I'm sure that after a while, you'll be happy with a solution like this.
The mirror mounts will be very simple. Just a small tube (6 or 7 mm long). At one end, the mirror will be fixed. And the other end should fit to the shaft, and be glued after adjustment.
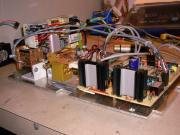
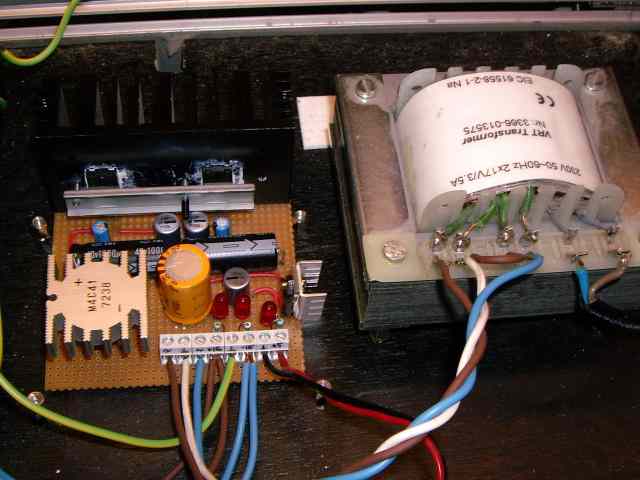 09-03-2007. I made a new power supply. After seeing how simple Norm made it, I had no worries about building a small PSU for this project. Until now I've used a big dual lab-PSU. The transformer on the new one delivers 2 x 17,5 Volt @ 3,5 Amp. Adding some regulators the PSU can make +/- 15 Volt for the Galvo driver, and a +5 Volt for the Laser diode driver. 09-03-2007. I made a new power supply. After seeing how simple Norm made it, I had no worries about building a small PSU for this project. Until now I've used a big dual lab-PSU. The transformer on the new one delivers 2 x 17,5 Volt @ 3,5 Amp. Adding some regulators the PSU can make +/- 15 Volt for the Galvo driver, and a +5 Volt for the Laser diode driver.
15-12-2006. Did a "Laser-gig" a couple of days ago. Again "Rammstein Jam" asked me to join them on a concert. This time it was at "The Rock" in Copenhagen.
I had three scanners with me; the green "china-box" in the centre of the stage, and my home build galvo scanner and a small stepper-scanner (made for this occasion) as satellites.
I made - also for this occasion - a nice and very useful 3-channel distribution amplifier, so I was able to control and adjust all three scanners with only one D/A Converter. Unfortunately I didn't thought about cable loss. For the galvos it's no big problem. But for the laser diode drivers in my satellite scanners it was. Both of them use analogue modulation. So the output of these two red lasers was a little disappointing. This is of course easy to fix. I just didn't have the time to test it all - with long cables.
No pictures from the concert this time.
Steen Meisner
|


")


